❗Before performing system reset/programming operations, it is essential to back up important data! Especially for system programming, it will indiscriminately erase all contents.
⭐If you have installed a lot of miscellaneous libraries and software during configuration or use, leading to disorganized software management or even abnormal operation, but the Ubuntu system still runs normally, and you want to clean them up or quickly restore to a clean system, then using the built-in Ubuntu system reset function is the simplest and fastest choice. It should be noted that system reset does not change the Ubuntu operating system itself, nor does it change the software in the core partition of the Ubuntu system.
The system reset can be performed using the reset tool provided by Ubuntu.
⭐When is it appropriate to choose system flashing:
- if you need to completely erase all data, including the operating system itself;
- If the expansion kit's computing module motherboard (Jetson Orin NX) has "bricked" and cannot boot;
- If you need to use a custom-built (Built from Source) system image, system flashing is mandatory. This is the most thorough and fundamental method of system recovery for Jetson devices and can resolve any system issues at the software level.
The steps for system flashing are as follows:
1.Material Preparation
- Dupont wire (2.54mm pitch) x1
- Type-C data cable x1
- Ubuntu computer with version 20.04 x1 (Do not use virtual machine)
- TRON1 host & expansion kit x1
- DisplayPort (DP) interface monitor x1
- Keyboard and mouse x1
2.Environment Preparation
(1) Turn on the Ubuntu computer with version 20.04 (hereinafter referred to as the computer), and visit https://developer.nvidia.com/sdk-manager to obtain the sdk-manager software.

Click to download the .deb Ubuntu version. A Nvidia account login interface will pop up. You need to prepare a Nvidia account to log in and download.
(2) After the download is complete, open the terminal (shortcut key Ctrl+Alt+T) and execute the following commands:
sudo apt install ./sdkmanager_[version]-[build#]_amd64.deb
(3) After the installation is complete, enter the following command in the terminal to start sdk-manager:
sdkmanager
The interface of the sdk-manager software after it is launched is shown in the figure below:

At this point, click LOGIN to log in to your Nvidia account. After logging in, wait for the user data to load completely (the loading speed is affected by the network speed). The interface shown in the figure below indicates that the sdk-manager software has been successfully installed.

3.Connect the Cables
Taking the sensor expansion kit as an example, the operation of the voice expansion kit is exactly the same.
Take out the prepared Dupont wire (2.54mm pitch) and Type-C data cable. First, short-circuit the REC and GND pins on the side of the Orin NX board card of the sensor expansion kit, as shown in the figure below:


Then insert the Type-C cable into the Type-C interface of the Orin NX, and plug the other end into the computer, as shown in the figure below:

Finally, plug the power cord of the Orin NX into the power output interface of the TRON1 main unit, as shown in the figure below:


⚠️Note: Please ensure that all cable connections are consistent with the examples shown above, otherwise the device may be damaged!
After ensuring that the cables are connected correctly, press and hold the power button on the TRON battery for three seconds to turn on the power. If the operation is correct, the sdk-manager interface will look as shown below:

4.System Formal Flashing
(1)JetPack Version Selection
Click SDK-VERSION, select the JetPack version from the drop-down menu, and then click CONTINUE, as shown in the figure below:
⚠️Note:
When selecting the SDK-VERSION, you must choose the corresponding version, as shown below:
- sensor expansion kit: JetPack must be selected as version 5.1.5, otherwise compatibility issues will arise later!
- Voice Interaction Kit: JetPack must be selected as version 6.2.1, otherwise compatibility issues will arise later!

(2)JetPack Installation Content Preparation
Check all the items, and also check "i accept the terms and conditions of the license agreements." below, but do not check "Download now. Install Later" on the right side. Then click CONTINUE to download the content (the download time is about 15-25 minutes with good internet speed), as shown in the figure below.


(3)JetPack Flashing
After the download is complete, the following interface will appear:
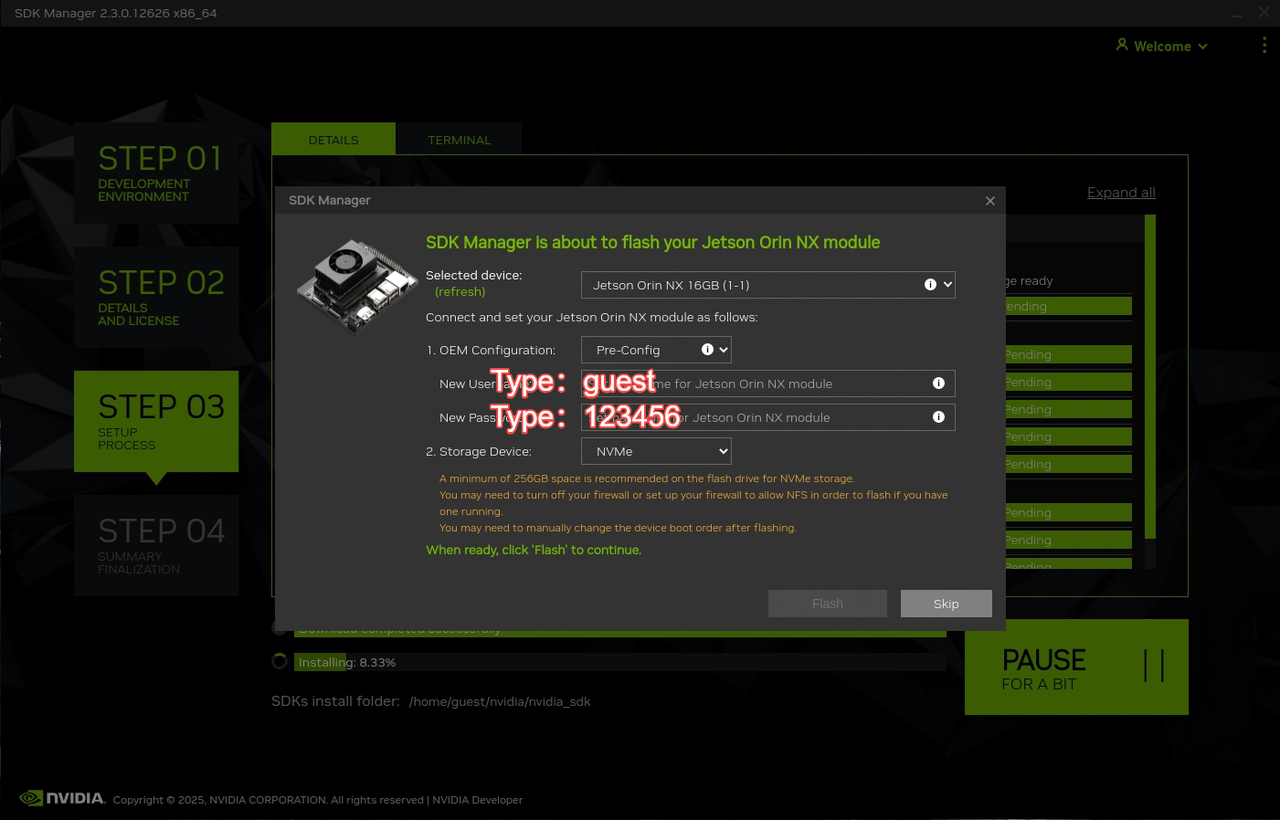
⚠️ Note: Please enter "guest" in the Username field and "123456" in the Password field.
After filling in the information, click Flash to start the flashing process (which takes about 30-50 minutes. It is recommended to use a USB 3.0 interface to increase the flashing speed), as shown in the figure below.

During the process, the Orin NX will restart several times. Additionally, a pop-up may appear during the flashing process. Just click Retry.

If the flashing fails, please go back to the previous section and start the flashing process again.
(4)Completing the Flashing
After the progress bar is complete, click FINISH, disconnect the USB cable, turn off the power, and the flashing process is finished.

5.System Initial Setup
After the flashing is complete, remove the Dupont wire, connect the monitor, keyboard, mouse, and power supply, and then press and hold the power button on the TRON battery for three seconds to power on the system. Subsequently, enter the password to access the system.
(1)System Performance Mode Setting
Click on the power mode setting in the upper right corner of the system desktop and change the Power mode to "0: MAXN SUPER" (or "MAXN").
⭐Note: MAXN SUPER is a power mode without a power limit, supporting the highest number and clock frequency of CPU, GPU, DLA, PVA, and SOC engine cores. However, rest assured that this power-unlimited mode is safe. Under this mode, if the total power of the module exceeds the thermal design power (TDP) limit, the system will reduce the module's frequency to lower the performance and keep the power within the thermal limit.

(2) System IP Settings
Click on the upper right corner of the desktop, click Setting to enter the settings interface, and then click Network.

Click the settings button under the wired tab.

First, click IPV4, then click Manual, and finally enter the following in the box below:
Address: 10.192.1.3
Netmask: 255.255.255.0
Gateway: 10.192.1.1
After completing the settings, click Apply to apply them.
⚠️Note: This step must strictly fill in the IP address, subnet mask, and gateway information. The communication between the Mid360 radar in the sensor expansion kit and the TRON main unit is based on this network information. If the information is filled in incorrectly, it may lead to system communication abnormalities!

(3) Computer Configuration
After completing the above configurations, you can connect the Orin NX module to the computer via an Ethernet cable. The specific module wiring method can be found in the following materials according to the specific kit type:
TRON 1 Quick Start Guide for Sensor Expansion Kit.pdf
TRON 1 Voice Interaction Kit Quick Start Guide.pdf
Users of the voice interaction kit need to first disconnect the Orin NX module from the robot body and use an Ethernet cable to connect the Orin NX module to the computer. After completing the configuration in this article, restore the Ethernet connection.
After completing the wiring, you need to configure the computer and the Orin NX module to be in the same subnet (static IP: 10.192.1.X, subnet mask 255.255.255.0, gateway set to 10.192.1.1). After the configuration is complete, open the Linux terminal or Windows CMD window and enter the command:
ssh guest@10.192.1.3
Remotely connect to the Orin NX module and check the Ubuntu system version of the Orin NX module:

⚠️Note:
Users of the sensor expansion kit should confirm the version as: 20.04.6 LTS
Users of the voice expansion kit should confirm the version as: 22.04.5 LTS
⚠️If you encounter the following issue when using an Ubuntu system computer to ssh connect to the Orin NX module:
Then execute sudo rm -rf /home/[this computer username]/.ssh/known_hosts
After that, execute ssh guest@10.192.1.3mailto:guest@10.192.1.3 again
During the process, you may see "Are you sure you want to continue connecting?"
Enter yes and then press Enter to re-enter the password to resolve the issue

Thus, the TRON1 Expansion Kit System Flashing Tutorial comes to an end.