Update Records
2025.07.23
Documentation Structure Optimization
- Merged C++ interface and Python interface
- pointfoot_sdk_lowlevel change to limxsdk_lowlevel
2025.04.29
New Features
- 5.5.7 Enable Marktime Mode
- 5.5.11 Fall Recovery
Updates
- 5.5.13 Global Messages: Added fall recovery related content
2025.04.15
New Features
- 5.5.4 Adjust Robot Height
- 5.5.8 Enable Odometry
- 5.5.10 Set Light Effects
Updates
- 8.1 Python-based Deployment: Changed to run based on Conda environment
- 7.2 RL Model Training: Modified the parameter file location for
--load_run
1. Pointfoot SDK Overview
The Pointfoot SDK is primarily divided into two levels:
-
pointfoot-sdk-lowlevel (Low-level SDK): In developer mode, users can use this interface to develop their own motion control algorithms and seamlessly deploy algorithms in simulation and on real machines. The low-level SDK provides direct access to and control of robot joints and sensors.
-
High-level Application Development Interface: Users can utilize the high-level application development interface to develop their own software business functions such as mapping, navigation, and robot management based on the pre-installed motion control algorithms of the robot. The high-level SDK allows developers to focus on the application functionality of the robot without having to delve into the details of the underlying motion control.
1.1 Communication Architecture
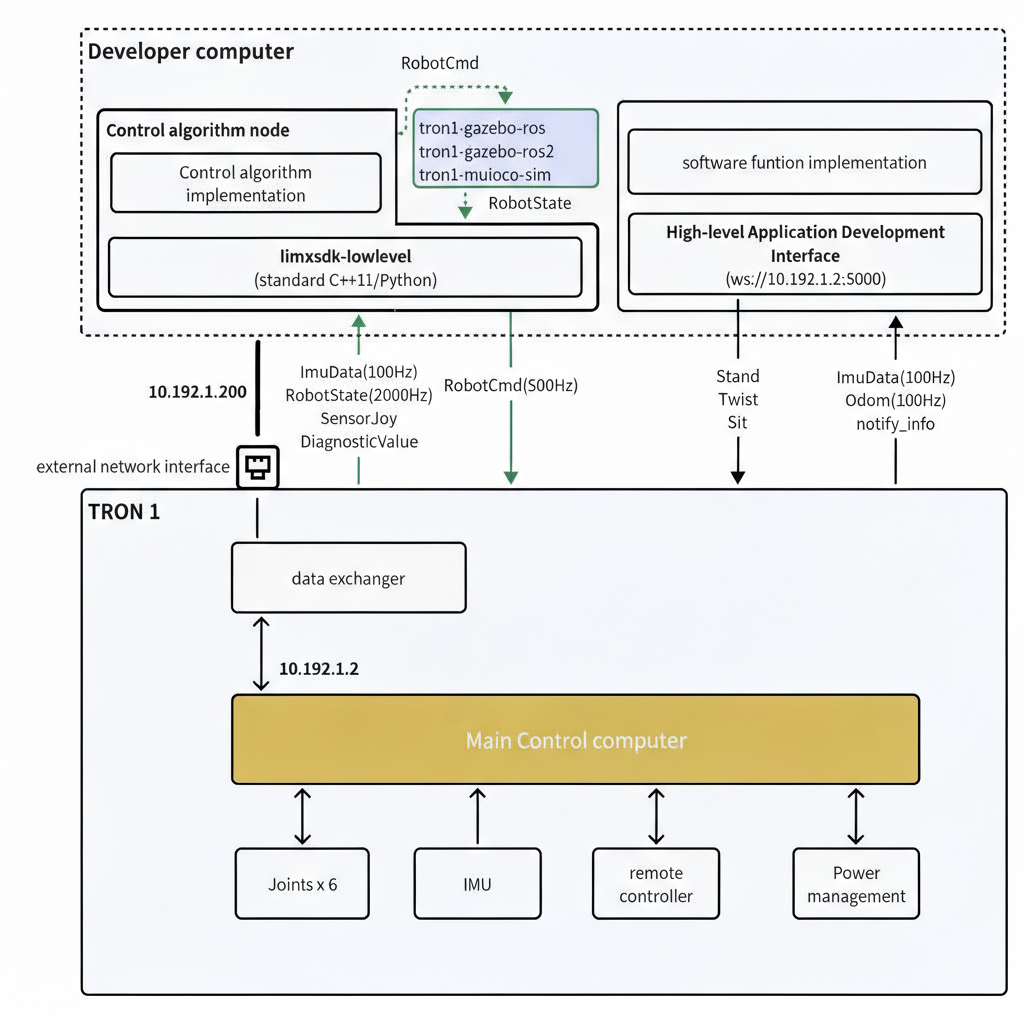
The following diagram presents the system composition and interaction between the developer's computer and the robot body. The development computer part covers the motion control algorithm node and software business logic implementation module, which controls the movement of the robot body through the high-level application development interface and lowlevel data communication. The robot body consists of a data switch, a main control computer, and various hardware components, with the main control computer responsible for coordinating the operation of each component.
2. View/Set Robot Model
It is crucial to select the correct robot model while compiling and running RL training, control algorithms, and simulator programs. You can ensure accurate identification and application of the corresponding robot model in different tasks by viewing the robot model and setting it in the environment variable ROBOT_TYPE. Below are the steps to view and configure the robot model.
-
Choose and connect to your robot's Wi-Fi hotspot, which generally follows the naming convention of "PF_TRON1A_001", using the password
12345678. -
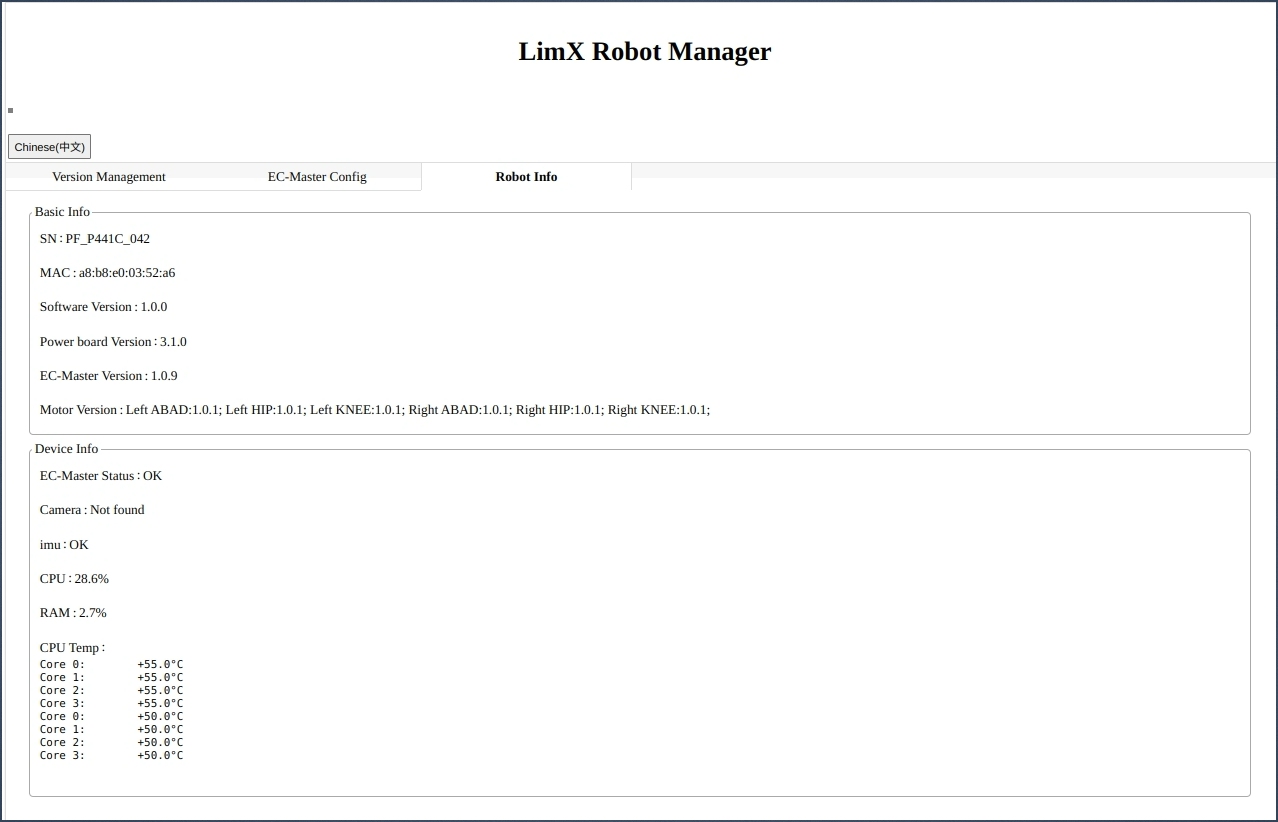
Enter
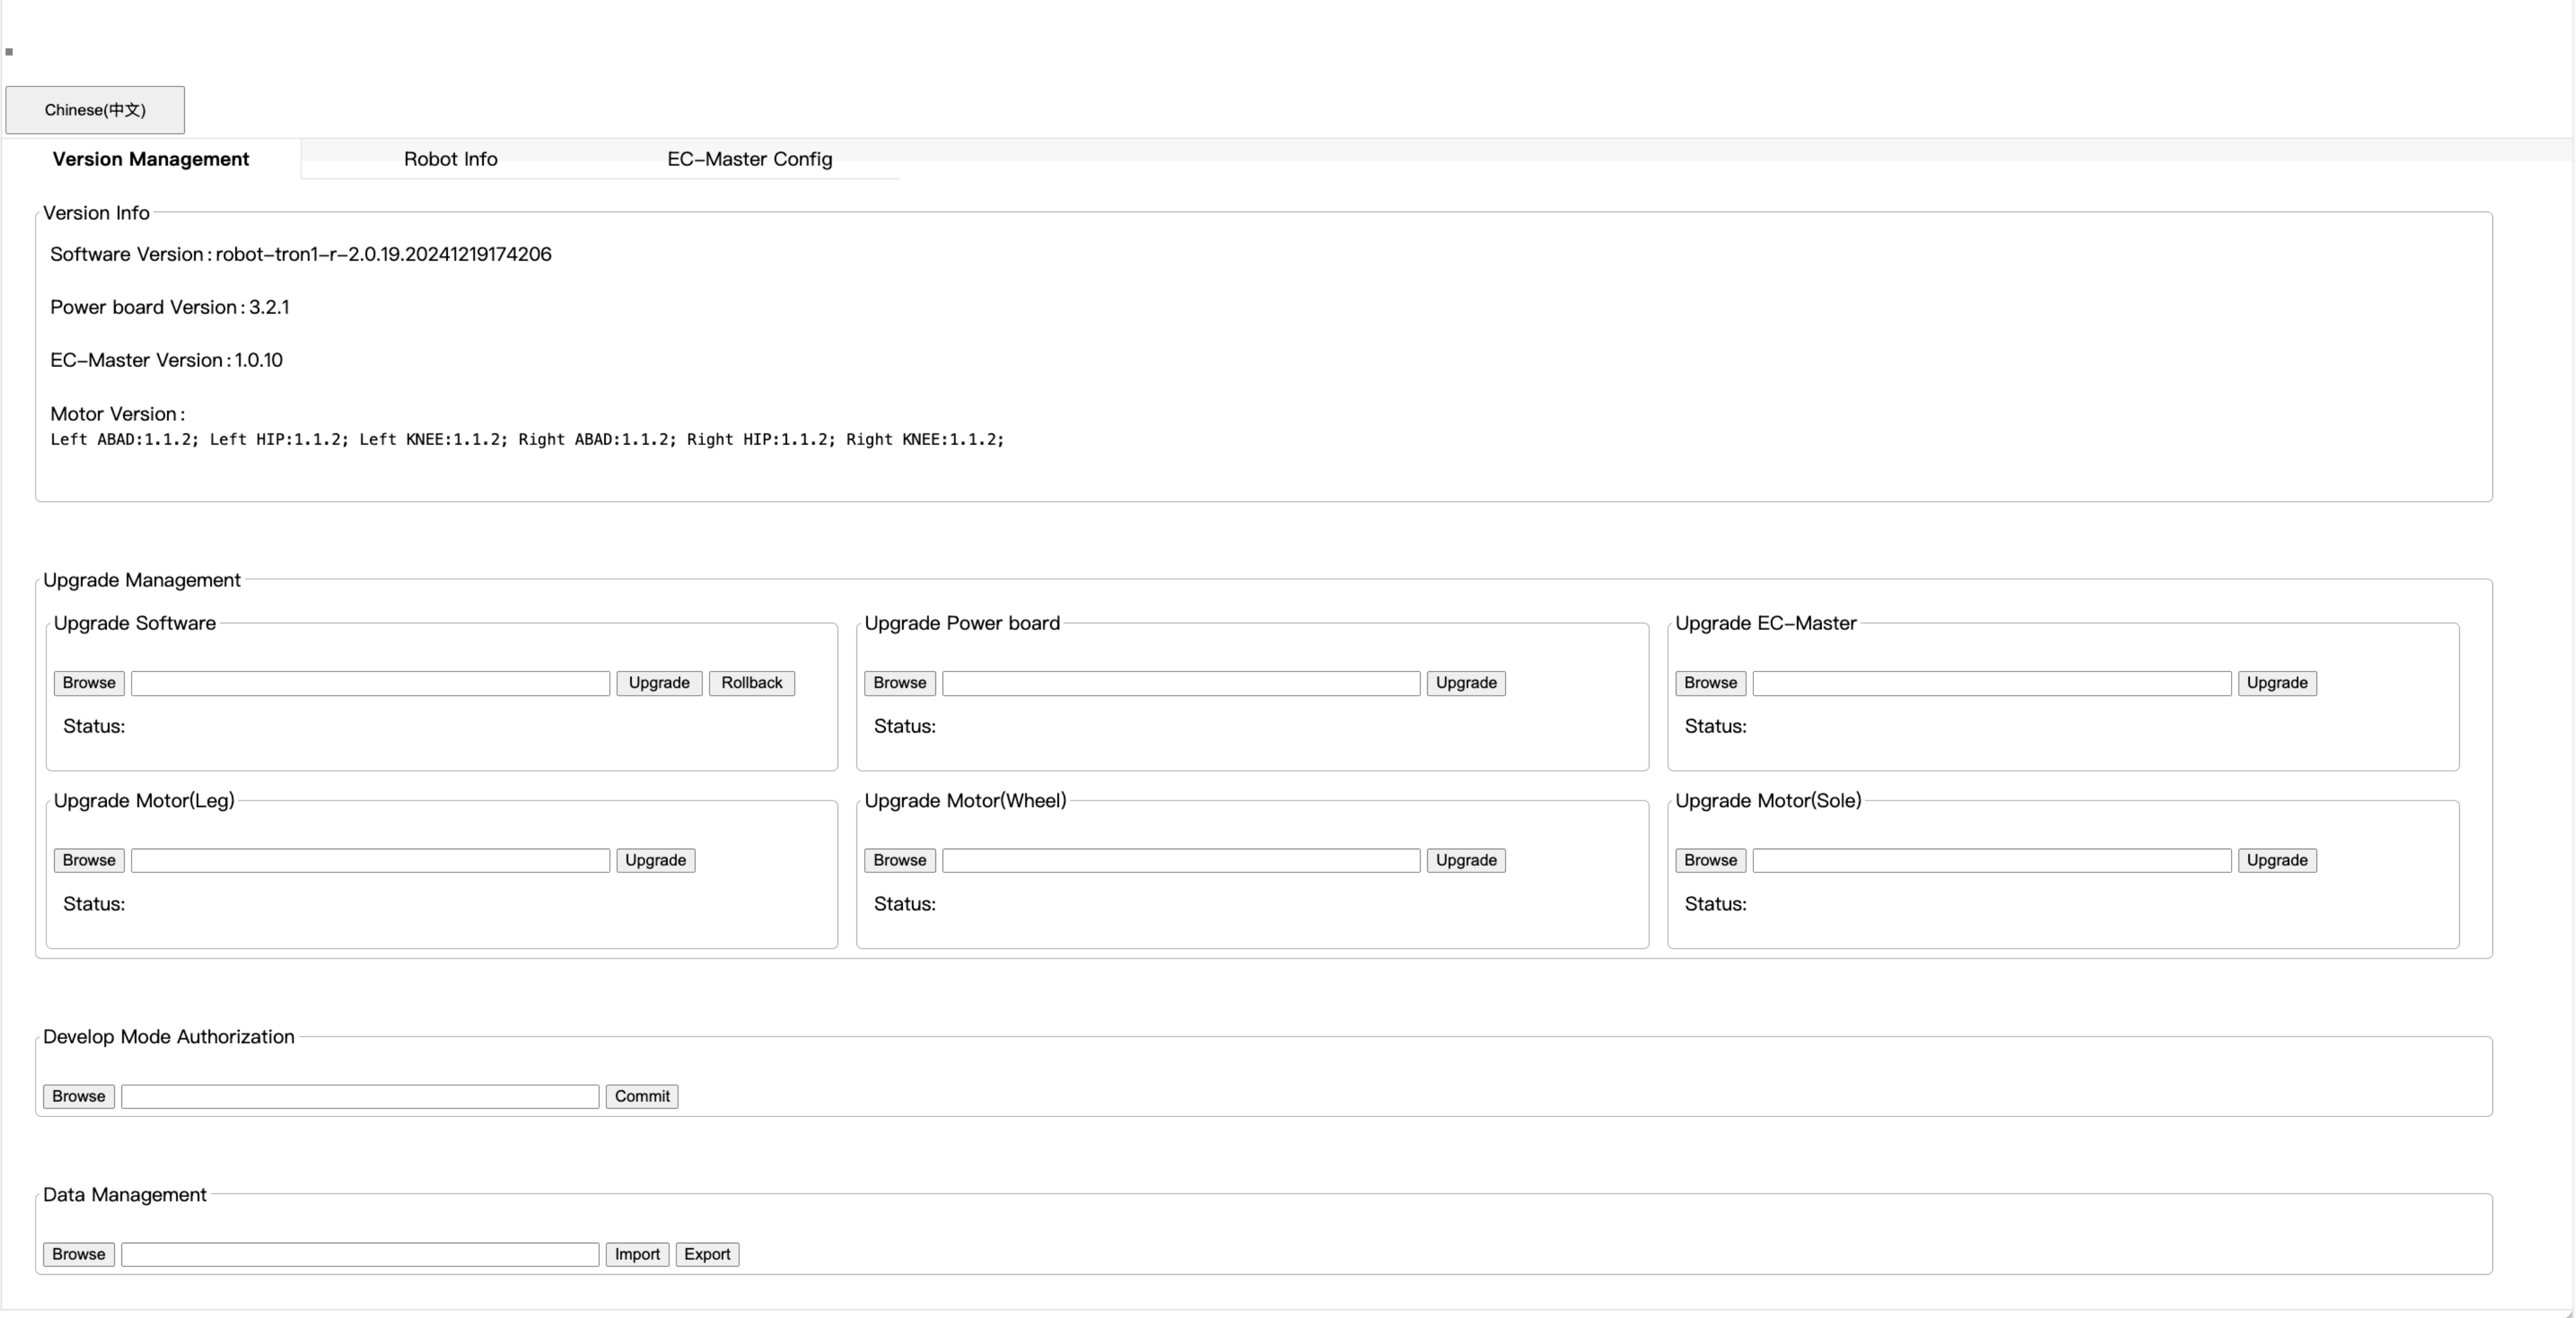
http://10.192.1.2:8080in your browser to access the "Robot Information" page and view details about the robot. As shown in the image below, the SN (Serial Number) isPF_P441C_037, andPF_P441Cis the robot model.
-
Set Robot Model: Open the Bash terminal and set the robot model using the following shell command. This will ensure that you obtain the correct robot model when compiling and running RL training algorithms, control algorithms, and simulator programs.
-
echo 'export ROBOT_TYPE=PF_TRON1A' >> ~/.bashrc && source ~/.bashrc
-
3. Simulation and Real Machine Debugging
3.1 Pointfoot SDK Core Functions
:::tip
- pointfoot-sdk-lowlevel: In developer mode, users can use this interface to develop their own motion control algorithms and achieve seamless deployment of algorithms in simulation and on real machines.
- pointfoot-sdk-highlevel: Users can utilize the high-level application development interface to develop their own software business functions such as mapping, navigation, and robot management based on the pre-installed motion control algorithms of the robot.
:::
:::tip
This part mainly introduces how to use the examples in our SDK for simulation and real machine debugging. Developers can refer to the examples and subsequent interface introductions to develop their own control programs to replace our examples for simulation and real machine debugging. It is recommended to first run the developed control programs in Gazebo, and only after the effects meet expectations should you proceed to testing on real machines.
:::
3.2 Setting up the Development Environment
On an algorithm developer's personal computer, we recommend setting up a ROS Noetic-based algorithm development environment running the Ubuntu 20.04 operating system. ROS Noetic provides a series of tools and libraries, including core libraries, communication libraries, and simulation tools like Gazebo, greatly facilitating the development, testing, and deployment of robotic algorithms. These resources collectively offer users a comprehensive and robust algorithm development environment.
Of course, even without ROS, you can choose to develop your own motion control algorithms in other environments. The motion control development interface we provide is a dependency-free SDK that is based on standard C++11 and Python. It supports cross-operating system and cross-platform invocation development, offering developers more flexible options.
-
For ROS Noetic installation, please refer to the documentation at https://wiki.ros.org/noetic/Installation/Ubuntu/ and select "ros-noetic-desktop-full" for installation.
-
Once ROS Noetic is installed, open the Bash terminal and enter the following Shell command to install the libraries that are required for the development environment.
-
sudo apt-get update
sudo apt install ros-noetic-urdf \
                 ros-noetic-kdl-parser \
                 ros-noetic-urdf-parser-plugin \
                 ros-noetic-hardware-interface \
                 ros-noetic-controller-manager \
                 ros-noetic-controller-interface \
                 ros-noetic-controller-manager-msgs \
                 ros-noetic-control-msgs \
                 ros-noetic-ros-control \
                 ros-noetic-robot-state-* \
                 ros-noetic-joint-state-* \
                 ros-noetic-gazebo-* \
                 ros-noetic-rqt-gui \
                 ros-noetic-rqt-controller-manager \
                 ros-noetic-plotjuggler* \
                 ros-noetic-joy-teleop ros-noetic-joy \
                 cmake build-essential libpcl-dev libeigen3-dev libopencv-dev libmatio-dev \
                 python3-pip libboost-all-dev libtbb-dev liburdfdom-dev liborocos-kdl-dev -y
-
3.3 Creating a Workspace
You can create an algorithm development workspace by following these steps:
-
Open a Bash terminal.
-
Create a new directory to hold the workspace. For example, you can create a directory called "limx_ws" under the user's home directory.
-
mkdir -p ~/limx_ws/src
-
-
Download the motion control development interface.
-
cd ~/limx_ws/src
git clone https://github.com/limxdynamics/pointfoot-sdk-lowlevel.git
-
-
Download the Gazebo simulator.
-
cd ~/limx_ws/src
git clone https://github.com/limxdynamics/pointfoot-gazebo-ros.git
-
-
Download the robot model description file.
-
cd ~/limx_ws/src
git clone https://github.com/limxdynamics/robot-description.git
-
-
Download the visualization debugging tool.
-
cd ~/limx_ws/src
git clone https://github.com/limxdynamics/robot-visualization.git
-
-
Compile the Project:
-
# If you have Conda installed, deactivate the Conda environment temporarily
# Because Conda may interfere with the configuration of ROS's runtime environment
conda deactivate

cd ~/limx_ws
catkin_make install
-
3.4 Simulation Debugging
-
Set the Robot Model: To view or set your robot model, refer to the "View/Set the Robot Model" section. If it has not been set yet, follow these steps to do so.
-
Use the Shell command
tree -L 1 src/robot-description/pointfootto list the available robot types. -
limx@limx:~$ tree -L 1 src/robot-description/pointfoot src/robot-description/pointfoot ├── PF_P441A ├── PF_P441B ├── PF_P441C └── PF_P441C2 └── PF_TRON1A └── SF_TRON1A └── WF_TRON1A -
- Set the robot model type using
PF_TRON1A(please replace with your actual robot type) as an example.
- Set the robot model type using
-
echo 'export ROBOT_TYPE=PF_TRON1A' >> ~/.bashrc && source ~/.bashrc
-
-
Run the simulator:
-
# If you have Conda installed, deactivate the Conda environment temporarily
# Because Conda may interfere with the configuration of ROS's runtime environment
conda deactivate

cd ~/limx_ws
source install/setup.bash
roslaunch pointfoot_gazebo empty_world.launch
-
-
Run the control routine to verify that the robot in the simulator exhibits movement, thereby indicating that the simulation environment is set up completely.
-
# If you have Conda installed, deactivate the Conda environment temporarily # Because Conda may interfere with the configuration of ROS's runtime environment conda deactivate cd ~/limx_ws source install/setup.bash rosrun limxsdk_lowlevel pf_groupJoints_move -

-
-
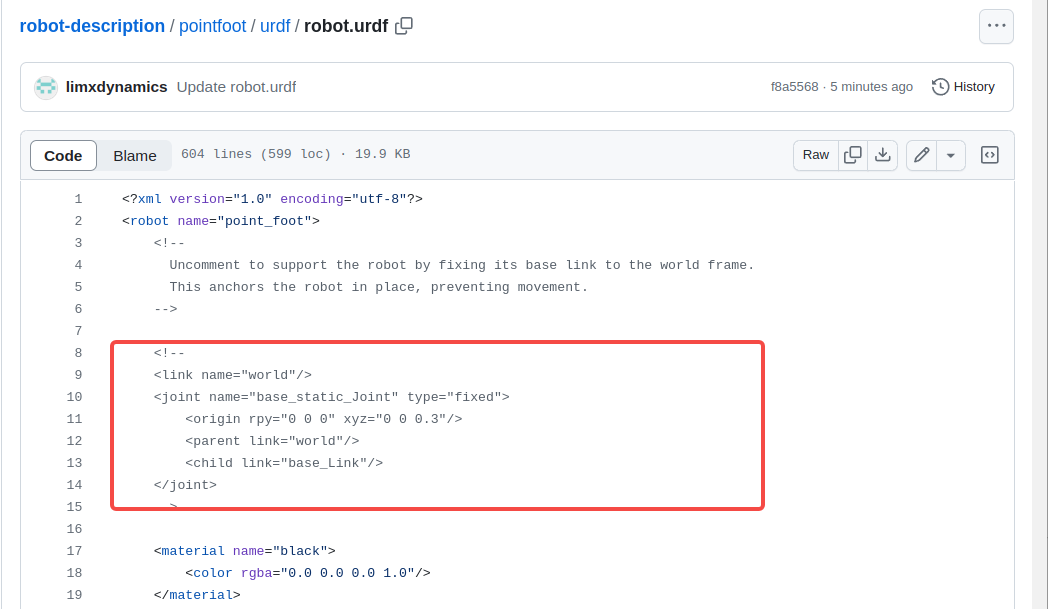
Note: To better observe the robot's movement, uncomment the
robot.urdffile in the robot model. This will lift the robot by anchoring its base link to the world coordinate system, suspending it in the air for easier monitoring of its movements.
3.5 Real Machine Debugging
-
To activate Developer Mode: Once the robot is powered on, simultaneously press the
R1 and Leftbuttons on the remote controller. This will prompt the robot o automatically restart and switch to Developer Mode. In this mode, users have the ability to develop their own motion control algorithms. Importantly, the Developer Mode setting will persist even after a power failure or reboot. Below is a list of remote controller buttons used to switch between working modes:Buttons Mode Description R1+Left Developer Mode (Under authorization) Users can develop their own motion control algorithms using the motion control development interface. R1+Right Remote Control Mode The robot runs the pre-installed motion control algorithm to walk smoothly in complex terrains including going up and down steps and crossing obstacles. -
Modify the IP of the developer computer: Make sure that your development computer and the robot are connected through an external Ethernet port.
-
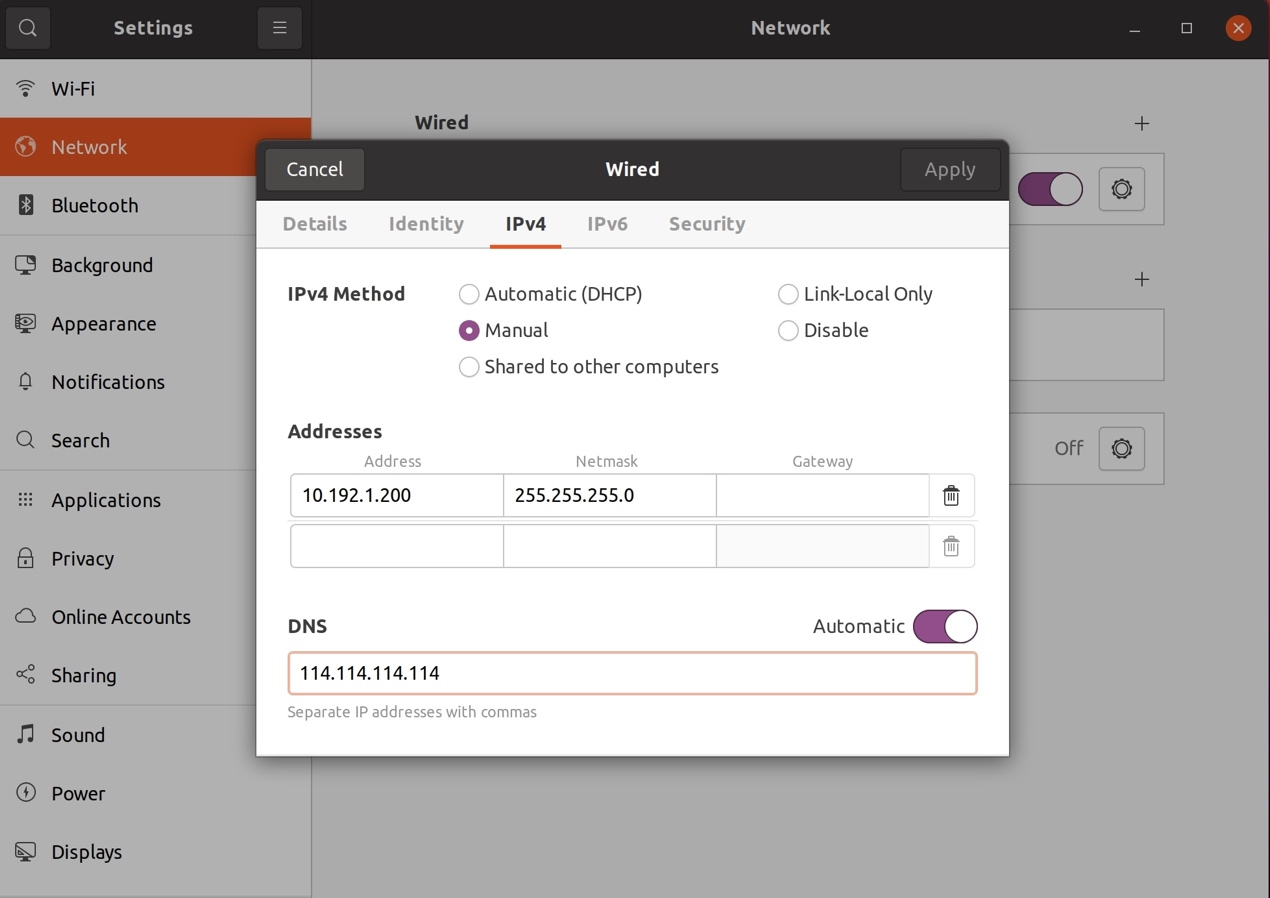
Set the IP address of your computer to 10.192.1.200, and verify that the robot can successfully respond to the Shell command ping 10.192.1.2 to ensure network communication with your computer.
Set the IP for your development computer as shown in the following image: -
Perform Zero Calibration: After the robot is turned on, before executing the motion control program, perform zero calibration to make each joint of the robot return to the initial position. The remote controller buttons for zero calibration are L1 and R1.
-
Set the Robot Model: To view or set your robot model, refer to the "View/Set the Robot Model" section. If it has not been set yet, follow these steps to do so.
-
Use the Shell command
tree -L 1 src/robot-description/pointfootto list the available robot types. -
limx@limx:~$ tree -L 1 src/robot-description/pointfoot src/robot-description/pointfoot ├── PF_P441A ├── PF_P441B ├── PF_P441C └── PF_P441C2 └── PF_TRON1A └── SF_TRON1A └── WF_TRON1A -
Set the robot model type using
PF_TRON1A(please replace with your actual robot type) as an example. -
echo 'export ROBOT_TYPE=PF_TRON1A' >> ~/.bashrc && source ~/.bashrc
-
-
Robot deployment and operation. Assign the robot's IP address as specified below to execute the routine and complete the deployment process (ensuring proper lifting and installation of the robot is crucial during deployment and operation).
-
# If you have Conda installed, deactivate the Conda environment temporarily
# Because Conda may interfere with the configuration of ROS's runtime environment
conda deactivate

source install/setup.bash
rosrun limxsdk_lowlevel pf_groupJoints_move 10.192.1.2
-
3.6 Visualization Tools
We provide a set of visual debugging tools that can be utilized for both simulation and real-world robot deployment. These tools leverage RViz and Plotjuggler to visually present data. You can easily access and use these tools through our GitHub link: https://github.com/limxdynamics/robot-visualization. These tools are intuitive and easy to use, boosting development productivity and facilitating the code debugging process. Follow these steps to create a visualization tool workspace:
-
Open a Bash terminal.
-
Create a new directory to hold the workspace. For example, you can create a directory called "limx_ws" under the user's home directory:
-
mkdir -p ~/limx_ws/src
-
-
Download the robot model description file.
-
cd ~/limx_ws/src
git clone https://github.com/limxdynamics/robot-description.git
-
-
Download the visualization tool
-
cd ~/limx_ws/src
git clone https://github.com/limxdynamics/robot-visualization.git
-
-
Compile the visualization tool:
-
# If you have Conda installed, deactivate the Conda environment temporarily
# Because Conda may interfere with the configuration of ROS's runtime environment
conda deactivate

cd ~/limx_ws
catkin_make install
-
3.6.1 Using Plotjuggler for Visualization
PlotJuggler is a powerful data visualization tool that provides users with an intuitive interface for loading, displaying, and analyzing various types of data. Users can present data through charts, curves, and graphs to better understand the relationships and trends among the data. PlotJuggler not only supports visualization of real-time data, but also loads and processes large amounts of historical data. Website address: https://plotjuggler.io
-
Simulation deployment: Here's how to run Plotjugler
-
# If you have Conda installed, deactivate the Conda environment temporarily
# Because Conda may interfere with the configuration of ROS's runtime environment
conda deactivate

source install/setup.bash
roslaunch robot_visualization pointfoot_plot_sim.launch
-
-
Real-world Robot Deployment: Here's how to run Plotjugler
-
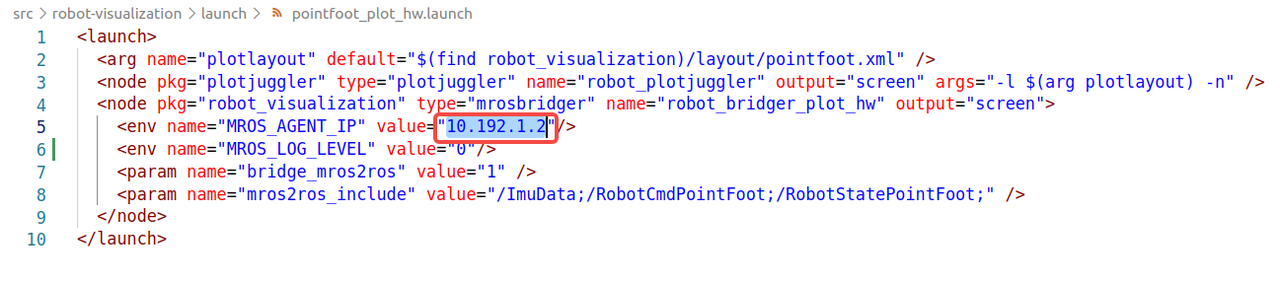
Open the
pointfoot_plot_hw.launchfile and change the IP address of the robot to the actual robot address: -
Then recompile the tool and execute the following commands:
-
# If you have Conda installed, deactivate the Conda environment temporarily
# Because Conda may interfere with the configuration of ROS's runtime environment
conda deactivate

cd ~/limx_ws
catkin_make install
-
-
Once compiled, you can run the PlotJuggler tool with the following Shell command:
-
# If you have Conda installed, deactivate the Conda environment temporarily
# Because Conda may interfere with the configuration of ROS's runtime environment
conda deactivate

cd ~/limx_ws
source install/setup.bash
roslaunch robot_visualization pointfoot_plot_hw.launch
-
-
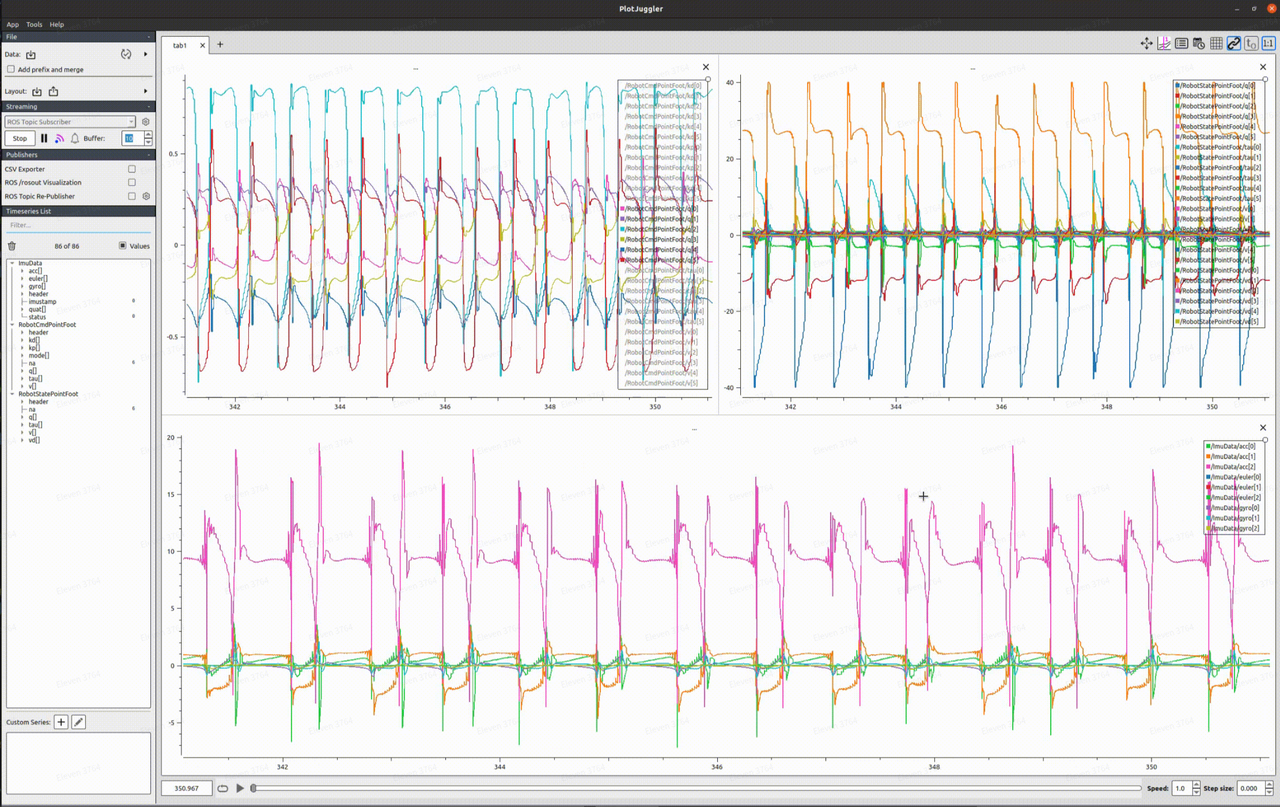
Below is how Plotjugler operates in action.
-
Data Topics Description /ImuData IMU real-time data /RobotCmdPointFoot Real-time data of robot control commands /RobotStatePointFoot Real-time data of the robot state -
-
-
3.6.2 Using RViz for Visualization
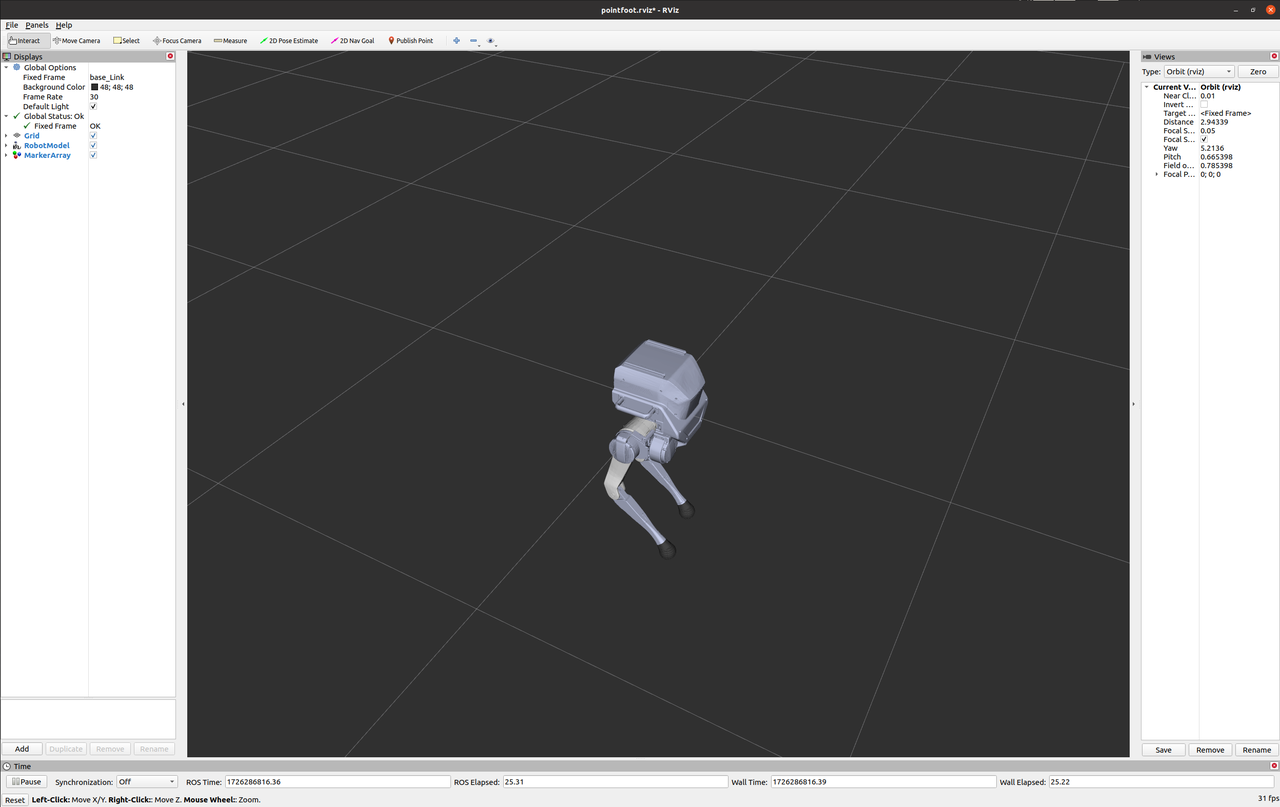
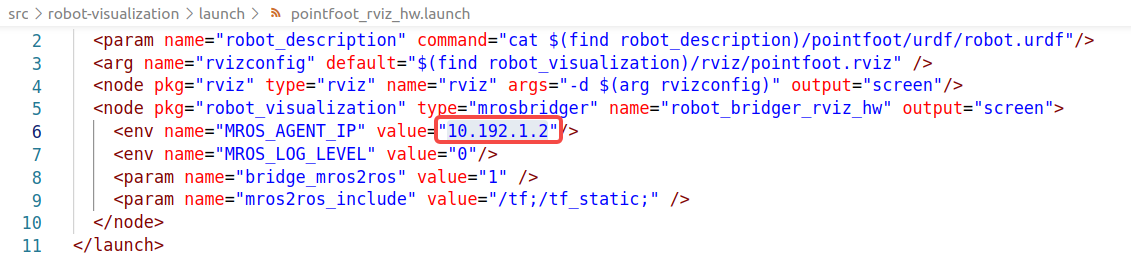
During actual robot deployment, in addition to using PlotJuggler for data visualization, you can also utilize RViz to view the robot's operation in real time. RViz is a powerful 3D visualization tool that can display the robot's sensor data, movement status, and environmental perception. Using RViz, users can observe the robot's movement trajectories and changes in sensor data in real time, helping to debug and monitor the robot's operation status. During deployment, RViz can be configured to subscribe to the robot's sensor data topics and display them in a 3D scene, enabling real-time monitoring of the robot's behavior and facilitating necessary adjustments and optimizations. Follow these steps to run RViz:
-
Open the
pointfoot_rviz_hw.launchfile and change the IP address of the robot to the actual robot address: -
Then recompile the tool and execute the following commands:
-
# If you have Conda installed, deactivate the Conda environment temporarily
# Because Conda may interfere with the configuration of ROS's runtime environment
conda deactivate

catkin_make install
-
-
Once compiled, you can run RViz with the following Shell command:
-
# If you have Conda installed, deactivate the Conda environment temporarily # Because Conda may interfere with the configuration of ROS's runtime environment conda deactivate source install/setup.bash roslaunch robot_visualization pointfoot_rviz_hw.launch -
-
3.7 Package Data, Log Data, and Embedded Data Points
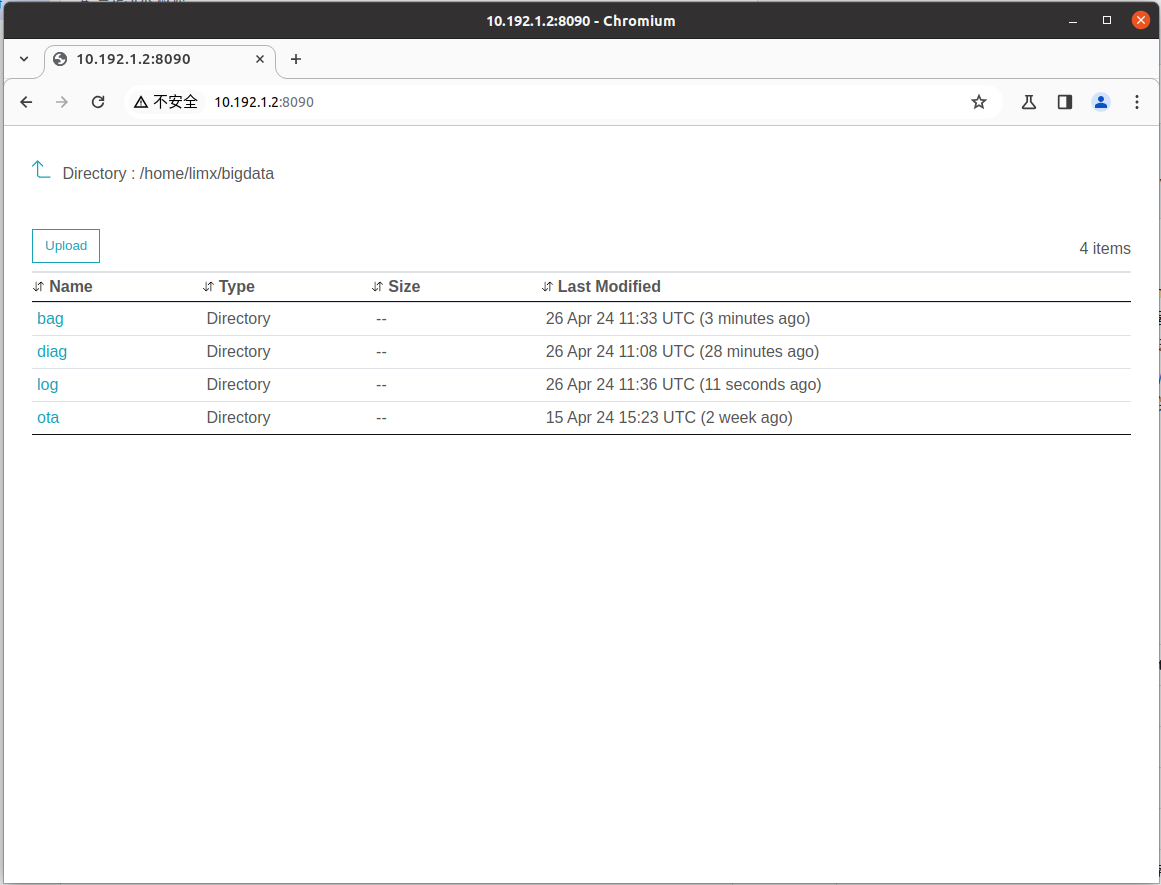
The robot system automatically records important data such as the IMU data of the robot (/ImuData), the robot state data (RobotStatePointFoot), and the robot command data (RobotCmdPointFoot). These data are crucial for the analysis of the robot's motion control. In addition, the robot also records runtime log data and structured data from diagnostic embedding points for troubleshooting and performance optimization when needed.
When your computer connects to the robot's WiFi hotspot, you can access and download these data from http://10.192.1.2:8090. This process facilitates monitoring, maintenance, and debugging of the robot.
3.7.1 Package Data Visualization Analysis Method
-
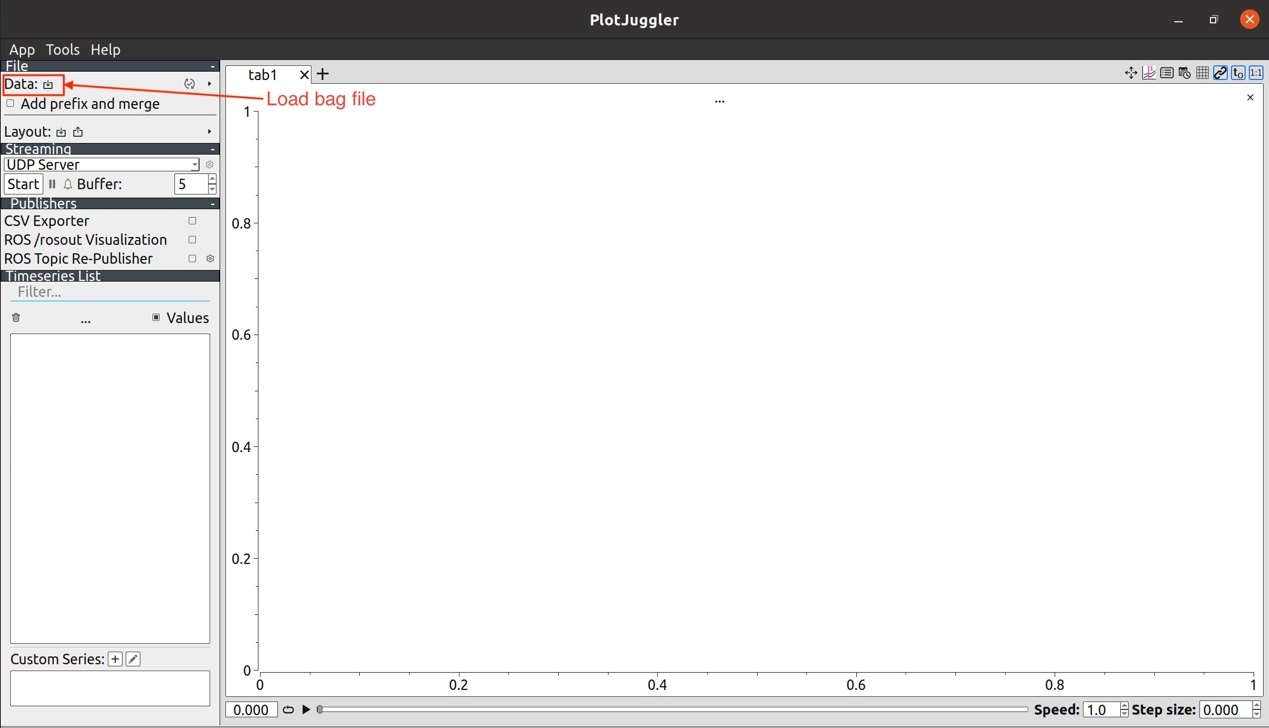
Package Download: After downloading the .bag file, you can use the PlotJuggler visualization tool to load and analyze the package data. Notably, if you download a .bag.active file, you need to re-index it using the following Shell command to generate a new .bag file that PlotJuggler can load:
-
rosbag reindex your_file.bag.active
mv your_file.bag.active your_file.bag
-
-
Visualization Viewing: Launch the PlotJuggler visualization tool with the Shell commandrosrun plotjuggler plotjuggler -n. As shown in the figure below, load the package data and analyze it.
3.7.2 Log Data and Diagnostic Data
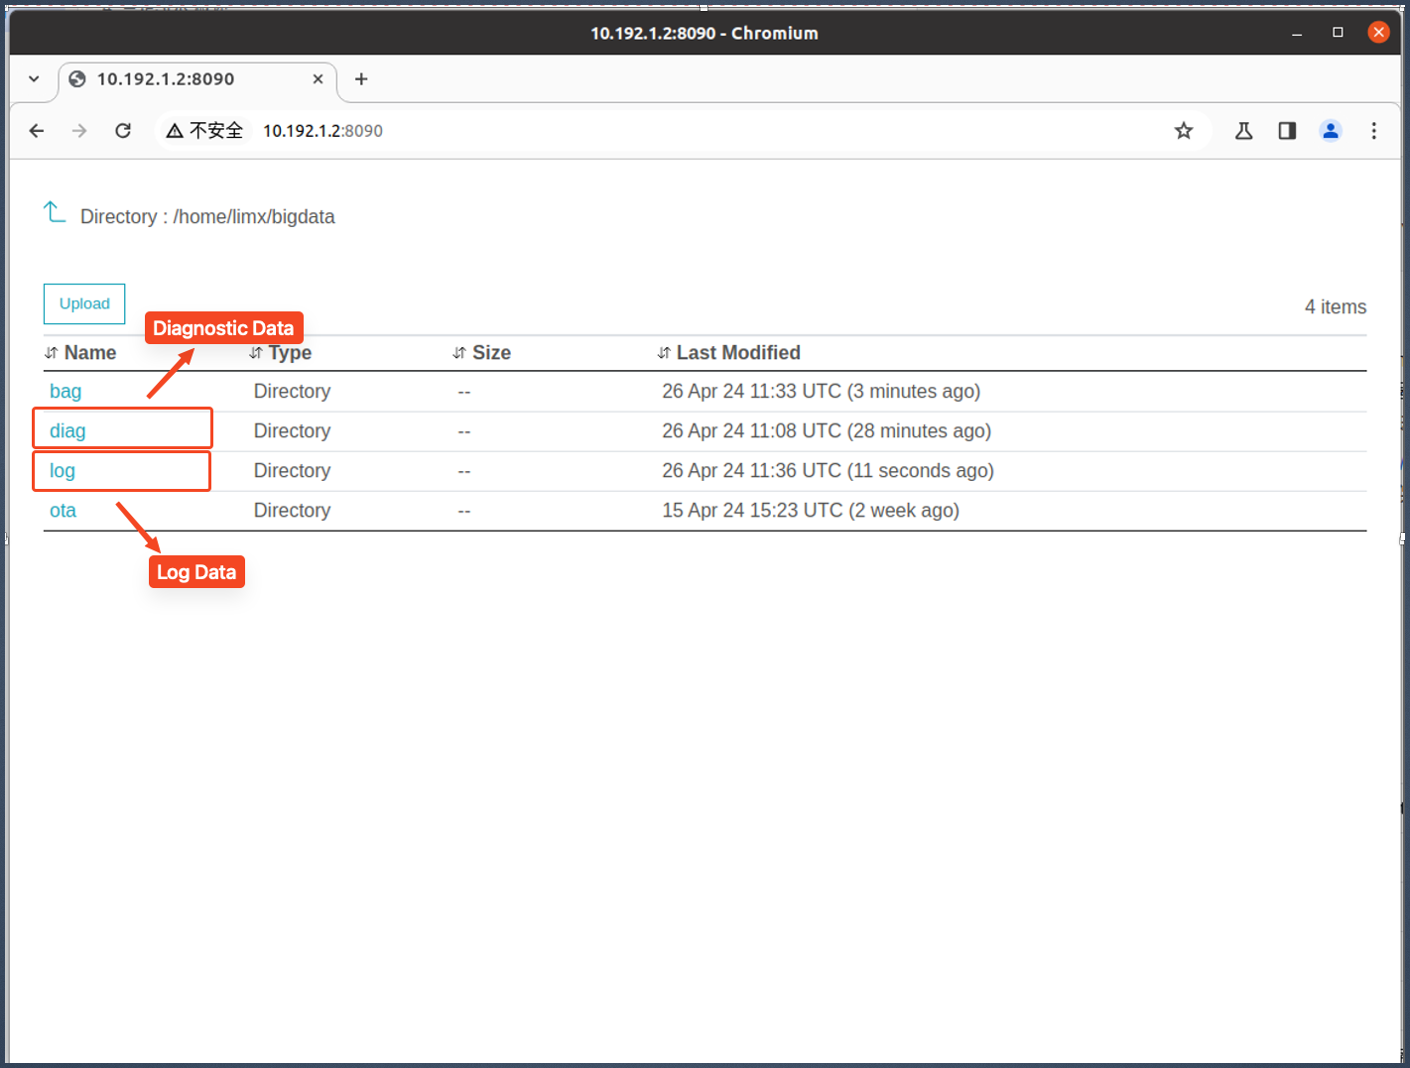
The following figures show the log data and the diagnostic data respectively. The data can be used for troubleshooting and performance optimization when needed.
3.8 MuJoCo Simulation
MuJoCo is a lightweight and high-performance physics simulator specifically designed for multi-joint robots and mechanical systems. It boasts an efficient physics engine capable of accurately handling contact and friction, and it can operate independently without relying on ROS. Thanks to its high-speed computing capabilities, MuJoCo is widely applied in robot simulation and reinforcement learning, particularly in scenarios demanding high simulation efficiency. Below are the steps to conduct a simulation using MuJoCo:
3.8.1 Running the MuJoCo Simulation
-
Open a Bash terminal.
-
Download the MuJoCo Simulator code:
-
git clone --recurse https://github.com/limxdynamics/pointfoot-mujoco-sim.git
-
-
Install the motion control development libraries:
-
Linux x86_64 Environment
-
pip install pointfoot-mujoco-sim/limxsdk-lowlevel/python3/amd64/limxsdk-*-py3-none-any.whl -
Linux aarch64 Environment
-
pip install pointfoot-mujoco-sim/limxsdk-lowlevel/python3/aarch64/limxsdk-*-py3-none-any.whl
-
-
Set Robot Model: Refer to the "View/Set Robot Model" section to see your robot model. If it has not been set yet, follow these steps to do so.
-
List the available robot types with the Shell command
tree -L 1 pointfoot-mujoco-sim/robot-description/pointfoot: -
limx@limx:~$ tree -L 1 pointfoot-mujoco-sim/robot-description/pointfoot pointfoot-mujoco-sim/robot-description/pointfoot ├── PF_P441A ├── PF_P441B ├── PF_P441C └── PF_P441C2 └── PF_TRON1A └── SF_TRON1A └── WF_TRON1A -
Set the robot model type using
PF_TRON1A(please replace with your actual robot type) as an example. -
echo 'export ROBOT_TYPE=PF_TRON1A' >> ~/.bashrc && source ~/.bashrc
-
-
Run the MuJoCo simulator:
-
python pointfoot-mujoco-sim/simulator.py
-
3.8.2 Run the Controller Program
-
Open a Bash terminal.
-
Install the environment required for compilation
-
sudo apt update
sudo apt install -y cmake build-essential
-
-
Compiling an Example of the Controller SDK:
-
cd pointfoot-mujoco-sim/pointfoot-sdk-lowlevel

cd build
cmake ..
make
-
-
Set Robot Model: Refer to the "View/Set Robot Model" section to see your robot model. If it has not been set yet, follow these steps to do so.
-
List the available robot types with the Shell command
tree -L 1 pointfoot-mujoco-sim/robot-description/pointfoot: -
limx@limx:~$ tree -L 1 pointfoot-mujoco-sim/robot-description/pointfoot pointfoot-mujoco-sim/robot-description/pointfoot ├── PF_P441A ├── PF_P441B ├── PF_P441C └── PF_P441C2 └── PF_TRON1A └── SF_TRON1A └── WF_TRON1A -
Set the robot model type using
PF_TRON1A(please replace with your actual robot type) as an example. -
echo 'export ROBOT_TYPE=PF_TRON1A' >> ~/.bashrc && source ~/.bashrc
-
-
Run the Controller SDK Example:
-
./examples/pf_groupJoints_move
-
3.8.3 Demonstration of the Simulator's Operational Effect
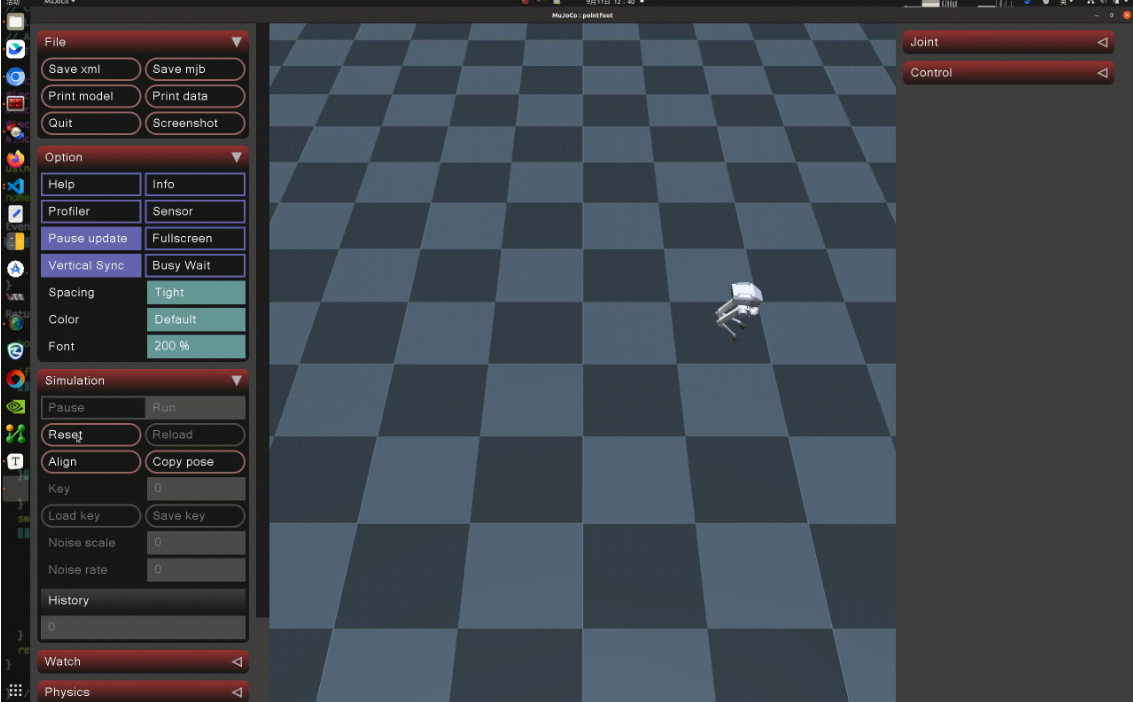
4. Low-Level Motion Control Development Interface
The cross-platform low-level motion control development interface library provides unified C++/Python APIs that are compatible with ROS1, ROS2, and non-ROS systems, enabling rapid migration and deployment of motion control algorithms. Through hardware abstraction layers and standardized communication protocols, developers can seamlessly switch between simulation and real hardware environments, significantly reducing multi-platform adaptation costs.
4.1 C++ Interface User Guide
4.1.1 Introduction to getInstance Interface
| Function | getInstance |
| Function prototype | static PointFoot* getInstance(); |
| Function overview | Obtains a pointer to a singleton instance of the PointFoot class |
| Parameters | None |
| Return value | PointFoot *, a pointer to a PointFoot instance |
| Notes | The singleton pattern is used to ensure that only one instance of the PointFoot class exists in the program |
Code example:
#include <thread>

//Include limxsdk::PointFoot header to import PointFoot class
#include "limxsdk/pointfoot.h"

// Use the limxsdk namespace to simplify references to the PointFoot class
using namespace limxsdk;

int main(int argc, char *argv[]){
  //Get the singleton instance of the PointFoot class
  PointFoot* pf = PointFoot::getInstance();

 //Infinite loop to keep the program running
  while (true)
  {
    // Sleep for 1000 milliseconds
    std::this_thread::sleep_for(std::chrono::milliseconds(1000));
  }

  return 0;
}
4.1.2 Introduction to init Interface
| Function | init |
| Function prototype | bool init(const std::string& robot_ip_address = "127.0.0.1"); |
| Function overview | **Initializes** the communication runtime environment of the motion control algorithm program. This function is usually invoked to complete the initialization before other interfaces are called in the main function. |
| Parameters | robot_ip_address: The IP address of the robot. It is usually set to "127.0.0.1" for simulation and probably "10.192.1.2" for a physical robot. |
| Return value | Returns true if the initialization is successful and false otherwise. |
| Notes | None |
Code example:
#include <thread>

// Include limxsdk:: PointFoot header to import the PointFoot class
#include "limxsdk/pointfoot.h"

// Use the limxsdk namespace to simplify references to the PointFoot class
using namespace limxsdk;

int main(int argc, char *argv[]){
  // Get the singleton instance of the PointFoot class
  PointFoot* pf = PointFoot::getInstance();

  // Default robot IP address
  std::string robot_ip = "127.0.0.1";
  if (argc > 1)
  {
    // If command line arguments are provided, use the command line arguments as the robot IP address
    robot_ip = argv[1];
  }

  // Initialize the communication runtime environment of the motion control algorithm program
  if (!pf->init(robot_ip))
  {
   // If initialization fails, exit the program
    exit(1);
  }

  // Infinite loop to keep the program running
  while (true)
  {
    // Sleep for 1000 milliseconds
    std::this_thread::sleep_for(std::chrono::milliseconds(1000));
  }
  return 0;
}
4.1.3 Introduction to getMotorNumber Interface
| Function | getMotorNumber |
| Function prototype | uint32_t getMotorNumber(); |
| Function overview | This function retrieves the total number of motors in the robot. |
| Parameters | None |
| Return value | Returns an unsigned integer representing the total motor count. |
| Notes | Generally, there are six motors in a point-foot robot |
Code example:
#include <thread>

// Include limxsdk::PointFoot header to import the PointFoot class
#include "limxsdk/pointfoot.h"

// Use the limxsdk namespace to simplify references to the PointFoot class
using namespace limxsdk;

int main(int argc, char *argv[]){
  // Get the singleton instance of the PointFoot class
  PointFoot* pf = PointFoot::getInstance();

  // Default robot IP address
  std::string robot_ip = "127.0.0.1";
  if (argc > 1)
  {
    // If command line arguments are provided, use the command line arguments as the robot IP address
    robot_ip = argv[1];
  }

  // Initialize the communication runtime environment of the motion control algorithm program
  if (!pf->init(robot_ip))
  {
   // If initialization fails, exit the program
    exit(1);
  }

  // Get the number of motors in the robot
  uint32_t motor_num = pf->getMotorNumber();

  // Infinite loop to keep the program running
  while (true)
  {
    // Sleep for 1000 milliseconds
    std::this_thread::sleep_for(std::chrono::milliseconds(1000));
  }
  return 0;
}
4.1.4 Introduction to subscribeImuData Interface
| Function | subscribeImuData |
| Function prototype | `void subscribeImuData(std::function cb);` |
| Function overview | Subscribe to the robot's **IMU data** and invoke the specified callback function when the new IMU data is received. |
| Parameters | cb: Callback function to process new IMU data. |
| Return value | None |
Notes:
The prototype of the ImuData data structure is as follows:
/**
 * @struct ImuData
 *
 * @brief denotes the structure of the robot's IMU data based on sensor feedback.
 *
 * This structure encapsulates the IMU data, including the accelerometer, gyroscope, and quaternion.
 */

struct ImuData {
  uint64_t stamp; // Timestamp, in nanoseconds, generally denotes the time when the data was recorded or generated.
  float acc[3];  // Used to store the accelerometer data in the IMU to track the linear acceleration along the three axes (X, Y and Z).
  float gyro[3];  // Used to store the gyroscope data in the IMU to track the angular or rotational velocity along the three axes (X, Y and Z).
  float quat[4];  // Used to store the quaternion data in the IMU, representing orientation in 3D space (w, x, y, z).
};

// Aliases of smart pointer types
typedef std::shared_ptr<ImuData> ImuDataPtr;
typedef std::shared_ptr<ImuData const> ImuDataConstPtr;
Code example:
#include <thread>

// include limxsdk::PointFoot header to import PointFoot class
#include "limxsdk/pointfoot.h"

// Use the limxsdk namespace to simplify the reference to the PointFoot class
using namespace limxsdk;

int main(int argc, char *argv[]){
   // Get the singleton instance of the PointFoot class
  PointFoot* pf = PointFoot::getInstance();

 // Default robot IP address
  std::string robot_ip = "127.0.0.1";
  if (argc > 1)
  {
   // If command line arguments are provided, use the command line arguments as the robot IP address
    robot_ip = argv[1];
  }

  // Initialize the communication runtime environment for the motion control algorithm program
  if (!pf->init(robot_ip))
  {
   // If initialization fails, exit the program
    exit(1);
  }

  // Subscribe to the robot state updates and specify the callback function
  pf->subscribeImuData([&](const ImuDataConstPtr& msg) {
    // Process the received RobotState data here
    // Note: The callback function will be invoked when receiving the ImuData
  });

  // Infinite loop to keep the program running
  while (true)
  {
   // Sleep for 1000 milliseconds
    std::this_thread::sleep_for(std::chrono::milliseconds(1000));
  }
  return 0;
}
4.1.5 Introduction to the subscribeRobotState Interface
| Function | subscribeRobotState |
| Function prototype | `void subscribeRobotState(std::function cb);` |
| Function overview | Subscribe to **robot state updates**. |
| Parameters | cb: A callback function that will be invoked when the robot state updates are received. Arguments of the callback function point to the constant pointers of the RobotState object. |
| Return value | None |
Notes:
- The prototype of the RobotState data structure is as follows:
/**
 * @struct RobotState
 *
 * @brief represents the structure of the robot's state based on sensor feedback.
 *
 * This structure encapsulates various data points that can be used to monitor and control the robot, including the IMU data (accelerometer, gyroscope and quaternion), output torque, current angle and speed.
 */
struct RobotState {
  // Default constructor
  RobotState() { }
 // Constructor with arguments to initialize the tau, q and dq vectors with vector size of motor_num and initial value of 0.0
  RobotState(int motor_num)
  : tau(motor_num, 0.0)
  , q(motor_num, 0.0)
  , dq(motor_num, 0.0) { }
  uint64_t stamp;              // Timestamp, in nanoseconds, generally denotes the time when the data was recorded or generated
  std::vector<float> tau;      // Vector to store the current estimated output torque (in Newton-meters)
  std::vector<float> q;        // Vector to store the current angle (in radians)
  std::vector<float> dq;       // Vector to store the current speed (in radians per second)
};

// Aliases of smart pointer types
typedef std::shared_ptr<RobotState> RobotStatePtr;
typedef std::shared_ptr<RobotState const> RobotStateConstPtr;
- The order of motors corresponding to the tau, q and dq array of robot state data is as follows:
- Point-Foot
0: abad_L_Joint, 1: hip_L_Joint, 2: knee_L_Joint
3: abad_R_Joint, 4: hip_R_Joint, 5: knee_R_Joint - Wheel-Foot
0: abad_L_Joint, 1: hip_L_Joint, 2: knee_L_Joint, 3: wheel_L_Joint
4: abad_R_Joint, 5: hip_R_Joint, 6: knee_R_Joint, 6: wheel_R_Joint - Sole-Foot
0: abad_L_Joint, 1: hip_L_Joint, 2: knee_L_Joint, 3: ankle_L_Joint
4: abad_R_Joint, 5: hip_R_Joint, 6: knee_R_Joint, 6: ankle_R_Joint
- Point-Foot
Code example:
#include <thread>

// Include limxsdk::PointFoot header to import the PointFoot class
#include "limxsdk/pointfoot.h"

// use the limxsdk namespace to simplify references to the PointFoot class
using namespace limxsdk;

int main(int argc, char *argv[]){
  // Get the singleton instance of the PointFoot class
  PointFoot* pf = PointFoot::getInstance();

  // Default robot IP address
  std::string robot_ip = "127.0.0.1";
  if (argc > 1)
  {
    // If command line arguments are provided, use the command line arguments as the robot IP address
    robot_ip = argv[1];
  }

  // Initialize the communication runtime environment for the motion control algorithm program
  if (!pf->init(robot_ip))
  {
    // If initialization fails, exit the program
    exit(1);
  }

  // Subscribe to the robot state updates and specify the callback function
  pf->subscribeRobotState([&](const RobotStateConstPtr& msg) {
    // Process the received RobotState data here
    // Note: The callback function will be invoked when the robot state updates are received
  });

  // Infinite loop to keep the program running
  while (true)
  {
    // Sleep for 1000 milliseconds
    std::this_thread::sleep_for(std::chrono::milliseconds(1000));
  }
  return 0;
}
4.1.6 Introduction to publishRobotCmd Interface
| Function | publishRobotCmd |
| Function prototype | bool publishRobotCmd(const RobotCmd& cmd); |
| Function overview | Publish a command to control **robot movements**. |
| Parameters |
cmd: Denote the RobotCmd object of the required robot command. The order of corresponding motors for the command data array is as follows: - Point-Foot 0: abad_L_Joint, 1: hip_L_Joint, 2: knee_L_Joint 3: abad_R_Joint, 4: hip_R_Joint, 5: knee_R_Joint - Wheel-Foot 0: abad_L_Joint, 1: hip_L_Joint, 2: knee_L_Joint, 3: wheel_L_Joint 4: abad_R_Joint, 5: hip_R_Joint, 6: knee_R_Joint, 6: wheel_R_Joint - Sole-Foot 0: abad_L_Joint, 1: hip_L_Joint, 2: knee_L_Joint, 3: ankle_L_Joint 4: abad_R_Joint, 5: hip_R_Joint, 6: knee_R_Joint, 6: ankle_R_Joint |
| Return value | None |
Notes:
- The prototype RobotCmd data structure is as follows:
/**
  * @struct RobotCmd
  *
  *  @brief denotes the structure of the commands that control the robot.
  *
  * This structure contains various commands that can be used to control the robot, including the desired working mode, angle, speed, output torque, position stiffness, and speed stiffness.
  */
struct RobotCmd {
  RobotCmd() { }
  RobotCmd(int motor_num)
  : mode(motor_num, 0)
  , q(motor_num, 0.0)
  , dq(motor_num, 0.0)
  , tau(motor_num, 0.0)
  , Kp(motor_num, 0.0)
  , Kd(motor_num, 0.0) { }
  uint64_t stamp;             // Timestamp (in nanoseconds), generally denoting the time when data was recorded or generated.
  std::vector<uint8_t> mode;  // 0: torque mode control; 1: speed mode control; 2: position mode control, default value: 0
  std::vector<float> q;       // Vector to store the desired angles (in radians).
  std::vector<float> dq;      // Vector to store desired speed (in radians per second).
  std::vector<float> tau;     // Vector to store desired output torque (in Newton meters).
  std::vector<float> Kp;      // Vector to store desired position stiffness (in Newton meters per radians).
  std::vector<float> Kd;      // Vector to store desired speed stiffness (in Newton meters per radians per second)
};

// Aliases of smart pointer types
typedef std::shared_ptr<RobotCmd> RobotCmdPtr;
typedef std::shared_ptr<RobotCmd const> RobotCmdConstPtr;
Code example:
#include <thread>

// Include the limxsdk::PointFoot header to import the PointFoot class
#include "limxsdk/pointfoot.h"

// Use the limxsdk namespace to simplify references to the PointFoot class
using namespace limxsdk;

int main(int argc, char *argv[]){
  // Get the singleton instance of the PointFoot class
  PointFoot* pf = PointFoot::getInstance();

  // Default robot IP address
  std::string robot_ip = "127.0.0.1";
  if (argc > 1)
  {
    // If command line arguments are provided, use the command line arguments as the robot IP address
    robot_ip = argv[1];
  }

  // Initialize the communication runtime environment for the motion control algorithm program
  if (!pf->init(robot_ip))
  {
    // If initialization fails, exit the program
    exit(1);
  }

  // Get the number of motors in the robot
  uint32_t motor_num = pf->getMotorNumber();

  // Create a RobotCmd object containing the number of motors in the robot
  RobotCmd cmd(motor_num);

  // Publish a command
  pf->publishRobotCmd(cmd);

  // Infinite loop to keep the program running
  while (true)
  {
    // Sleep for 1000 milliseconds
    std::this_thread::sleep_for(std::chrono::milliseconds(1000));
  }
  return 0;
}
4.1.7 Introduction to subscribeSensorJoy Interface
| Function | subscribeSensorJoy |
| Function prototype | `void subscribeSensorJoy(std::function cb);` |
| Function overview | This method is used for subscribing to data from the robot's remote controller in real-world deployments. When the robot receives data from the remote controller, the specified callback function is invoked, and the robot system then passes pointers to the SensorJoy structure, which contains the remote controller data, to the callback function for processing. |
| Parameters | cb: A callback function used for receiving data from the robot's remote controller. The parameter type of this callback function is SensorJoyConstPtr, which is a shared pointer to a constant SensorJoy structure. |
| Return value | None |
Notes:
- The prototype of the SensorJoy data structure is as follows:
/**
 * @struct SensorJoy
 *
 * @brief A structure containing data from the robot remote controller.
 *
 * This struct contains the timestamp information associated with the remote controller, as well as the joystick and button values.
 */
struct SensorJoy {
    uint64_t stamp;                     // Timestamp associated with the sensor input, in nanoseconds.
    std::vector<float> axes;            // Value denoting the joystick.
    std::vector<int32_t> buttons;       // Value denoting the button state.
};

// Definition of the types of SensorJoy smart pointers
typedef std::shared_ptr<SensorJoy> SensorJoyPtr;
typedef std::shared_ptr<const SensorJoy> SensorJoyConstPtr;
- Mapping of remote controller joysticks
| Joysticks | Axes Index |
|---|---|
| left_horizon | 0 |
| left_vertival | 1 |
| right_horizon | 2 |
| right_vertival | 3 |
- Mapping of the remote controller buttons
| Button | Buttons Index |
|---|---|
| X(A) | 0 |
| 〇(B) | 1 |
| 口(X) | 2 |
| △(Y) | 3 |
| L1 | 4 |
| L2 | 6 |
| R1 | 7 |
| R2 | 5 |
| SELECT | 8 |
| START | 9 |
| UP | 12 |
| DOWN | 13 |
| LEFT | 14 |
| RIGHT | 15 |
| MENU | 16 |
| BACK | 17 |
- When configuring your own button logic, it is recommended not to conflict with the system's reserved button functions. The system's reserved button functions in the developer mode:
| Button | Function Description |
|---|---|
| L1 + R1 | Zero Calibration |
| R1 + Left | Developer Mode |
| R1 + Right | Turn on Motion Control Mode |
| Left + Right Joysticks | Emergency Stop |
| Right Joystick | Release Emergency Stop |
Code example:
#include <thread>

// Include the limxsdk::PointFoot header to import the PointFoot class
#include "limxsdk/pointfoot.h"

// Use the limxsdk namespace to simplify references to the PointFoot class
using namespace limxsdk;

int main(int argc, char *argv[]){
  // Get the singleton instance of the PointFoot class
  PointFoot* pf = PointFoot::getInstance();

  // Default robot IP address
  std::string robot_ip = "127.0.0.1";
  if (argc > 1)
  {
    // /If command line arguments are provided, use the command line arguments as the robot IP address
    robot_ip = argv[1];
  }

  // Initialize the communication runtime environment for the motion control algorithm program
  if (!pf->init(robot_ip))
  {
    // If initialization fails, exit the program
    exit(1);
  }

  // Subscribe to the robot's remote control data
  pf->subscribeSensorJoy([&](const limxsdk::SensorJoyConstPtr &joy) {
    // Press L1 & R1
    if (joy->buttons[4] == 1 && joy->buttons[7] == 1)
    {
      // Execute related operations here
    }

    // Process stick data
    double axes_left_horizontal = joy->axes[0];
    double axes_left_vertical = joy->axes[1];
    double axes_right_horizontal = joy->axes[2];
    double axes_right_vertical = joy->axes[3];
  });

  // Infinite loop to keep the program running
  while (true)
  {
    // Sleep for 1000 milliseconds
    std::this_thread::sleep_for(std::chrono::milliseconds(1000));
  }
  return 0;
}
4.1.8 Introduction to subscribeDiagnosticValue Interface
| Function | subscribeDiagnosticValue |
| Function prototype | `void subscribeDiagnosticValue(std::function cb);` |
| Function overview | This method is used to subscribe to the robot's **diagnostic values and state information** in the physical robot deployment. When the robot delivers a diagnostic value, the system invokes the specified callback function, which then process the diagnostic values contained in pointers of the DiagnosticValue structure constant. It enables real-time monitor of robot health and reacts promptly to deal with possible problems. |
| Parameters | cb: A callback function to receive the robot diagnostic values. The parameter type is `DiagnosticValueConstPtr`, a shared pointer to the `DiagnosticValue` structure constant. The `DiagnosticValue` structure contains information about the robot diagnostic values, including timestamp, level, name, code, and message field. |
| Return value | None |
Notes:
- The prototype of the DiagnosticValue data structure is as follows:
C++
/**
 * @struct DiagnosticValue
 *
 * @brief A structure that denotes diagnostic values
 *
 * This structure contains information about the diagnostic level, name, code, and message.
 */
struct DiagnosticValue {
  enum { OK = 0 };         // Diagnostic level for normal state
  enum { WARN = 1 };       // Diagnostic level for warning state
  enum { ERROR = 2 };      // Diagnostic level for error state

  uint64_t stamp;          // Timestamp in nanoseconds
  int32_t level;           // Level associated with the diagnostic value
  std::string name;        // Name of the diagnostic value
  int32_t code;            // Code corresponding to the diagnostic value.
  std::string message;     // Detailed message associated with the diagnostic value.
};

// DiagnosticValue Definition of types of DiagnosticValue smart pointers
typedef std::shared_ptr<DiagnosticValue> DiagnosticValuePtr;
typedef std::shared_ptr<DiagnosticValue const> DiagnosticValueConstPtr;
- Common diagnostic data
| name        | level  | code | message
|-------------|--------|------|---------------------------------
| version     | OK     |  0   | - Contains software version information
|-------------|--------|------|---------------------------------
| imu         | OK     |  0   | - IMU in normal operation
| imu         | ERROR  | -1   | - IMU in abnormal operation, containing abnormal information
|-------------|--------|------|---------------------------------
| ethercat    | OK     |  0   | - EtherCAT in normal operation
| ethercat    | ERROR  | -1   | - EtherCAT in abnormal operation, containing abnormal information
|-------------|--------|------|--------------------
| calibration | OK     |  0   | - Zero calibration completed
| calibration | WARN   |  1   | - Warning: Robot in zero calibration
| calibration | ERROR  | -1   | - Error: Robot zero calibration fails, containing causes of failure
|-------------|--------|------|----------------------------------
Code example:
#include <thread>

// Include the limxsdk::PointFoot header to import the PointFoot class
#include "limxsdk/pointfoot.h"
// Use the limxsdk namespace to simplify references to the PointFoot
using namespace limxsdk;

int main(int argc, char *argv[]){
  // Get the singleton instance of the PointFoot class
  PointFoot* pf = PointFoot::getInstance();

  // Default robot IP address

  std::string robot_ip = "127.0.0.1";
  if (argc > 1)
  {
    // If command line arguments are provided, use the command line arguments as the robot IP address
    robot_ip = argv[1];
  }

    // Initialize the communication runtime environment for the motion control algorithm program
  if (!pf->init(robot_ip))
  {
    // If initialization fails, exit the program
    exit(1);
  }

  // Subscribe to the robot diagnostic data
  pf->subscribeDiagnosticValue([&](const DiagnosticValueConstPtr& msg) {
    // Robot diagnostic values are processed here
    // For example, appropriate action can be taken based on the level and message of the diagnostic value
    std::cout << "Diagnostic Value: " << msg->name << std::endl;
    std::cout << "Level: " << msg->level << std::endl;
    std::cout << "Code: " << msg->code << std::endl;
    std::cout << "Message: " << msg->message << std::endl;
  });

  // Infinite loop to keep the program running
  while (true)
  {
    // Sleep for 1000 milliseconds
    std::this_thread::sleep_for(std::chrono::milliseconds(1000));
  }
  return 0;
}
4.1.9 Introduction to the setRobotLightEffect Interface
| Function | setRobotLightEffect |
| Function prototype | bool setRobotLightEffect(int effect); |
| Function overview | This method is used to **set the robot's light effect** in the robot deployment. |
| Parameters | effect: An integer denoting the desired robot light effect, as defined in the enumeration of `PointFoot:: LightEffect`. |
| Return value | bool: Indicate whether the robot light effect has been set successfully. |
Notes:
Enumerated definition of PointFoot::LightEffect:
enum LightEffect : int {
    STATIC_RED = 0,     // Static red light
    STATIC_GREEN,       // Static green light
    STATIC_BLUE,        // Static blue light
    STATIC_CYAN,        // Static cyan light
    STATIC_PURPLE,      // Static purple light
    STATIC_YELLOW,      // Static yellow light
    STATIC_WHITE,       // Static white light
    LOW_FLASH_RED,      // Flashing red light (slow)
    LOW_FLASH_GREEN,    // Flashing green light (slow)
    LOW_FLASH_BLUE,     // Flashing blue light (slow)
    LOW_FLASH_CYAN,     // Flashing cyan light (slow)
    LOW_FLASH_PURPLE,   // Flashing purple light (slow)
    LOW_FLASH_YELLOW,   // Flashing yellow light (slow)
    LOW_FLASH_WHITE,    // Flashing white light (slow)
    FAST_FLASH_RED,     // Flashing red light (fast)
    FAST_FLASH_GREEN,   // Flashing green light (fast)
    FAST_FLASH_BLUE,    // Flashing blue light (fast)
    FAST_FLASH_CYAN,    // Flashing cyan light (fast)
    FAST_FLASH_PURPLE,  // Flashing purple light (fast)
    FAST_FLASH_YELLOW,  // Flashing yellow light (fast)
    FAST_FLASH_WHITE    // Flashing white light (fast)
};
Code example:
#include <thread>

// Include the limxsdk::PointFoot header to import the PointFoot class
#include "limxsdk/pointfoot.h"

// Use the limxsdk namespace to simplify references to the PointFoot class
using namespace limxsdk;

int main(int argc, char *argv[]){
  // Get the singleton instance of the PointFoot class
  PointFoot* pf = PointFoot::getInstance();

  // Default robot IP address
  std::string robot_ip = "127.0.0.1";
  if (argc > 1)
  {
    // If command line arguments are provided, use the command line arguments as the robot IP address
    robot_ip = argv[1];
  }

  // Initialize the communication runtime environment for the motion control algorithm program
  if (!pf->init(robot_ip))
  {
    // If initialization fails, exit the program
    exit(1);
  }

  // Set robot light effect as static red light
  robot->setRobotLightEffect(limxsdk::PointFoot::STATIC_RED);

  // Infinite loop to keep the program running
  while (true)
  {
    // Sleep for 1000 milliseconds
    std::this_thread::sleep_for(std::chrono::milliseconds(1000));
  }
  return 0;
}
4.1.10 Reference Routines
- Single-joint control routines:
https://github.com/limxdynamics/pointfoot-sdk-lowlevel/blob/master/examples/pf_joint_move.cpp
- Multi-joint control routines:
https://github.com/limxdynamics/pointfoot-sdk-lowlevel/blob/master/examples/pf_groupJoints_move.cpp
4.2 Python Interface User Guide
4.2.1 Overview
The Python motion control algorithm development interfaces, which provide the same functions as the C++ interfaces, enable developers unfamiliar with the C++ programming language to develop motion control algorithms with Python.
As an easy-to-learn programming language, Python features a concise and clear syntax and rich third-party libraries, allowing developers to get started more quickly and implement algorithms promptly. Through the Python interfaces, developers can leverage the language's dynamic characteristics to conduct prototype design and experimental verification in a quick manner and to accelerate the iteration and optimization of algorithms. Moreover, the cross-platform nature and strong ecosystem of Python make it possible to widely apply motion control algorithms to diverse platforms and environments.
In addition, the flexibility of Python facilitates the quick deployment of reinforcement learning (RL) models to both the simulation and physical robot environments. Developers can use Python to effortlessly integrate RL models into various simulation platforms and physical hardware, thus, to swiftly iterate and verify the performance of algorithms.
4.2.2 Installing Motion Control Development Libraries
-
Linux x86_64 environment
git clone https://github.com/limxdynamics/pointfoot-sdk-lowlevel.git pip install pointfoot-sdk-lowlevel/python3/amd64/limxsdk-*-py3-none-any.whl -
Linux aarch64 environment
git clone https://github.com/limxdynamics/pointfoot-sdk-lowlevel.git pip install pointfoot-sdk-lowlevel/python3/aarch64/limxsdk-*-py3-none-any.whl -
Windows environment
git clone https://github.com/limxdynamics/pointfoot-sdk-lowlevel.git
pip install pointfoot-sdk-lowlevel/python3/win/limxsdk-*-py3-none-any.whl
4.2.3 Introduction to __init__ Interface
| Function | `__init__` |
| Function prototype | def `__init__`(self, robot_type: robot.RobotType) |
| Function overview | Specifies the robot type and create a corresponding local robot instance of the type during the initialization. |
| Parameters | robot_type: An enumerated value that denotes the robot type, with the point-foot robot as RobotType.PointFoot. |
| Return value | None |
| Notes | None |
Code example:
import sys
import limxsdk.robot.Robot as Robot
import limxsdk.robot.RobotType as RobotType

if __name__ == '__main__':
    # Create a Robot instance of type PointFoot
    robot = Robot(RobotType.PointFoot)
4.2.4 Introduction to init Interface
| Function | init |
| Function prototype | def init(self, robot_ip: str = "127.0.0.1") |
| Function overview | This function initializes the communication runtime environment of the motion control algorithm program. The function is invoked to complete initialization before the main function calls other interfaces. |
| Parameters | robot_ip_address: The IP address of the robot. It is usually set to "127.0.0.1" for simulation and probably "10.192.1.2" for a physical robot. |
| Return value | Success: Return True Failure: Return False |
| Notes | None |
Code example:
import sys
import limxsdk.robot.Robot as Robot
import limxsdk.robot.RobotType as RobotType

if __name__ == '__main__':
    # Create a Robot instance of type PointFoot
    robot = Robot(RobotType.PointFoot)

    robot_ip = "127.0.0.1"
    # Check if the command-line argument is provided as the robot IP
    if len(sys.argv) > 1:
        robot_ip = sys.argv[1]

    # Use the IP address to initialize the robot's communication runtime environment
    if not robot.init(robot_ip):
        sys.exit()
4.2.5 Introduction to getMotorNumber Interface
| Function | getMotorNumber |
| Function prototype | def getJointLimit(self, timeout: float = -1.0) |
| Function overview | This function retrieves the number of motors in the robot. |
| Parameters | None |
| Return value | Returns an unsigned integer representing the total motor count. |
| Notes | Generally, there are six motors in a point-foot robot |
Code example:
import sys
import limxsdk.robot.Robot as Robot
import limxsdk.robot.RobotType as RobotType

if __name__ == '__main__':
    # Create a Robot instance of type PointFoot
    robot = Robot(RobotType.PointFoot)

    robot_ip = "127.0.0.1"
    # Check if the command-line argument is provided as the robot IP

    if len(sys.argv) > 1:
        robot_ip = sys.argv[1]

    # Use robot_ip to initialize the robot

    if not robot.init(robot_ip):
        sys.exit()

    # Get the number of motors in the robot
    motor_number = robot.getMotorNumber()
4.2.6 Introduction to subscribeImuData Interface
| Function | subscribeImuData |
| Function prototype | def subscribeImuData(self, callback: Callable[[datatypes.ImuData], Any]) |
| Function overview | Subscribe to the robot's IMU data and invoke the specified callback function when the new IMU data is received. |
| Parameters | callback: Callback function to process new IMU data. |
| Return value | Success: Return True Failure: Return False |
Notes:
The prototype of the datatypes.ImuData data structure is as follows:
import sys

class ImuData(object):
    __slots__ = ['stamp','acc','gyro','quat']
    def __init__(self):
        self.stamp = 0 # Timestamp, in nanoseconds, generally denotes the time when the data was recorded or generated.
        self.acc = [0. for x in range(0, 3)]  # Used to store the accelerometer data in the inertial measurement unit (IMU) to track the linear acceleration along the three axes.
        self.gyro = [0. for x in range(0, 3)] # Used to store the gyroscope data in the IMU to track the angular or rotational velocity.
        self.quat = [0. for x in range(0, 4)] # Used to store the quaternion data in the IMU, representing orientation in 3D space (w, x, y, z).
Code example:
import sys
from functools import partial
import limxsdk.robot.Robot as Robot
import limxsdk.robot.RobotType as RobotType
import limxsdk.datatypes as datatypes

class RobotReceiver:
    # Subscribe to the robot's IMU data
    def imuDataCallback(self, imu: datatypes.ImuData):
        print("\n------\nrobot_state:" + \
              "\n  stamp: " + str(imu.stamp) + \
              "\n  acc: " + str(imu.acc) + \
              "\n  gyro: " + str(imu.gyro) + \
              "\n  quat: " + str(imu.quat))

if __name__ == '__main__':
    # Create a Robot instance of type PointFoot
    robot = Robot(RobotType.PointFoot)

    robot_ip = "127.0.0.1"
    # Check if the command-line argument is provided as the robot IP
    if len(sys.argv) > 1:
        robot_ip = sys.argv[1]

    # Use robot_ip to initialize the robot
    if not robot.init(robot_ip):
        sys.exit()

    # Create a RobotReceiver instance to process the callback
    receiver = RobotReceiver()

    # Create a partial function for the callback function
    imuDataCallback = partial(receiver.imuDataCallback)

    # Subscribe to the robot's IMU data
    robot.subscribeImuData(imuDataCallback)

    # Sleep for 1 second to prevent program exit
    import time
    while True:
        time.sleep(1)
4.2.7 Introduction to subscribeRobotState Interface
| Function | subscribeRobotState |
| Function prototype | def subscribeRobotState(self, callback: Callable[[datatypes.RobotState], Any]) |
| Function overview | Subscribe to robot state updates. |
| Parameters |
callback: A callback function that will be invoked when the robot state updates are received. Arguments of the callback function point to the datatypes.RobotState object.
- The order of corresponding motors for the command data array is as follows:
- Point - foot 0: abad_L_Joint, 1: hip_L_Joint, 2: knee_L_Joint 3: abad_R_Joint, 4: hip_R_Joint, 5: knee_R_Joint - Wheel - foot 0: abad_L_Joint, 1: hip_L_Joint, 2: knee_L_Joint, 3: wheel_L_Joint 4: abad_R_Joint, 5: hip_R_Joint, 6: knee_R_Joint, 6: wheel_R_Joint - Sole - foot 0: abad_L_Joint, 1: hip_L_Joint, 2: knee_L_Joint, 3: ankle_L_Joint 4: abad_R_Joint, 5: hip_R_Joint, 6: knee_R_Joint, 6: ankle_R_Joint - The data structure fields of datatypes.RobotState are as follows: - stamp: Timestamp, which generally denotes the time when data was recorded or generated. - tau: Vector to store currently estimated output torque (in Newton meters). - q: Vector to store the current angle (in radians). - dq: Vector to store the current speed (in radians per second). |
| Return value | Success: Return True Failure: Return False |
Notes:
The prototype of the datatypes.RobotState data structure is as follows:
import sys

class RobotState(object):
    __slots__ = ['stamp','tau','q','dq']
    def __init__(self):
        self.stamp = 0 # Timestamp, in nanoseconds, generally denotes the time when the data was recorded or generated.
        self.tau = []  # Vector to store currently estimated output torque (in Newton meters).
        self.q = []    # Vector to store the current angle (in radians)
        self.dq = []   # Vector to store the current speed (in radians per second)
Code example:
import sys
from functools import partial
import limxsdk.robot.Robot as Robot
import limxsdk.robot.RobotType as RobotType
import limxsdk.datatypes as datatypes

class RobotReceiver:
    # Callback function to receive the robot state
    def robotStateCallback(self, robot_state: datatypes.RobotState):
        print("\n------\nrobot_state:" + \
              "\n  stamp: " + str(robot_state.stamp) + \
              "\n  tau: " + str(robot_state.tau) + \
              "\n  q: " + str(robot_state.q) + \
              "\n  dq: " + str(robot_state.dq))

if __name__ == '__main__':
    # Create a Robot instance of type PointFoot
    robot = Robot(RobotType.PointFoot)

    robot_ip = "127.0.0.1"
    # Check if the command-line argument is provided as the robot IP
    if len(sys.argv) > 1:
        robot_ip = sys.argv[1]

    # Use robot_ip to initialize the robot
    if not robot.init(robot_ip):
        sys.exit()

    # Create a RobotReceiver instance to process the callback
    receiver = RobotReceiver()

    # Create a partial function for the callback function
    robotStateCallback = partial(receiver.robotStateCallback)

    # Subscribe to the robot state
    robot.subscribeRobotState(robotStateCallback)

    # Sleep for 1 second to prevent program exit
    import time
    while True:
        time.sleep(1)
4.2.8 Introduction to publishRobotCmd Interface
| Function | publishRobotCmd |
| Function prototype | def publishRobotCmd(self, cmd: datatypes.RobotCmd) |
| Function overview | Publish a command to control robot movements. |
| Parameters |
cmd: Denote the RobotCmd object of the required robot command, which includes the following fields:
- stamp: Timestamp that generally denotes the time when the data was recorded or generated, in nanoseconds.
- mode:robot mode control: 0: torque mode control; 1: speed mode control; 2: position mode control, default value: 0
- q: Vector to store the desired angles (in radians).
- dq: Vector to store desired speed (in radians per second).
- tau: Vector to store desired output torque (in Newton meters).
- Kp: Vector to store desired position stiffness (in Newton meters per radians).
- Kd: Vector to store desired speed stiffness (in Newton meters per radians per second)
The order of corresponding motors for the command data array is as follows:
- Point - foot
0: abad_L_Joint, 1: hip_L_Joint, 2: knee_L_Joint 3: abad_R_Joint, 4: hip_R_Joint, 5: knee_R_Joint - Wheel - foot 0: abad_L_Joint, 1: hip_L_Joint, 2: knee_L_Joint, 3: wheel_L_Joint 4: abad_R_Joint, 5: hip_R_Joint, 6: knee_R_Joint, 6: wheel_R_Joint - Sole - foot 0: abad_L_Joint, 1: hip_L_Joint, 2: knee_L_Joint, 3: ankle_L_Joint 4: abad_R_Joint, 5: hip_R_Joint, 6: knee_R_Joint, 6: ankle_R_Joint |
| Return value | Success: Return True Failure: Return False |
Notes:
The prototype of the datatypes.RobotCmd data structure is as follows:
import sys

class RobotCmd(object):
    __slots__ = ['stamp','mode','q','dq','tau','Kp','Kd']
    def __init__(self):
        self.stamp = 0 # Timestamp (in nanoseconds), generally denoting the time when data was recorded or generated.
        self.mode = [] # The robot's desired working mode.
        self.q = []    # Vector to store the desired angles (in radians).
        self.dq = []   # Vector to store desired speed (in radians per second).
        self.tau = []  # Vector to store desired output torque (in Newton meters).
        self.Kp = []   # Vector to store desired position stiffness (in Newton meters per radians).
        self.Kd = []   # Vector to store desired speed stiffness (in Newton meters per radians per second)
Code example:
import sys
import time
import limxsdk.robot.Rate as Rate
import limxsdk.robot.Robot as Robot
import limxsdk.robot.RobotType as RobotType
import limxsdk.datatypes as datatypes

if __name__ == '__main__':
    # Create a Robot instance of type PointFoot
    robot = Robot(RobotType.PointFoot)

    robot_ip = "127.0.0.1"
    # Check if the command-line argument is provided as the robot IP
    if len(sys.argv) > 1:
        robot_ip = sys.argv[1]

    # Use robot_ip to initialize the robot
    if not robot.init(robot_ip):
        sys.exit()

    # Get information about joint offset, joint limit, and motor number
    joint_offset = robot.getJointOffset()
    joint_limit = robot.getJointLimit()
    motor_number = robot.getMotorNumber()

    # Main loop to continuously publish robot commands
    rate = Rate(500) # 1500 Hz
    cmd_msg = datatypes.RobotCmd()
    while True:
        # Set default values for the timestamp, control mode, joint position, speed, torque, Kp, and Kd
        cmd_msg.stamp = time.time_ns()
        cmd_msg.mode = [1.0 for _ in range(motor_number)]
        cmd_msg.q = [1.0 for _ in range(motor_number)]
        cmd_msg.dq = [1.0 for _ in range(motor_number)]
        cmd_msg.tau = [1.0 for _ in range(motor_number)]
        cmd_msg.Kp = [1.0 for _ in range(motor_number)]
        cmd_msg.Kd = [1.0 for _ in range(motor_number)]
        robot.publishRobotCmd(cmd_msg)  # Publish robot command
        rate.sleep()  # Control loop frequency
4.2.9 Introduction to subscribeSensorJoy Interface
| Function | subscribeSensorJoy |
| Function prototype | def subscribeSensorJoy(self, callback: Callable[[datatypes.SensorJoy], Any]) |
| Function overview | This method is used to subscribe to data from the robot's remote controller in the robot deployment. When the robot receives data from the remote controller, the specified callback function is invoked, and the robot system then passes pointers to the datatypes.SensorJoy, which contains the remote controller data, to the callback function for processing. |
| Parameters | callback: A callback function that receives data from the robot's remote control. The parameter type of the callback function is datatypes.SensorJoy. |
| Return value | Success: Return True Failure: Return False |
Notes:
- The prototype of the datatypes.SensorJoy data structure is as follows:
import sys

class SensorJoy(object):
    __slots__ = ['stamp','axes','buttons']
    def __init__(self):
        self.stamp = 0     # Timestamp associated with the sensor input, in nanoseconds.
        self.axes = []     # Value denoting the stick.
        self.buttons = []  # Value denoting button state.
- Mapping of remote controller sticks
| Joystick       | Axes Index  |
|----------------|-------------|
| left_horizon   |      0      |
|----------------|-------------|
| left_vertival  |      1      |
|----------------|-------------|
| right_horizon  |      2      |
|----------------|-------------|
| right_vertival |      3      |
|----------------|-------------|
- Mapping of remote controller buttons
|     Button     | Buttons Index  |
|----------------|----------------|
|       X(A)     |      0         |
|----------------|----------------|
|       〇(B)    |      1         |
|----------------|----------------|
|       口(X)    |      2         |
|----------------|----------------|
|       △(Y)     |      3         |
|----------------|----------------|
|        L1      |      4         |
|----------------|----------------|
|        L2      |      6         |
|----------------|----------------|
|        R1      |      7         |
|----------------|----------------|
|        R2      |      5         |
|----------------|----------------|
|      SELECT    |      8         |
|----------------|----------------|
|       START    |      9         |
|----------------|----------------|
|        UP      |      12        |
|----------------|----------------|
|       DOWN     |      13        |
|----------------|----------------|
|       LEFT     |      14        |
|----------------|----------------|
|       RIGHT    |      15        |
|----------------|----------------|
|       MENU     |      16        |
|----------------|----------------|
|       BACK     |      17        |
|----------------|----------------|
- When configuring your own button logic, it is recommended not to conflict with the system's reserved button functions. The system's reserved button functions in the developer mode:
| Button                  | Function Description
|-------------------------|-------------------------------
| L1 + R1                 | Zero Calibration
|-------------------------|-------------------------------
| R1 + Left               | Developer Mode
|-------------------------|-------------------------------
| R1 + Right              | Turn on RL Motion Control Mode
|-------------------------|-------------------------------
| R1 + Up                 | Turn on MB Motion Control Mode
|-------------------------|-------------------------------
| Left + Right Joysticks  | Emergency Stop
|-------------------------|-------------------------------
| Right Joystick          | Release Emergency Stop
|-------------------------|-------------------------------
Code example:
import sys
import time
from functools import partial
import limxsdk.robot.Robot as Robot
import limxsdk.robot.RobotType as RobotType
import limxsdk.datatypes as datatypes

class RobotReceiver:
    # Callback function to receive the remote control data
    def sensorJoyCallback(self, sensor_joy: datatypes.SensorJoy):
        print("\n------\nsensor_joy:" + \
              "\n  stamp: " + str(sensor_joy.stamp) + \
              "\n  axes: " + str(sensor_joy.axes) + \
              "\n  buttons: " + str(sensor_joy.buttons))

if __name__ == '__main__':
    # Create a Robot instance of type PointFoot
    robot = Robot(RobotType.PointFoot)

    robot_ip = "127.0.0.1"
    # Check if the command-line argument is provided as the robot IP
    if len(sys.argv) > 1:
        robot_ip = sys.argv[1]

    # Use robot_ip to initialize the robot
    if not robot.init(robot_ip):
        sys.exit()

    # Create a RobotReceiver instance to process the callback
    receiver = RobotReceiver()

    # Create a partial function for the callback function
    sensorJoyCallback = partial(receiver.sensorJoyCallback)

    # Subscribe to the robot remote control data
    robot.subscribeSensorJoy(sensorJoyCallback)

    # Sleep for 1 second to prevent program exit
    import time
    while True:
        time.sleep(1)
4.2.10 Introduction to the subscribeDiagnosticValue interface
| Function | subscribeDiagnosticValue |
| Function prototype | def subscribeDiagnosticValue(self, callback: Callable[[datatypes.DiagnosticValue], Any]) |
| Function overview | This method is used to subscribe to the robot's diagnostic values and state information in the robot deployment. When the robot delivers a diagnostic value, the system invokes the specified callback function, which then process the diagnostic values contained in structure object of datatypes.DiagnosticValue. It enables real-time monitor of robot health and reacts promptly to deal with possible problems. |
| Parameters | callback: A callback function to receive the robot diagnostic values. The parameter type is datatypes.DiagnosticValue, whose structure contains information about the robot diagnostic values, including timestamp, level, name, code, and message field. |
| Return value | Success: Return True Failure: Return False |
Notes:
The prototype of the datatypes.DiagnosticValue data structure is as follows:
import sys

class DiagnosticValue(object):
    __slots__ = ['stamp','level','name','code','message']
    def __init__(self):
        self.stamp = 0 # Timestamp in nanoseconds
        self.level = 0 # Level associated with the diagnostic value - 0: OK, 1: WARN, 2: ERROR
        self.name = '' # Name of the diagnostic value
        self.code = 0  # Code corresponding to the diagnostic value.
        self.message = ''  # Detailed message associated with the diagnostic value.
- Common diagnostic data
| name        | level  | code | message
|-------------|--------|------|--------------------
| version     | OK     |  0   | - Contains software version information
|-------------|--------|------|--------------------
| imu         | OK     |  0   | - IMU in normal operation
| imu         | ERROR  | -1   | - IMU in abnormal operation, containing abnormal information
|-------------|--------|------|--------------------
| ethercat    | OK     |  0   | - EtherCAT in normal operation
| ethercat    | ERROR  | -1   | - EtherCAT in abnormal operation, containing abnormal information

|-------------|--------|------|--------------------
| calibration | OK     |  0   | - Zero calibration completed
| calibration | WARN   |  1   | - Warning: Robot in zero calibration
| calibration | ERROR  | -1   | - Error: Robot zero calibration fails, containing causes of failure
|-------------|--------|------|--------------------
Code example:
import sys
from functools import partial
import limxsdk.robot.Robot as Robot
import limxsdk.robot.RobotType as RobotType
import limxsdk.datatypes as datatypes

class RobotReceiver:
    # Callback function to receive the diagnostic value
    def diagnosticValueCallback(self, diagnostic_value: datatypes.DiagnosticValue):
        print("\n------\ndiagnostic_value:" + \
              "\n  stamp: " + str(diagnostic_value.stamp) + \
              "\n  name: " + diagnostic_value.name + \
              "\n  level: " + str(diagnostic_value.level) + \
              "\n  code: " + str(diagnostic_value.code) + \
              "\n  message: " + diagnostic_value.message)

if __name__ == '__main__':
    # Create a Robot instance of type PointFoot
    robot = Robot(RobotType.PointFoot)

    robot_ip = "127.0.0.1"
    # Check if the command-line argument is provided as the robot IP
    if len(sys.argv) > 1:
        robot_ip = sys.argv[1]

    # Use robot_ip to initialize the robot
    if not robot.init(robot_ip):
        sys.exit()

    # Create a RobotReceiver instance to process the callback

    receiver = RobotReceiver()

    # Create a partial function for the callback function
    diagnosticValueCallback = partial(receiver.diagnosticValueCallback)

    # Subscribe to the robot diagnostic information
    robot.subscribeDiagnosticValue(diagnosticValueCallback)

    # Sleep for 1 second to prevent program exit
    import time
    while True:
        time.sleep(1)
4.2.11 Introduction to setRobotLightEffect Interface
| Function | setRobotLightEffect |
| Function prototype | def setRobotLightEffect(self, effect: datatypes.LightEffect) |
| Function overview | This method is used to set the robot's light effect in the physical robot deployment. |
| Parameters | effect: An integer denoting the desired robot light effect, as defined in the enumeration of `PointFoot:: LightEffect`. |
| Return value | Success: Return True Failure: Return False |
Notes:
Enumerated definition of datatypes.LightEffect:
class LightEffect(Enum):
    STATIC_RED        = 0   # Static red light
    STATIC_GREEN      = 1   # Static green light
    STATIC_BLUE       = 2   # Static blue light
    STATIC_CYAN       = 3   # Static cyan light
    STATIC_PURPLE     = 4   # Static purple light
    STATIC_YELLOW     = 5   # Static yellow light
    STATIC_WHITE      = 6   # Static white light
    LOW_FLASH_RED     = 7   # Flashing red light (slow)
    LOW_FLASH_GREEN   = 8   # Flashing green light (slow)
    LOW_FLASH_BLUE    = 9   # Flashing blue light (slow)
    LOW_FLASH_CYAN    = 10  # Flashing cyan light (slow)
    LOW_FLASH_PURPLE  = 11  # Flashing purple light (slow)
    LOW_FLASH_YELLOW  = 12  # Flashing yellow light (slow)
    LOW_FLASH_WHITE   = 13  # Flashing white light (slow)
    FAST_FLASH_RED    = 14  # Flashing red light (fast)
    FAST_FLASH_GREEN  = 15  # Flashing green light (fast)
    FAST_FLASH_BLUE   = 16  # Flashing blue light (fast)
    FAST_FLASH_CYAN   = 17  # Flashing cyan light (fast)
    FAST_FLASH_PURPLE = 18  # Flashing purple light (fast)
    FAST_FLASH_YELLOW = 19  # Flashing yellow light (fast)
    FAST_FLASH_WHITE  = 20  # Flashing white light (fast)
Code example:
import sys
from functools import partial
import limxsdk.robot.Robot as Robot
import limxsdk.robot.RobotType as RobotType
import limxsdk.datatypes as datatypes

class RobotReceiver:

if __name__ == '__main__':
    # Create a Robot instance of type PointFoot
    robot = Robot(RobotType.PointFoot)

    robot_ip = "127.0.0.1"
    # Check if the command-line argument is provided as the robot IP
    if len(sys.argv) > 1:
        robot_ip = sys.argv[1]

    # Use robot_ip to initialize the robot
    if not robot.init(robot_ip):
        sys.exit()

    # Set the robot light effect as static right light
    robot.setRobotLightEffect(datatypes.LightEffect.STATIC_RED)
4.2.12 Reference Routines
- Reference routines of Python interfaces
5. High-Level Application Development Interface
5.1 Overview
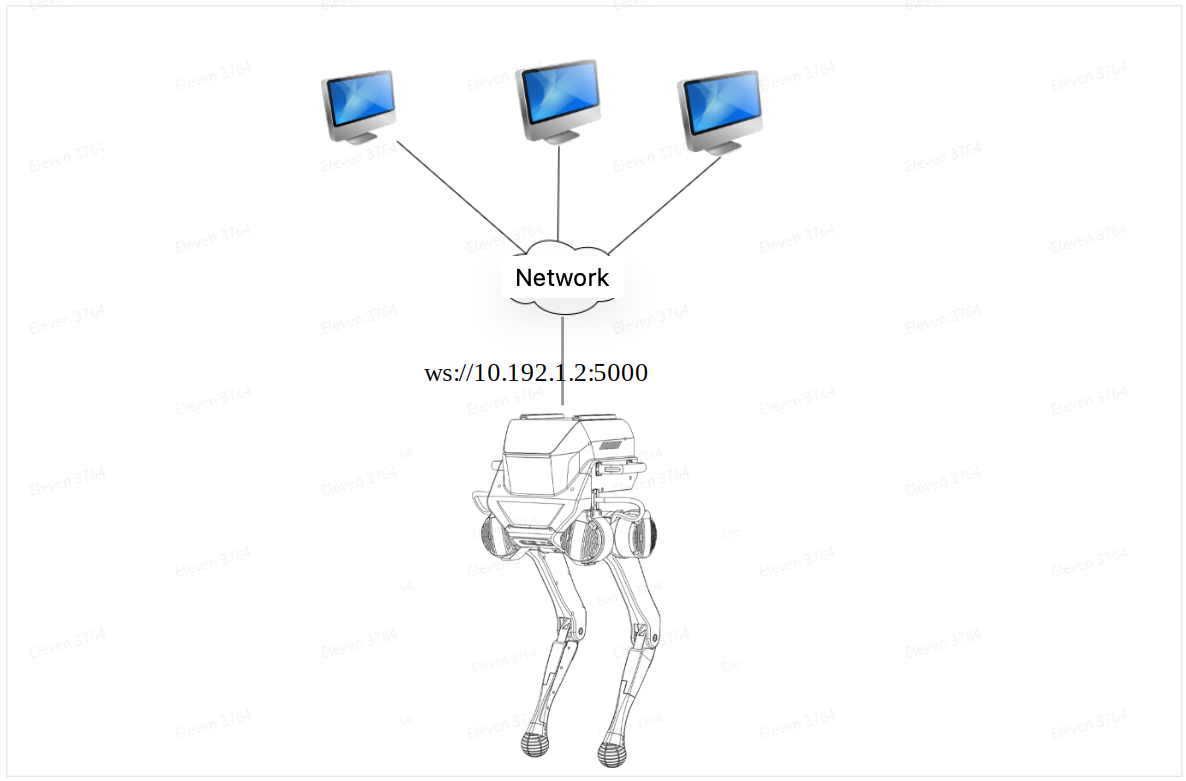
In Remote Control Mode, the robot receives user commands via WebSocket communication on port 5000. These commands include actions such as making the robot stand up, squat, or walk. WebSocket is a real-time communication protocol that establishes a persistent connection between the robot and the user client, enabling fast and efficient transmission of control information and data. As illustrated in the diagram below:
5.2 Communication Protocol Format
When the robot receives client commands via WebSocket, it uses a JSON-based data protocol for information exchange. This approach offers significant advantages: WebSocket is a full-duplex communication protocol that establishes a real-time, low-latency connection between the client and server, making it ideal for applications requiring frequent interactions. JSON, with its concise and highly readable structure, ensures intuitive and clear data transmission while offering cross-platform and cross-language compatibility. The combination of WebSocket and JSON not only transcends programming language constraints, making it suitable for various devices and systems, but also enhances development flexibility and ease of maintenance.
-
Request Data Format Includes the Following Fields:
-
accid:A unique identifier for the robot, representing its unique identity.; -
title:he message title, prefixed with"request_"; -
timestamp:Timestamp when the message was sent, in milliseconds; -
guid: A unique identifier for the command, used to distinguish between different requests. For synchronous interfaces, the guid value must be included in the "response_xxx" response message, so that the value can be returned to the client. After receiving the response message, the client can compare the guid values in the request and response to determine if the command has been completed. -
data:Contains the data content for the request command. Depending on specific requirements, it can include multiple subfields to store necessary data, such as parameters for actions or text content for messages. -
Example:
-
{
  "accid": "PF_TRON1A_042", # The unique serial number of the robot.
  "title": "request_xxx",   # The message title, prefixed with "`request_`".
  "timestamp": 1672373633989, # Timestamp when the message was sent, in milliseconds.
  "guid": "746d937cd8094f6a98c9577aaf213d98", # A unique identifier for the command, allowing differentiation between various command requests.
  "data": {}  # Contains the data content for the request.
}
-
-
Response Data Format Includes the Following Fields:
-
accid:A unique identifier for the robot, representing its unique identity; -
title:he message title, prefixed with"response_"; -
timestamp:Timestamp when the message was sent, in milliseconds; -
guid:Same asguidvalue in Request Data Format; -
data:At least one "result" subfield should be included to store the execution result data of the requested command. If necessary, additional subfields can also be included, such as error codes and error messages, to describe information about the operation result. -
Example:
-
{
  "accid": "PF_TRON1A_042",   # Robot's unique serial number, identifying its unique identity;
  "title": "response_xxx",  # The command name, prefixed with"`response_`"
  "timestamp": 1672373633989, # TTimestamp when the message was sent, in milliseconds;
  "guid": "746d937cd8094f6a98c9577aaf213d98", # Same as `guid` value with corresponding Request Data Format;
  "data": { # To store the specific data content of the response command.
    "result": "success"  # "result" Used to store whether the request command was successfully processed. Its value can be either: "success" or "fail_xxx".
  }
}
-
-
Message Push:
It refers to the process where the robot actively sends information to the client. This information may include the robot's serial number, current operational status, actions being performed, and other related data. By actively pushing this information to the client in a timely manner, the robot helps the client better understand its operational state, thereby enhancing the client's ability to utilize the services it provides.
The data format for message pushing includes the following fields:
-
accid:Robot's unique serial number, identifying its unique identity; -
title:The message title, prefixed with"notify_"; -
timestamp:Timestamp when the message was sent, in milliseconds; -
guid:Unique identifier for the message, to match responses; -
data:specific data related to the push message; -
example:
-
{
  "accid": "PF_TRON1A_042",   # Robot's unique serial number, identifying its unique identity;
  "title": "notify_xxx",  # he message title, prefixed with"`notify_`"
  "timestamp": 1672373633989, # Timestamp when the message was sent, in milliseconds;
  "guid": "746d937cd8094f6a98c9577aaf213d98", # Unique identifier for the message, to match responses;
  "data": { } # specific data related to the push message;
}
-
5.3 View Software Serial Number (ACCID)
- Connect to the Robot's Wireless Network:
- After powering on the robot, connect your personal computer to the robot's Wi-Fi. The network name typically follows the format "PF_TRON1A_xxx".
- Enter the Wi-Fi password:
12345678
- Open a browser and go to
http://10.192.1.2:8080to access the "Robot Information Page",where you can view the robot's details. As shown below, the displayed SN (serial number) on the page will bePF_TRON1A_131,andPF_TRON1A_131is the robot's software serial number (ACCID).。
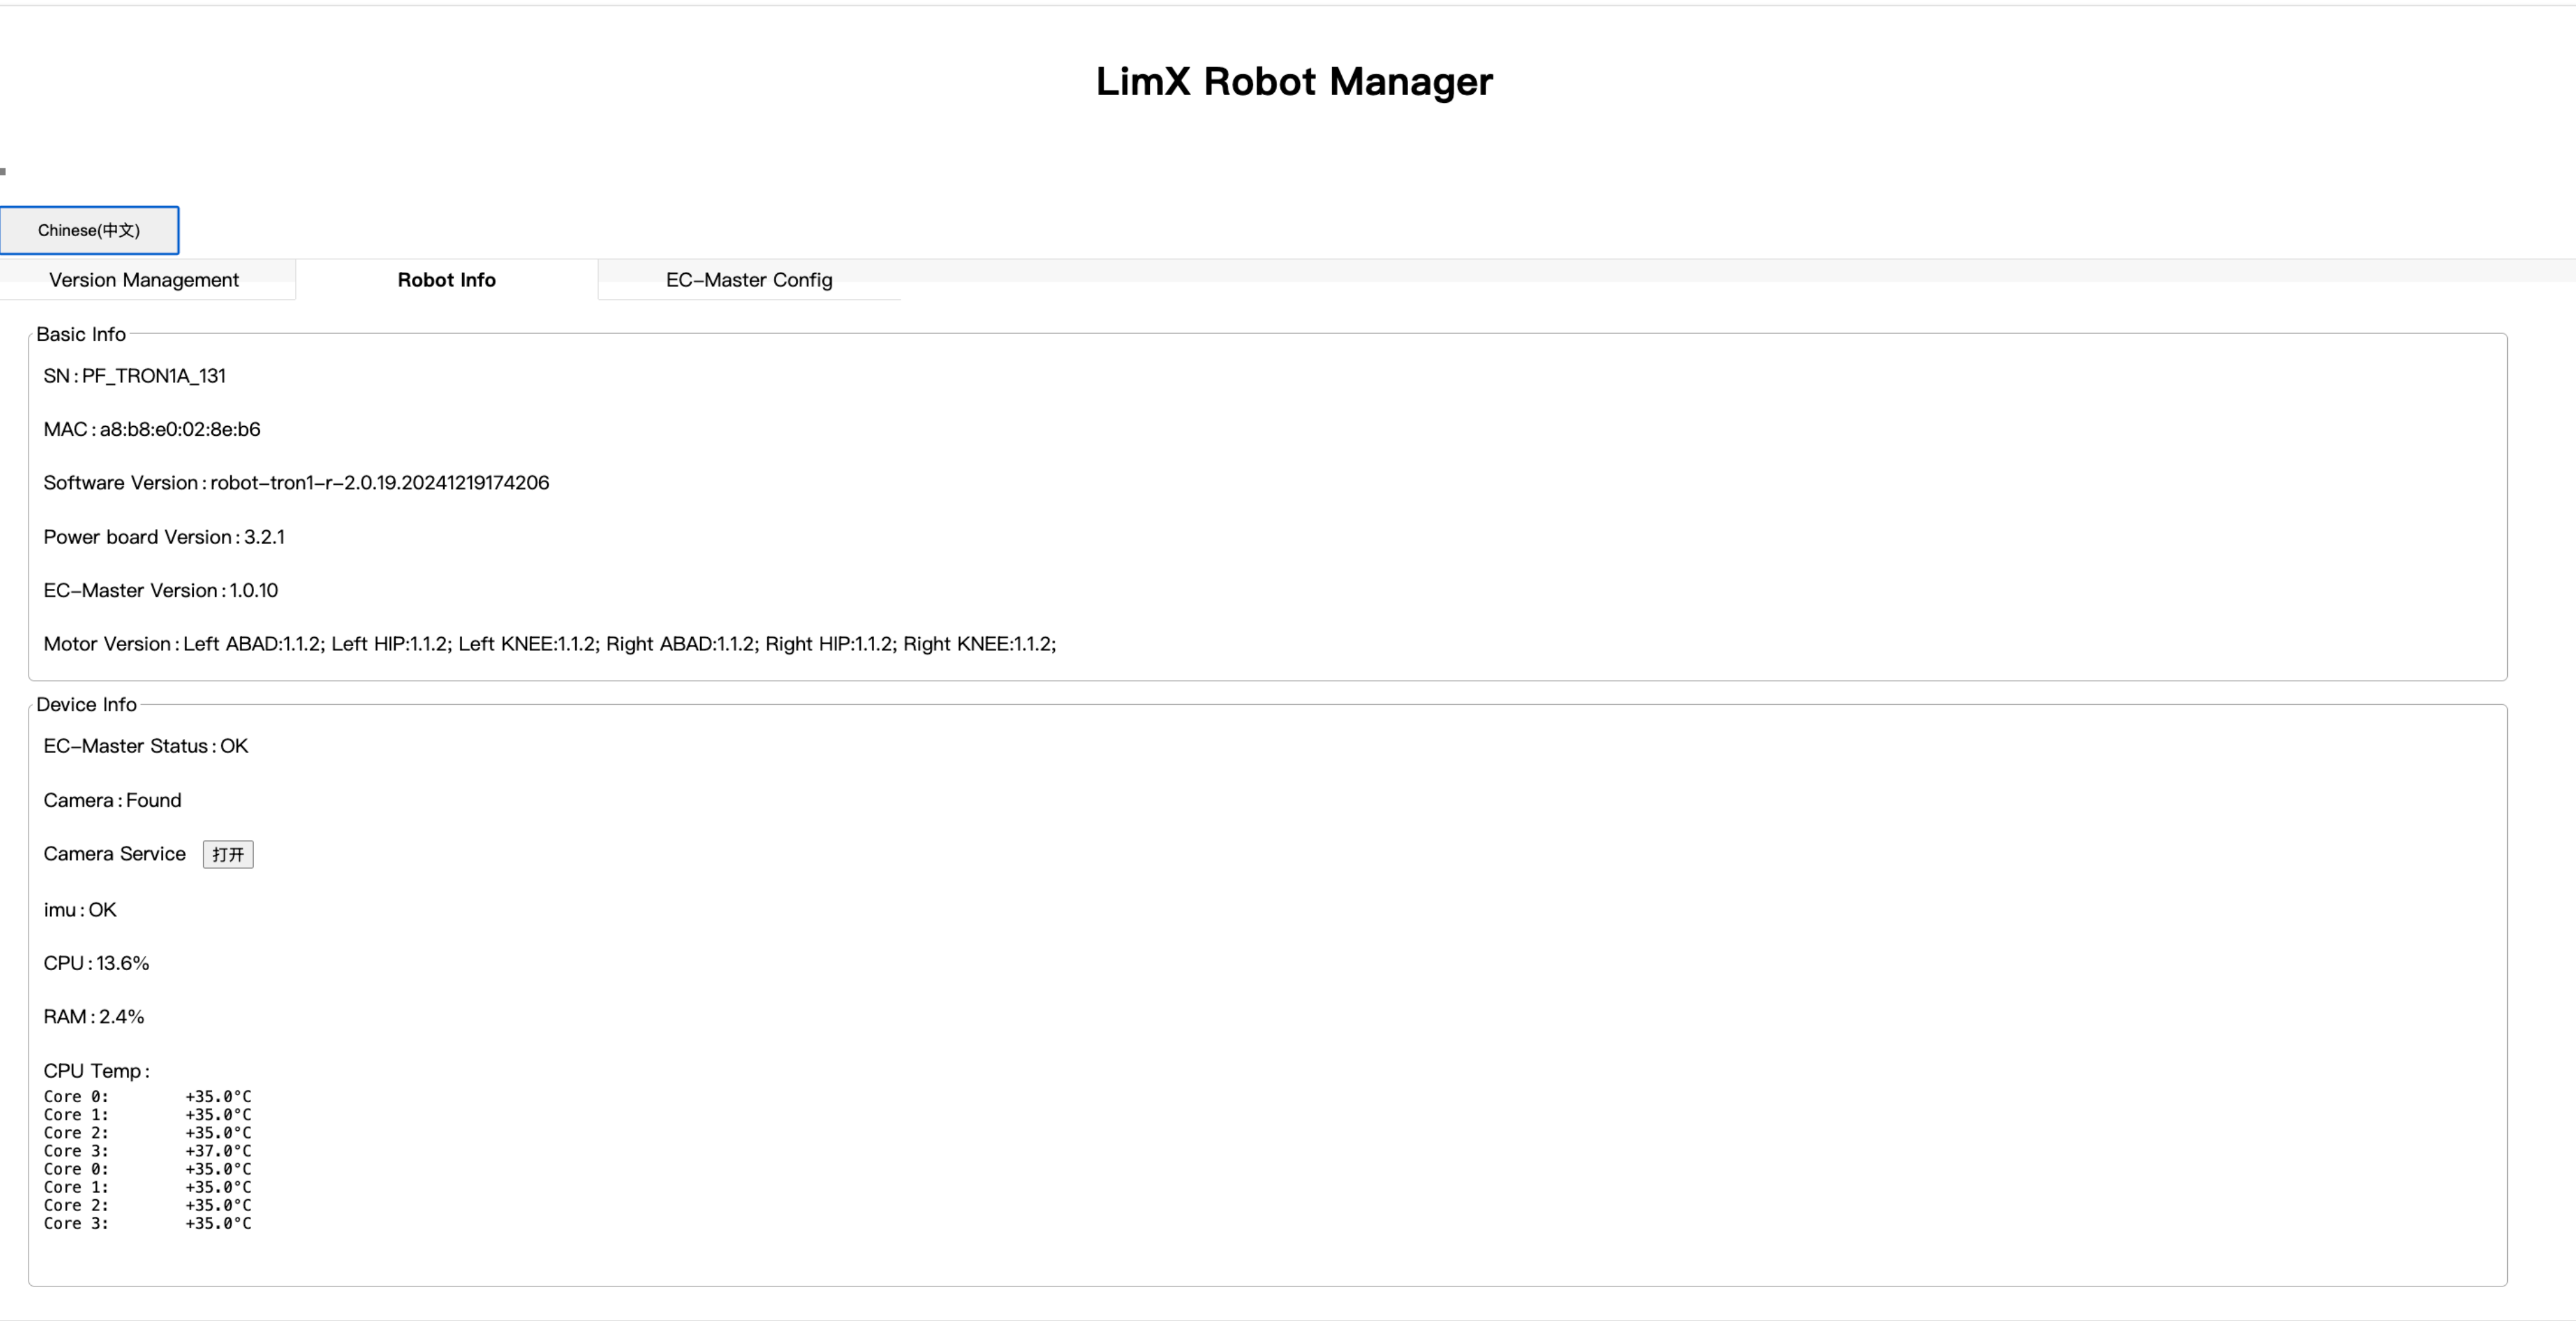
5.4 Communication Testing Method
Postman is a popular API development environment that can be used to test WebSocket interfaces. To test the WebSocket interface using Postman, follow the steps below:
- Install Postman:Download the installation file from:https://www.postman.com/downloads/?utm_source=postman-home;
- Open Postman and create a new WebSocket request.
- Connect to the Robot's Wireless Network:
- After powering on the robot, use your personal computer to connect to the robot's Wi-Fi. The network name typically follows the format "W P_TRON1A_xxx".
- Enter the Wi-Fi password:
12345678
- Enter the WebSocket Interface Address: In the request's URL field, input the WebSocket interface address, for example, ws://10.192.1.2:5000.
- nput the Command Request in the "Message" Field:
- Click the "Send" Button to send the command request;
- After sending the command, you can receive a response message from the server. Use Postman's response window to view the data returned by the server and check if it matches the expected result.
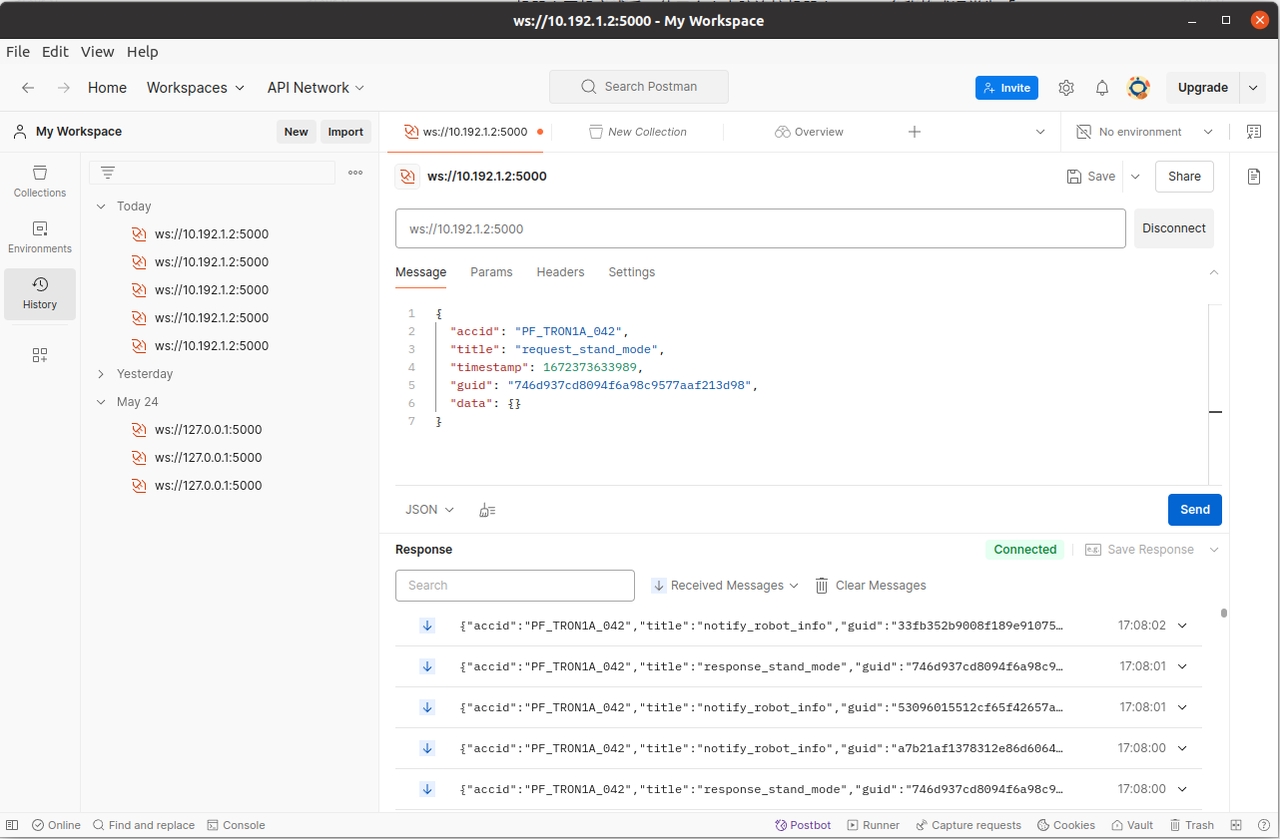
5.5 Protocol Interface Definition
该The robot interface design follows the same process and state transitions as the remote control, ensuring that the invocation order, response timing, and state transitions strictly align with the remote control's control logic. Users can experience a seamless interface interaction that mimics the intuitive operation of using a remote control. Additionally, the interface supports smooth switching between the remote control and the API, enabling a unified and stable robot control experience.
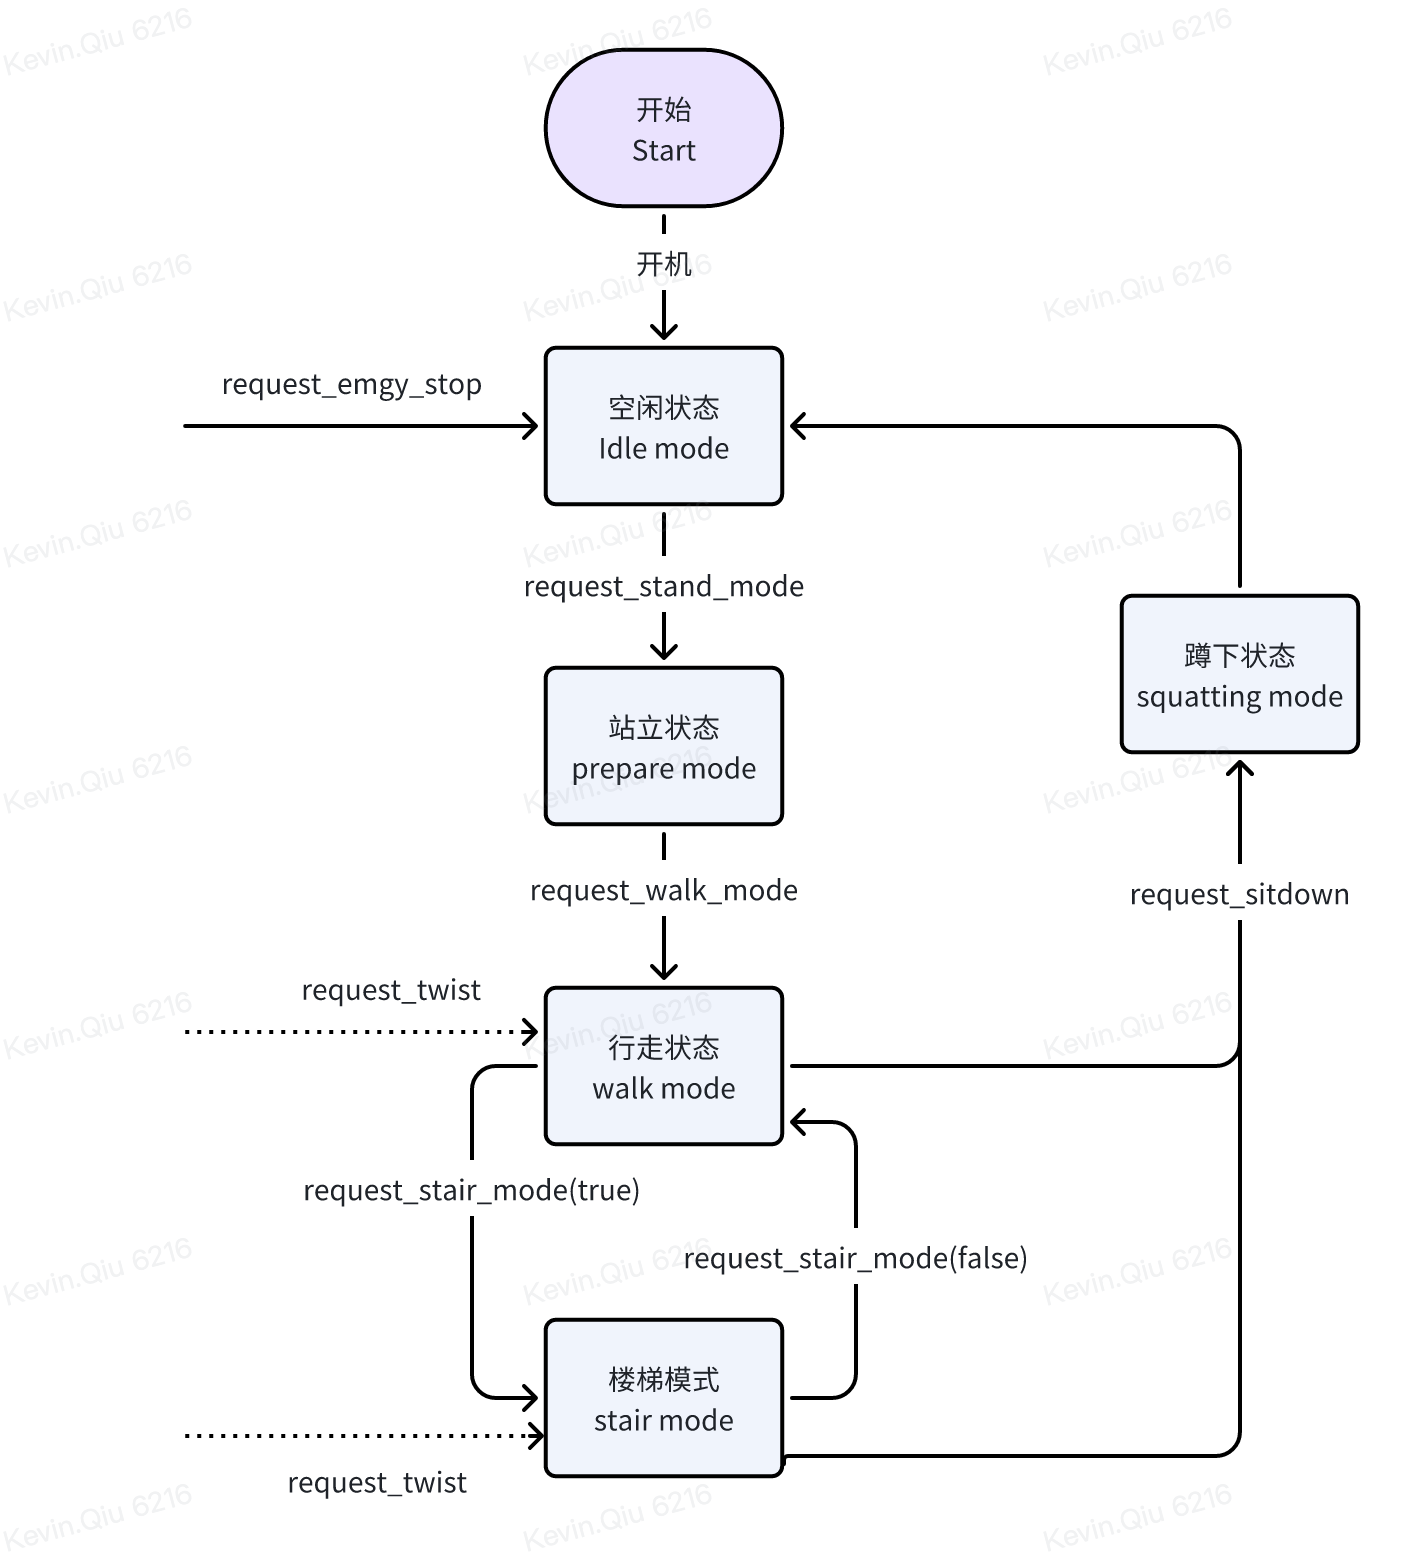
5.5.1 prepare mode
5.5.1.1 request:request_stand_mode
{
"accid": "PF_TRON1A_075",  // Robot serial number, please modify to your robot's serial number
"title": "request_stand_mode",
"timestamp": 1672373633989,
"guid": "746d937cd8094f6a98c9577aaf213d98",
"data": {
}
}
5.5.1.2 response:response_stand_mode
{
"accid": "PF_TRON1A_042",
"title": "response_stand_mode",
"timestamp": 1672373633989,
"guid": "746d937cd8094f6a98c9577aaf213d98",
"data": {
 "result": "success"
}
5.5.1.3 Message Push:notify_stand_mode
This message is actively pushed by the robot after the standing process either fails or completes.
{
"accid": "PF_TRON1A_042",
"title": "notify_stand_mode",
"timestamp": 1672373633989,
"guid": "746d937cd8094f6a98c9577aaf213d98",
"data": {
 "result": "success"
}
}
5.5.2 Waking mode
5.5.2.1 request:request_walk_mode
{
"accid": "PF_TRON1A_042",
"title": "request_walk_mode",
"timestamp": 1672373633989,
"guid": "746d937cd8094f6a98c9577aaf213d98",
"data": {
}
}
5.5.2.2 response:response_walk_mode
{
"accid": "PF_TRON1A_042",
"title": "response_walk_mode",
"timestamp": 1672373633989,
"guid": "746d937cd8094f6a98c9577aaf213d98",
"data": {
 "result": "success"
}
5.5.2.2 Message Push:notify_walk_mode
The robot actively pushes this message after the standing process either fails or completes.
{
"accid": "PF_TRON1A_042",
"title": "notify_walk_mode",
"timestamp": 1672373633989,
"guid": "746d937cd8094f6a98c9577aaf213d98",
"data": {
 "result": "success"
}
}
5.5.3 Control Walking
5.5.3.1 Request: request_twist
Please send commands at 30Hz or higher.
{
"accid": "PF_TRON1A_075",
"title": "request_twist",
"timestamp": 1672373633989,
"guid": "746d937cd8094f6a98c9577aaf213d98",
"data": {
 "x": 0.0,   // Forward/backward speed ratio, range [-1, 1]
 "y": 0.0,   // Lateral walking speed ratio, range [-1, 1]
 "z": 0.0    // Rotational angular velocity ratio, range [-1, 1]
}
}
5.5.3.2 response:none
5.5.3.3 message push:notify_twist
The robot actively pushes this message after the walking process is failed.
{
"accid": "PF_TRON1A_042",
"title": "notify_twist",
"timestamp": 1672373633989,
"guid": "746d937cd8094f6a98c9577aaf213d98",
"data": {
 "result": "fail_motor"  // fail_imu: IMU 错误, fail_motor: 电机错误
}
}
5.5.4 Adjust Robot Height
5.5.4.1 Request: request_base_height
{
"accid": "PF_TRON1A_042",
"title": "request_base_height",
"timestamp": 1672373633989,
"guid": "746d937cd8094f6a98c9577aaf213d98",
"data": {
 "direction": -1  // 1: Increase height, -1: Decrease height
                  // Each call to this request increases or decreases the robot's height by 5cm
}
}
5.5.4.2 Response: response_base_height
{
"accid": "PF_TRON1A_042",
"title": "response_base_height",
"timestamp": 1672373633989,
"guid": "746d937cd8094f6a98c9577aaf213d98",
"data": {
 "result": "success"  // success: Successful, fail_status: Indicates the robot's current state does not allow height adjustment
}
}
5.5.4.3 Push Notification: None
5.5.5 Sit Down
5.5.5.1 Request: request_sitdown
{
"accid": "PF_TRON1A_042",
"title": "request_sitdown",
"timestamp": 1672373633989,
"guid": "746d937cd8094f6a98c9577aaf213d98",
"data": {}
}
5.5.5.2 Response: response_sitdown
{
"accid": "PF_TRON1A_042",
"title": "response_sitdown",
"timestamp": 1672373633989,
"guid": "746d937cd8094f6a98c9577aaf213d98",
"data": {
 "result": "success"  // success: 成功, fail_imu: IMU 错误, fail_motor: 电机错误
}
}
5.5.5.3 message push:notify_sitdown
The robot actively pushes this message after the process is failed.
{
"accid": "PF_TRON1A_042",
"title": "notify_sitdown",
"timestamp": 1672373633989,
"guid": "746d937cd8094f6a98c9577aaf213d98",
"data": {
 "result": "success"  // success: 成功, fail_imu: IMU 错误, fail_motor: 电机错误
}
}
5.5.6 Enable Stair Mode
5.5.6.1 request:request_stair_mode
This function is only applicable to TRON1 in Wheel-foot mode.
{
"accid": "PF_TRON1A_042",
"title": "request_stair_mode",
"timestamp": 1672373633989,
"guid": "746d937cd8094f6a98c9577aaf213d98",
"data": {
   "enable": true  // true: Start stair mode, false: end stair mode
}
}
5.5.6.2 response:response_stair_mode
{
"accid": "PF_TRON1A_042",
"title": "response_stair_mode",
"timestamp": 1672373633989,
"guid": "746d937cd8094f6a98c9577aaf213d98",
"data": {
 "result": "success"  // success: 成功, fail_imu: IMU 错误, fail_motor: 电机错误
}
}
5.5.6.3 message push:none
5.5.7 Enable Marktime Mode
5.5.7.1 Request: request_marktime_mode
This function is only applicable to TRON1 biped robots.
{
"accid": "PF_TRON1A_042",
"title": "request_marktime_mode",
"timestamp": 1672373633989,
"guid": "746d937cd8094f6a98c9577aaf213d98",
"data": {
   "enable": true  // true: Enable marktime mode, false: Disable marktime mode
}
}
5.5.7.2 Response: response_marktime_mode
{
"accid": "PF_TRON1A_042",
"title": "response_marktime_mode",
"timestamp": 1672373633989,
"guid": "746d937cd8094f6a98c9577aaf213d98",
"data": {
 "result": "success"  // success: Successful, fail_imu: IMU error, fail_motor: Motor error
}
}
5.5.7.3 Push Notification: none
5.5.8 Emergency Stop
5.5.8.1 Request: request_emgy_stop
{
"accid": "PF_TRON1A_042",
"title": "request_emgy_stop",
"timestamp": 1672373633989,
"guid": "746d937cd8094f6a98c9577aaf213d98",
"data": {}
}
5.5.8.2 Response: response_emgy_stop
{
"accid": "PF_TRON1A_042",
"title": "response_emgy_stop",
"timestamp": 1672373633989,
"guid": "746d937cd8094f6a98c9577aaf213d98",
"data": {
 "result": "success"  // success: Successful, fail_imu: IMU error, fail_motor: Motor error
}
}
5.5.8.3 Push Notification: none
5.5.9 Enable Odometry
5.5.9.1 Request: request_enable_odom
This function is used to enable odometry pushing. Once enabled, the system will actively push odometry data (Note: Only wheel-legged robots have odometry).
{
"accid": "PF_TRON1A_042",
"title": "request_enable_odom",
"timestamp": 1672373633989,
"guid": "746d937cd8094f6a98c9577aaf213d98",
"data": {
   "enable": true  // true: Enable odometry, false: Disable odometry
}
}
5.5.9.2 Response: response_enable_odom
{
"accid": "PF_TRON1A_042",
"title": "response_enable_odom",
"timestamp": 1672373633989,
"guid": "746d937cd8094f6a98c9577aaf213d98",
"data": {
 "result": "success"  // success: Successful, fail_odom: Not supported
}
}
5.5.9.3 Push Notification: notify_odom
After enabling odometry, the system will actively push messages containing odometry data.
{
"accid": "PF_TRON1A_042",
"title": "notify_odom",
"timestamp": 1672373633989,
"guid": "746d937cd8094f6a98c9577aaf213d98",
"data": {
   "pose_orientation": [0.0, 0.0, 0.0, 0.0], // Pose [x, y, z, w]
   "pose_position": [0.0, 0.0, 0.0],         // Position [x, y, z] in m
   "twist_linear": [0.0, 0.0, 0.0],          // Linear velocity [x, y, z] in m/s
   "twist_angular": [0.0, 0.0, 0.0]          // Angular velocity [x, y, z] in rad/s
}
}
5.5.10 Enable IMU Data
5.5.10.1 Request: request_enable_imu
This function is used to enable IMU data pushing. Once enabled, the system will actively push IMU data.
{
"accid": "PF_TRON1A_042",
"title": "request_enable_imu",
"timestamp": 1672373633989,
"guid": "746d937cd8094f6a98c9577aaf213d98",
"data": {
   "enable": true  // true: Enable IMU, false: Disable IMU
}
}
5.5.10.2 Response: response_enable_imu
{
"accid": "PF_TRON1A_042",
"title": "response_enable_imu",
"timestamp": 1672373633989,
"guid": "746d937cd8094f6a98c9577aaf213d98",
"data": {
 "result": "success"  // success: Successful, fail_imu: IMU error
}
}
5.5.10.3 Push Notification: notify_imu
After enabling IMU data, the system will actively push messages containing IMU status.
{
"accid": "PF_TRON1A_042",
"title": "notify_imu",
"timestamp": 1672373633989,
"guid": "746d937cd8094f6a98c9577aaf213d98",
"data": {
   "euler": [0.0, 0.0, 0.0],     // Euler angles [roll, pitch, yaw] in degrees
   "acc": [0.0, 0.0, 0.0],       // Acceleration [x, y, z] in m/s²
   "gyro": [0.0, 0.0, 0.0],      // Gyroscope angular velocity [x, y, z] in rad/s
   "quat": [0.0, 0.0, 0.0, 0.0]  // Quaternion [w, x, y, z]
}
}
5.5.11 Fall Recovery
5.5.11.1 Request: request_recover
When the robot falls over, this interface can be called to make the robot automatically get up and return to walking mode.
{
"accid": "PF_TRON1A_042",
"title": "request_recover",
"timestamp": 1672373633989,
"guid": "746d937cd8094f6a98c9577aaf213d98",
"data": {}
}
5.5.11.2 Response: response_recover
{
"accid": "PF_TRON1A_042",
"title": "response_recover",
"timestamp": 1672373633989,
"guid": "746d937cd8094f6a98c9577aaf213d98",
"data": {
 "result": "success"  // success: Command received successfully, starting recovery, fail_no_fallover: Not fallen over
}
}
5.5.11.3 Push Notification: notify_recover
This message is pushed after the recovery process is completed.
{
"accid": "PF_TRON1A_042",
"title": "notify_recover",
"timestamp": 1672373633989,
"guid": "746d937cd8094f6a98c9577aaf213d98",
"data": {
   "result": "success"  // success: Recovery successful, fail_recover: Recovery failed
}
}
5.5.12 Light Effect
5.5.12.1 Request: request_light_effect
This interface is used to set the robot's light effect. Users can send specific light effect commands to the robot through this interface, and the robot will adjust its light display according to the commands.
{
"accid": "PF_TRON1A_042",
"title": "request_light_effect",
"timestamp": 1672373633989,
"guid": "746d937cd8094f6a98c9577aaf213d98",
"data": {
   "effect": 1
}
}
Request Parameter Description:
| Parameter Name | Type | Description |
|---|---|---|
| data.effect | Number | Light effect number, corresponding to different light display modes, with the following mapping: 1: STATIC_RED (Static red) 2: STATIC_GREEN (Static green) 3: STATIC_BLUE (Static blue) 4: STATIC_CYAN (Static cyan) 5: STATIC_PURPLE (Static purple) 6: STATIC_YELLOW (Static yellow) 7: STATIC_WHITE (Static white) 8: LOW_FLASH_RED (Low frequency flashing red) 9: LOW_FLASH_GREEN (Low frequency flashing green) 10: LOW_FLASH_BLUE (Low frequency flashing blue) 11: LOW_FLASH_CYAN (Low frequency flashing cyan) 12: LOW_FLASH_PURPLE (Low frequency flashing purple) 13: LOW_FLASH_YELLOW (Low frequency flashing yellow) 14: LOW_FLASH_WHITE (Low frequency flashing white) 15: FAST_FLASH_RED (High frequency flashing red) 16: FAST_FLASH_GREEN (High frequency flashing green) 17: FAST_FLASH_BLUE (High frequency flashing blue) 18: FAST_FLASH_CYAN (High frequency flashing cyan) 19: FAST_FLASH_PURPLE (High frequency flashing purple) 20: FAST_FLASH_YELLOW (High frequency flashing yellow) 21: FAST_FLASH_WHITE (High frequency flashing white) |
5.5.12.2 Response: response_light_effect
{
"accid": "PF_TRON1A_042",
"title": "response_light_effect",
"timestamp": 1672373633989,
"guid": "746d937cd8094f6a98c9577aaf213d98",
"data": {
 "result": "success"  // success: Successful, fail_light_effect: Failed
}
}
5.5.12.3 Push Notification: none
5.5.13 Global Messages
5.5.13.1 Robot Basic Information
The robot's basic information is reported once per second, including the following:
- accid: Robot's serial number
- title: notify_robot_info
- timestamp: Timestamp when the message was sent, in milliseconds
- guid: Unique identifier for the message
- data: Contains the message content, example as follows:
{
  "accid": "PF_TRON1A_042",
  "title": "notify_robot_info",
  "timestamp": 1672373633989,
  "guid": "746d937cd8094f6a98c9577aaf213d98",
  "data": {
    "accid": "PF_TRON1A_042",
    "sw_version": "robot-tron1-2.0.10.20241111103012",
    "imu": "OK",    # Robot IMU diagnostic information
    "camera": "OK", # Robot camera diagnostic information
    "motor": "OK",  # Robot motor diagnostic information
    "battery": 95,  # Robot battery level
    "status": "WALK" # Robot operating mode
  }
}
| Field | Description |
|---|---|
| accid | Robot serial number |
| sw_version | Robot software version information |
| imu | Robot IMU diagnostic information |
| camera | Robot camera diagnostic information |
| motor | Robot motor diagnostic information |
| battery | Robot battery level |
| status | Robot operating mode: STAND, WALK, SIT, DAMPING, ROTATE, STAIR, ERROR_FALLOVER (fallen), RECOVER (recovering from fall), ERROR_RECOVER (fall recovery failed) |
5.5.13.2 Illegal command message
When the robot receives a request instruction in an illegal format, it sends this message, which contains the following:
- accid: Robot's serial number
- title: notify_invalid_request
- timestamp: Timestamp when the message was sent, in milliseconds
- guid: Unique identifier for the message
- data: Contains the message content
Example:
{
  "accid": "PF_TRON1A_042",
  "title": "notify_invalid_request",
  "timestamp": 1672373633989,
  "guid": "746d937cd8094f6a98c9577aaf213d98",
  "data": "Returns the original request instruction content to facilitate client troubleshooting"
}
5.6 Protocol interface call example
5.6.1 Linux C++ Example
-
Installation dependencies: Taking Ubuntu 20.04 system as an example, install websocketpp, nlohmann/json and boost dependencies:
-
sudo apt-get install libboost-all-dev libwebsocketpp-dev nlohmann-json3-dev -
Compile code
-
g++ -std=c++11 -o websocket_client websocket_client.cpp -lssl -lcrypto -lboost_system -lpthread -
Run program
-
./websocket_client -
websocket_client.cpp
-
#include <iostream>
#include <atomic>
#include <string>
#include <thread>
#include <chrono>
#include <websocketpp/client.hpp>
#include <websocketpp/config/asio.hpp>
#include <nlohmann/json.hpp>
#include <boost/uuid/uuid.hpp>
#include <boost/uuid/uuid_generators.hpp>
#include <boost/uuid/uuid_io.hpp>

using json = nlohmann::json;
using websocketpp::client;
using websocketpp::connection_hdl;

// Replace this ACCID value with your robot's actual serial number (SN)
static std::string ACCID = "";

// WebSocket client instance
static client<websocketpp::config::asio> ws_client;

// Atomic flag for graceful exit
static std::atomic<bool> should_exit(false);

// Connection handle for sending messages
static connection_hdl current_hdl;

// Generate dynamic GUID
static std::string generate_guid() {
    boost::uuids::random_generator gen;
    boost::uuids::uuid u = gen();
    return boost::uuids::to_string(u);
}

// Send WebSocket request with title and data
static void send_request(const std::string& title, const json& data = json::object()) {
    json message;

    // Adding necessary fields to the message
    message["accid"] = ACCID;
    message["title"] = title;
    message["timestamp"] = std::chrono::duration_cast<std::chrono::milliseconds>(
                                std::chrono::system_clock::now().time_since_epoch()).count();
    message["guid"] = generate_guid();
    message["data"] = data;

    std::string message_str = message.dump();

    // Send the message through WebSocket
    ws_client.send(current_hdl, message_str, websocketpp::frame::opcode::text);
}

// Handle user commands
static void handle_commands() {
    while (!should_exit) {
        std::string command;
        std::cout << "Enter command ('stand', 'walk', 'twist', 'sit', 'stair', 'stop', 'imu') or 'exit' to quit:" << std::endl;
        std::getline(std::cin, command);  // Read user input

        if (command == "exit") {
            should_exit = true;  // Exit flag to stop the loop
            break;
        } else if (command == "stand") {
            send_request("request_stand_mode");  // Send stand mode request
        } else if (command == "walk") {
            send_request("request_walk_mode");  // Send walk mode request
        } else if (command == "twist") {
            float x, y, z;
            std::cout << "Enter x, y, z values:" << std::endl;
            std::cin >> x >> y >> z;  // Get twist values from user
            send_request("request_twist", {{"x", x}, {"y", y}, {"z", z}});
        } else if (command == "sit") {
            send_request("request_sitdown");  // Send sit down request
        } else if (command == "stair") {
            bool enable;
            std::cout << "Enable stair mode (true/false):" << std::endl;
            std::cin >> enable;  // Get stair mode enable flag from user
            send_request("request_stair_mode", {{"enable", enable}});
        } else if (command == "stop") {
            send_request("request_emgy_stop");  // Send emergency stop request
        } else if (command == "imu") {
            std::string enable;
            std::cout << "Enable IMU (true/false):" << std::endl;
            std::cin >> enable;  // Get IMU enable flag from user
            send_request("request_enable_imu", {{"enable", enable == "true" ? true : false}});
        }
    }
}

// WebSocket open callback
static void on_open(connection_hdl hdl) {
    std::cout << "Connected!" << std::endl;

    // Save connection handle for sending messages later
    current_hdl = hdl;

    // Start handling commands in a separate thread
    std::thread(handle_commands).detach();
}

// WebSocket message callback
static void on_message(connection_hdl hdl, client<websocketpp::config::asio>::message_ptr msg) {
  // Parse JSON data from message payload
  json data = json::parse(msg->get_payload());

  // Extract 'accid' field if present
  if (data.contains("accid") && data["accid"].is_string() && ACCID.empty()) {
      ACCID = data["accid"].get<std::string>();
  }


    std::cout << "Received: " << msg->get_payload() << std::endl;  // Print received message
}

// WebSocket close callback
static void on_close(connection_hdl hdl) {
    std::cout << "Connection closed." << std::endl;
}

// Close WebSocket connection
static void close_connection(connection_hdl hdl) {
    ws_client.close(hdl, websocketpp::close::status::normal, "Normal closure");  // Close connection normally
}

int main() {
    ws_client.init_asio();  // Initialize ASIO for WebSocket client

    // Set WebSocket event handlers
    ws_client.set_open_handler(&on_open);  // Set open handler
    ws_client.set_message_handler(&on_message);  // Set message handler
    ws_client.set_close_handler(&on_close);  // Set close handler

    std::string server_uri = "ws://10.192.1.2:5000";  // WebSocket server URI

    websocketpp::lib::error_code ec;
    client<websocketpp::config::asio>::connection_ptr con = ws_client.get_connection(server_uri, ec);  // Get connection pointer

    if (ec) {
        std::cout << "Error: " << ec.message() << std::endl;
        return 1;  // Exit if connection error occurs
    }

    connection_hdl hdl = con->get_handle();  // Get connection handle
    ws_client.connect(con);  // Connect to server
    std::cout << "Press Ctrl+C to exit." << std::endl;

    // Run the WebSocket client loop
    ws_client.run();

    return 0;
}
5.6.2 Python Example
-
Environment preparation: Taking Ubuntu 20.04 system as an example, install the following dependencies
-
sudo apt install python3-dev python3-pip sudo pip3 install websocket-client -
run script
-
python3 websocket_client.py -
websocket_client.py
-
import json
import uuid
import threading
import time
import websocket
from datetime import datetime

# Replace this ACCID value with your robot's actual serial number (SN)
ACCID = None

# Atomic flag for graceful exit
should_exit = False

# WebSocket client instance
ws_client = None

# Generate dynamic GUID
def generate_guid():
    return str(uuid.uuid4())

# Send WebSocket request with title and data
def send_request(title, data=None):
    if data is None:
        data = {}

    # Create message structure with necessary fields
    message = {
        "accid": ACCID,
        "title": title,
        "timestamp": int(time.time() * 1000),  # Current timestamp in milliseconds
        "guid": generate_guid(),
        "data": data
    }

    message_str = json.dumps(message)

    # Send the message through WebSocket if client is connected
    if ws_client:
        ws_client.send(message_str)

# Handle user commands
def handle_commands():
    global should_exit
    while not should_exit:
        command = input("Enter command ('stand', 'walk', 'twist', 'sit', 'stair', 'stop', 'imu') or 'exit' to quit:\n")

        if command == "exit":
            should_exit = True  # Set exit flag to stop the loop
            break
        elif command == "stand":
            send_request("request_stand_mode")  # Send stand mode request
        elif command == "walk":
            send_request("request_walk_mode")  # Send walk mode request
        elif command == "twist":
            # Get twist values from user
            x = float(input("Enter x value:"))
            y = float(input("Enter y value:"))
            z = float(input("Enter z value:"))
            send_request("request_twist", {"x": x, "y": y, "z": z})
        elif command == "sit":
            send_request("request_sitdown")  # Send sit down request
        elif command == "stair":
            # Get stair mode enable flag from user
            enable = input("Enable stair mode (true/false):").strip().lower() == 'true'
            send_request("request_stair_mode", {"enable": enable})
        elif command == "stop":
            send_request("request_emgy_stop")  # Send emergency stop request
        elif command == "imu":
            # Get IMU enable flag from user
            enable = input("Enable IMU (true/false):").strip().lower() == 'true'
            send_request("request_enable_imu", {"enable": enable})

# WebSocket on_open callback
def on_open(ws):
    print("Connected!")
    # Start handling commands in a separate thread
    threading.Thread(target=handle_commands, daemon=True).start()

# WebSocket on_message callback
def on_message(ws, message):
    print(f"Received message: {message}")  # Print the received message

# WebSocket on_close callback
def on_close(ws, close_status_code, close_msg):
    print("Connection closed.")

# Close WebSocket connection
def close_connection(ws):
    ws.close()

def main():
    global ws_client

    # Create WebSocket client instance
    ws_client = websocket.WebSocketApp(
        "ws://10.192.1.2:5000",  # WebSocket server URI
        on_open=on_open,
        on_message=on_message,
        on_close=on_close
    )

    # Run WebSocket client loop
    print("Press Ctrl+C to exit.")
    ws_client.run_forever()

if __name__ == "__main__":
    main()
5.6.3 JavaScript Example
-
HTML page: To interact with the user, you can add an input box in the HTML page where the user can enter commands. The following is the index.html implementation:
-
<!DOCTYPE html> <html lang="en"> <head> <meta charset="UTF-8"> <meta name="viewport" content="width=device-width, initial-scale=1.0"> <title>WebSocket Robot Control</title> <style> #commandInput { width: 400px; /* Adjust the width to make it wider */ padding: 10px; font-size: 14px; } </style> </head> <body> <h2>Robot Control Commands</h2> <input type="text" id="commandInput" placeholder="Enter command ('stand', 'walk', 'twist', 'sit', 'stair', 'stop', 'imu')"> <p>Type a command and press Enter.</p> <script src="robotControl.js"></script> </body> </html> -
robotControl.js 实现:
-
// Replace this ACCID value with your robot's actual serial number (SN) let ACCID = ""; // WebSocket client instance let wsClient = null; // Generate dynamic GUID function generateGuid() { return 'xxxxxxxx-xxxx-4xxx-yxxx-xxxxxxxxxxxx'.replace(/[xy]/g, function(c) { const r = Math.random() * 16 | 0, v = c === 'x' ? r : (r & 0x3 | 0x8); return v.toString(16); }); } // Send WebSocket request with title and data function sendRequest(title, data = {}) { const message = { accid: ACCID, title: title, timestamp: Date.now(), // Current timestamp in milliseconds guid: generateGuid(), data: data }; // Send the message through WebSocket if client is connected if (wsClient && wsClient.readyState === WebSocket.OPEN) { wsClient.send(JSON.stringify(message)); } } // Handle user commands function handleCommands() { const commandInput = document.getElementById('commandInput'); commandInput.addEventListener('keydown', function(event) { if (event.key === 'Enter') { const command = commandInput.value.trim(); commandInput.value = ''; // Clear input field switch (command) { case 'stand': sendRequest('request_stand_mode'); break; case 'walk': sendRequest('request_walk_mode'); break; case 'twist': const x = parseFloat(prompt("Enter x value:")); const y = parseFloat(prompt("Enter y value:")); const z = parseFloat(prompt("Enter z value:")); sendRequest('request_twist', {"x": x, "y": y, "z": z}); break; case 'sit': sendRequest('request_sitdown'); break; case 'stair': const enableStair = prompt("Enable stair mode (true/false):").toLowerCase() === 'true'; sendRequest('request_stair_mode', {"enable": enableStair}); break; case 'stop': sendRequest('request_emgy_stop'); break; case 'imu': const enableImu = prompt("Enable IMU (true/false):").toLowerCase() === 'true'; sendRequest('request_enable_imu', {"enable": enableImu}); break; case 'exit': wsClient.close(); break; default: alert("Invalid command. Try again."); } } }); } // WebSocket onOpen callback function onOpen() { console.log("Connected!"); handleCommands(); } // WebSocket onMessage callback function onMessage(event) { console.log("Received message:", event.data); const message = JSON.parse(event.data); if (!ACCID && message.accid) { ACCID = message.accid; console.log(`ACCID set to: ${ACCID}`); } } // WebSocket onClose callback function onClose(event) { console.log("Connection closed."); } // Initialize WebSocket client function initWebSocket() { // Replace this URL with your WebSocket server URI wsClient = new WebSocket('ws://10.192.1.2:5000'); wsClient.onopen = onOpen; wsClient.onmessage = onMessage; wsClient.onclose = onClose; console.log("Press Ctrl+C to exit."); } // Start WebSocket connection when the page loads window.onload = initWebSocket; -
Example Run program
- Save the
index.htmlandrobotControl.jsfiles to the same directory, then openindex.htmlin a browser and run it. You can view the received detailed information through the browser's developer tools. 
- Save the
5.6.4 Go Example
-
First you need to install the
gorilla/websocketpackage: -
go get github.com/gorilla/websocket -
The Go implementation code is as follows:
-
package main

import (
        "encoding/json"
        "fmt"
        "github.com/gorilla/websocket"
        "time"
        "strings"
        "github.com/google/uuid"
)

// Global variables
var wsClient *websocket.Conn
var shouldExit bool

// Replace with your robot's serial number
var ACCID = ""

// Generate dynamic GUID
func generateGUID() string {
        return uuid.New().String()
}

// Send WebSocket request with title and data
func sendRequest(title string, data map[string]interface{}) {
        if data == nil {
                data = make(map[string]interface{})
        }

        message := map[string]interface{}{
                "accid":    ACCID,
                "title":    title,
                "timestamp": time.Now().UnixMilli(),
                "guid":     generateGUID(),
                "data":     data,
        }

        messageBytes, err := json.Marshal(message)
        if err != nil {
                fmt.Println("Error marshaling message:", err)
                return
        }

        // Send the message through WebSocket if client is connected
        if wsClient != nil {
                err = wsClient.WriteMessage(websocket.TextMessage, messageBytes)
                if err != nil {
                        fmt.Println("Error sending message:", err)
                }
        }
}

// Handle user commands
func handleCommands() {
        var command string
        for !shouldExit {
                fmt.Println("Enter command ('stand', 'walk', 'twist', 'sit', 'stair', 'stop', 'imu') or 'exit' to quit:")
                fmt.Scanln(&command)

                command = strings.TrimSpace(command)
                switch command {
                case "exit":
                        shouldExit = true
                        return
                case "stand":
                        sendRequest("request_stand_mode", nil)
                case "walk":
                        sendRequest("request_walk_mode", nil)
                case "twist":
                        var x, y, z float64
                        fmt.Println("Enter x value:")
                        fmt.Scanln(&x)
                        fmt.Println("Enter y value:")
                        fmt.Scanln(&y)
                        fmt.Println("Enter z value:")
                        fmt.Scanln(&z)
                        sendRequest("request_twist", map[string]interface{}{"x": x, "y": y, "z": z})
                case "sit":
                        sendRequest("request_sitdown", nil)
                case "stair":
                        var enable bool
                        fmt.Println("Enable stair mode (true/false):")
                        var input string
                        fmt.Scanln(&input)
                        enable = strings.ToLower(input) == "true"
                        sendRequest("request_stair_mode", map[string]interface{}{"enable": enable})
                case "stop":
                        sendRequest("request_emgy_stop", nil)
                case "imu":
                        var enable bool
                        fmt.Println("Enable IMU (true/false):")
                        var input string
                        fmt.Scanln(&input)
                        enable = strings.ToLower(input) == "true"
                        sendRequest("request_enable_imu", map[string]interface{}{"enable": enable})
                }
        }
}

// WebSocket onOpen callback
func onOpen(ws *websocket.Conn) {
        fmt.Println("Connected!")
        wsClient = ws
        go handleCommands()
}

// WebSocket onMessage callback
func onMessage(ws *websocket.Conn, message []byte) {
        fmt.Println("Received message:", string(message))

        if ACCID == "" {
                var msgMap map[string]interface{}
                if err := json.Unmarshal(message, &msgMap); err != nil {
                        fmt.Println("Error parsing message:", err)
                        return
                }
                ACCID = msgMap["accid"].(string)
                fmt.Printf("ACCID initialized from server: %s\n", ACCID)
        }
}

// WebSocket onClose callback
func onClose(ws *websocket.Conn, code int, text string) {
        fmt.Println("Connection closed. Code:", code, "Message:", text)
}

// Connect to the WebSocket server
func connectWebSocket() {
        url := "ws://10.192.1.2:5000" // WebSocket server URI

        conn, _, err := websocket.DefaultDialer.Dial(url, nil)
        if err != nil {
                fmt.Println("Error connecting to WebSocket server:", err)
                return
        }

        onOpen(conn)

        // Start receiving messages from the server
        go func() {
                for {
                        _, message, err := conn.ReadMessage()
                        if err != nil {
                                fmt.Println("Error reading message:", err)
                                break
                        }
                        onMessage(conn, message)
                }
        }()

        // Wait until WebSocket connection is closed
        select {}
}

// Main function
func main() {
        defer func() {
                if wsClient != nil {
                        wsClient.Close()
                }
        }()

        // Connect to WebSocket server
        go connectWebSocket()

        // Block main goroutine to allow handling commands
        select {}
}
5.6.5 Java Example
import org.java-websocket.client.WebSocketClient;
import org.java-websocket.handshake.ServerHandshake;
import org.json.JSONObject;

import java.net.URI;
import java.util.Scanner;
import java.util.UUID;

public class WebSocketExample {

 // Replace this ACCID value with your robot's actual serial number (SN)
 private static String ACCID = "";

 // Atomic flag for graceful exit
 private static volatile boolean shouldExit = false;

 // WebSocket client instance
 private static WebSocketClient wsClient = null;

 // Generate dynamic GUID
 private static String generateGuid() {
     return UUID.randomUUID().toString();
 }

 // Send WebSocket request with title and data
 private static void sendRequest(String title, JSONObject data) {
     if (data == null) {
         data = new JSONObject();
     }

     // Create message structure with necessary fields
     JSONObject message = new JSONObject();
     message.put("accid", ACCID);
     message.put("title", title);
     message.put("timestamp", System.currentTimeMillis());  // Current timestamp in milliseconds
     message.put("guid", generateGuid());
     message.put("data", data);

     String messageStr = message.toString();

     // Send the message through WebSocket if client is connected
     if (wsClient != null && wsClient.isOpen()) {
         wsClient.send(messageStr);
     }
 }

 // Handle user commands
 private static void handleCommands() {
     Scanner scanner = new Scanner(System.in);
     while (!shouldExit) {
         System.out.println("Enter command ('stand', 'walk', 'twist', 'sit', 'stair', 'stop', 'imu') or 'exit' to quit:");
         String command = scanner.nextLine().trim();

         switch (command) {
             case "exit":
                 shouldExit = true;
                 break;
             case "stand":
                 sendRequest("request_stand_mode", null);
                 break;
             case "walk":
                 sendRequest("request_walk_mode", null);
                 break;
             case "twist":
                 System.out.print("Enter x value: ");
                 double x = scanner.nextDouble();
                 System.out.print("Enter y value: ");
                 double y = scanner.nextDouble();
                 System.out.print("Enter z value: ");
                 double z = scanner.nextDouble();
                 scanner.nextLine();  // Consume the newline
                 JSONObject twistData = new JSONObject();
                 twistData.put("x", x);
                 twistData.put("y", y);
                 twistData.put("z", z);
                 sendRequest("request_twist", twistData);
                 break;
             case "sit":
                 sendRequest("request_sitdown", null);
                 break;
             case "stair":
                 System.out.print("Enable stair mode (true/false): ");
                 boolean enableStair = scanner.nextLine().trim().equalsIgnoreCase("true");
                 JSONObject stairData = new JSONObject();
                 stairData.put("enable", enableStair);
                 sendRequest("request_stair_mode", stairData);
                 break;
             case "stop":
                 sendRequest("request_emgy_stop", null);
                 break;
             case "imu":
                 System.out.print("Enable IMU (true/false): ");
                 boolean enableImu = scanner.nextLine().trim().equalsIgnoreCase("true");
                 JSONObject imuData = new JSONObject();
                 imuData.put("enable", enableImu);
                 sendRequest("request_enable_imu", imuData);
                 break;
             default:
                 System.out.println("Invalid command. Try again.");
                 break;
         }
     }
 }

 // WebSocket onOpen callback
 private static void onOpen() {
     System.out.println("Connected!");
     // Start handling commands in a separate thread
     new Thread(WebSocketExample::handleCommands).start();
 }

 // WebSocket onMessage callback
 private static void onMessage(String message) {
     System.out.println("Received message: " + message);

     if (ACCID.isEmpty()) {
         try {
             JSONObject jsonMessage = new JSONObject(message);
             ACCID = jsonMessage.getString("accid");
             System.out.printf("ACCID initialized from server: %s%n", ACCID);
         } catch (Exception e) {
             System.out.println("Error parsing ACCID from message: " + e.getMessage());
         }
     }
 }

 // WebSocket onClose callback
 private static void onClose(int code, String reason, boolean remote) {
     System.out.println("Connection closed. Reason: " + reason);
 }

 public static void main(String[] args) {
     // WebSocket server URI
     URI serverUri = URI.create("ws://10.192.1.2:5000");

     // Create WebSocket client instance
     wsClient = new WebSocketClient(serverUri) {

         @Override
         public void onOpen(ServerHandshake handshakedata) {
             onOpen();
         }

         @Override
         public void onMessage(String message) {
             onMessage(message);
         }

         @Override
         public void onClose(int code, String reason, boolean remote) {
             onClose(code, reason, remote);
         }

         @Override
         public void onError(Exception ex) {
             System.out.println("Error: " + ex.getMessage());
         }
     };

     // Connect to the WebSocket server
     wsClient.connect();
     System.out.println("Press Ctrl+C to exit.");
 }
}
6. Reinforcement Learning Environment Setup
6.1 Recommened hardware
| Hardware components | Recommended specifications | Instruction |
|---|---|---|
| GPU | GeForce RTX 3080 (12 GB) or higher | 12 GB of GDDR6 video memory or higher, suitable for deep learning and reinforcement learning tasks. GeForce RTX 30 Series:  GeForce RTX 40 Series: GeForce RTX 40 Series: |
| CPU | At least a six-core processor | Recommended Model:• Intel: Core i7-10700K or higher• AMD: Ryzen 5 5600X or higher |
| Memory | 16 GB to 32 GB | System memory: 16 GB to 32 GB. Larger memory can support more complex simulation and training tasks, while improving system responsiveness. |
| Storage | 512 GB to 1 TB NVMe SSD | The SSD improves read and write speed, reduces load time and improves system performance. |
| Operating System | Ubuntu 20.04 LTS | Ensure compatibility with GPU drivers. |
| GPU Drivers | / | Select the recommended driver version to install. |
| Python | Python 3.8 or higher | Install the required Python packages and libraries (such as PyTorch). |
| Network environment | Github is accessible. | The environment setup process requires downloading the model training code via GitHub. |
6.2 Installation
-
Install RL Environment in One Click
-
mkdir -p ~/limx_rl && cd ~/limx_rl && \
sudo apt update && sudo apt install -y git && \
if [ ! -d "pointfoot-legged-gym" ]; then \
  git clone https://github.com/limxdynamics/pointfoot-legged-gym.git; \
fi && \
cd pointfoot-legged-gym && bash install.sh && source ~/.bashrc
-
-
Verify Whether NVIDIA Driver is Installed Successfully
-
nvidia-smi -
If the NVIDIA driver version and GPU information are displayed, the driver is installed successfully.
-
-
-
Verify Whether Isaac Gym is Installed Successfully
-
Run the Isaac Gym example to confirm installation and configuration.
-
conda activate pointfoot_legged_gym cd ~/limx_rl/isaacgym/python/examples python 1080_balls_of_solitude.py -
-
-
Verify Whether pointfoot-legged-gym is Installed Successfully
When you have installed the RL environment, the following contents are included under the ~/limx_rl directory:
cd ~/limx_rl
.
├── isaacgym
└── pointfoot-legged-gym
6.3 Environment Setup
6.3.1 Install Graphics Card Drivers
-
Check the Current NVIDIA Drivers
-
If NVIDIA drivers are already installed on your system, you can check with the following command:
-
nvidia-smi -
If the NVIDIA driver version and GPU information are displayed, the driver is installed. If not, continue with the following steps.
-
-
Add the official NVIDIA driver PPA (Personal Package Archive):
-
sudo add-apt-repository ppa:graphics-drivers/ppa
sudo apt update
-
-
Use the following command to list the available NVIDIA driver versions:
-
ubuntu-drivers devices
-
-
Install NVIDIA Drivers
Select the recommended driver version to install, for example:
sudo apt install nvidia-driver-XXX
Replace XXX with the recommended driver version number, for example nvidia-driver-535.
-
Disable Nouveau Drivers (if Necessary): In some cases, you may need to disable the default Nouveau driver:
-
sudo bash -c "echo blacklist nouveau > /etc/modprobe.d/blacklist-nouveau.conf"
sudo bash -c "echo options nouveau modeset=0 >> /etc/modprobe.d/blacklist-nouveau.conf"
sudo update-initramfs -u
-
-
Reboot System: After the driver installation is complete, reboot the system to activate the driver:
-
sudo reboot
-
-
Verify Driver Installation: After the reboot, verify that the NVIDIA driver is installed successfully with the following command:
-
nvidia-smi -
If the NVIDIA driver version and GPU information are displayed, the driver is installed successfully.
-
-
6.3.2 Conda Environment Configuration
Conda is a cross-platform, open source package and environment management system that enables rapid creation of virtual environments where packages can be installed, run, and updated, effectively addressing the Python and dependent library version requirements of different software packages. Follow the following steps to download and install Conda:
-
Download the Anaconda installation script:
-
Download the installation script for Anaconda using
wget(select the version that is appropriate for your needs): -
cd && wget https://repo.anaconda.com/archive/Anaconda3-2024.06-1-Linux-x86_64.sh
-
-
Run the installation script:
-
Execute the downloaded installation script:
-
bash Anaconda3-2024.06-1-Linux-x86_64.sh -
Press
Enterto view the license agreement. -
Enter
yesto accept the license agreement. -
Select the default installation path (typically
~/anaconda3), or customize the path as needed. -
When the script asks if you want to initialize Conda, select
yesto automatically configure the environment.
-
-
Initialize Conda (if not automatically configured during installation):
-
~/anaconda3/bin/conda init
-
Make the .bashrc configuration take effect immediately:
source ~/.bashrc
-
Configure the Conda Environment for RL Training
-
Create a Conda environment dedicated to RL training (for example,
pointfoot_legged_gym) and specify the Python version: -
conda create --name pointfoot_legged_gym python=3.8
-
-
Activate the environment you have just created:
-
conda activate pointfoot_legged_gym
-
-
Follow these steps to install the PyTorch library:
1.Visit the PyTorch installation page.
2.Select the following options:
- Operating System: Linux
- Package Manager: Conda
- Language: Python
- CUDA Version: 12.1
3.Generate the installation command and run the following command to install:
-
conda install pytorch torchvision torchaudio pytorch-cuda=12.1 -c pytorch -c nvidia
6.3.3 Install Isaac Gym
6.3.3.1 Download Isaac Gym
- Download Page: Go to the Isaac Gym download page.
- Accept Terms and Conditions: You may need to accept some terms and conditions.
- Download: Select the appropriate version to download the installation package for Isaac Gym.
6.3.3.2 Install Isaac Gym
-
Install setuptools:
-
Setuptools is a library for managing and distributing Python packages. It simplifies the process of packaging Python projects, making them easier to install and distribute. Additionally, Setuptools handles the projects' dependencies. By specifying the version
59.5.0, you can ensure compatibility and stability with other dependencies. -
pip install setuptools==59.5.0
-
-
Install TensorBoard
TensorBoard is a tool for visualizing TensorFlow charts, metrics and other relevant data. To ensure compatibility and stability, we specify the installation version as
2.12.0.pip install tensorboard==2.12.0 -
Activate the conda environment for pointfoot_legged_gym
-
conda activate pointfoot_legged_gym
-
-
Create a directory path to store the training code (e.g.:
limx_rl)-
mkdir -p ~/limx_rl
-
-
Extract File: Extract the installation zip file downloaded in the previous step into the
limx_rldirectory. Note: Replace/path/to/IsaacGym_Preview_4_Package.tar.gzwith the actual path to the package you have installed.-
tar -xzvf /path/to/IsaacGym_Preview_4_Package.tar.gz -C ~/limx_rl/
-
-
Install Isaac Gym and configure:
-
cd ~/limx_rl/isaacgym/python
pip install -e .
-
-
Troubleshoot NumPy compatibility issues:
-
In newer versions of NumPy, the use of
np.floatis discouraged because it is ambiguous and can lead to warnings or errors. To avoid these issues, it is recommended to use Python's built-infloattype directly. -
cd ~/limx_rl/isaacgym/python
sed -i 's/np.float/float/' isaacgym/torch_utils.py
-
-
Verify Installation
-
Run the examples for Isaac Gym, which can help confirm that Isaac Gym is installed and configured correctly.
-
cd ~/limx_rl/isaacgym/python/examples python 1080_balls_of_solitude.py -
-
6.3.4 Install pointfoot-legged-gym
-
Activate the conda environment for pointfoot_legged_gym
-
conda activate pointfoot_legged_gym
-
-
Install pointfoot-legged-gym
-
cd ~/limx_rl
git clone https://github.com/limxdynamics/pointfoot-legged-gym.git
cd ~/limx_rl/pointfoot-legged-gym && pip install -e .
-
-
Verify Installation
When you have completed all the previous steps, include the following under the ~/limx_rl directory:
cd ~/limx_rl
.
├── isaacgym
└── pointfoot-legged-gym
6.4 Deploy RL Docker Container Environment
6.4.1 Install Docker Service
Update package index and install dependencies:
# Add Docker's official GPG key:
sudo apt-get update
sudo apt-get install ca-certificates curl
sudo mkdir -p /etc/apt/keyrings
curl -fsSL https://download.docker.com/linux/ubuntu/gpg | sudo gpg --dearmor -o /etc/apt/keyrings/docker.gpg
sudo chmod a+r /etc/apt/keyrings/docker.gpg

# Add the repository to Apt sources:
echo "deb [arch=$(dpkg --print-architecture) signed-by=/etc/apt/keyrings/docker.gpg] https://download.docker.com/linux/ubuntu $(lsb_release -cs) stable" | sudo tee /etc/apt/sources.list.d/docker.list > /dev/null
sudo apt-get update
Install Docker Engine:
sudo apt-get install docker-ce docker-ce-cli containerd.io docker-buildx-plugin docker-compose-plugin
6.4.2 Install NVIDIA Docker Tools
#### Set up NVIDIA Docker repository ###
distribution=$(. /etc/os-release;echo $ID$VERSION_ID)
curl -s -L https://nvidia.github.io/nvidia-docker/gpgkey | sudo apt-key add -
curl -s -L https://nvidia.github.io/nvidia-docker/$distribution/nvidia-docker.list | sudo tee /etc/apt/sources.list.d/nvidia-docker.list

#### Update package index and install NVIDIA Docker tools
sudo apt-get update
sudo apt-get install -y nvidia-docker2

#### Restart Docker service
sudo systemctl restart docker
6.4.3 Verify Docker Environment Installation
#### Run a test container with NVIDIA support to check if nvidia-smi command works in the container
sudo docker run -it --rm --gpus all nvidia/cuda:12.1.1-base-ubuntu20.04 nvidia-smi
If you see output similar to the following image, it indicates that the Docker environment is installed correctly:
6.4.4 Pull RL Docker Environment Base Image
The following RL environment base image comes pre-installed with conda, IsaacGym, pointfoot-legged-gym, and other environments. After pulling the image, you can use it directly without needing to configure the related environments:
sudo docker pull crpi-yznuflhnzo12tr44.cn-shanghai.personal.cr.aliyuncs.com/limx-rl/base:v10
7. Reinforcement Learning Model Training
7.1 Start Training
-
Open a Terminal (
Ctrl + Alt + T) -
Set Robot Model
[Training TRON1 Point-foot robot]:
No need to set robot model, but you need to switch the training code branchcd ~/limx_rl/pointfoot-legged-gym git checkout encoder-actor-critic[2. Training other robot models]
Refer to the "View/Set Robot Model" section to check your robot model. If it has not been set yet, follow these steps to set it.
-
List the available robot models via the shell command
tree -L 1 resources/robots/pointfoot:limx@limx:~$ cd ~/limx_rl/pointfoot-legged-gym limx@limx:~$ tree -L 1 resources/robots/pointfoot resources/robots/pointfoot ├── PF_P441A ├── PF_P441B ├── PF_P441C └── PF_P441C2 └── PF_TRON1A └── SF_TRON1A └── WF_TRON1A -
Set the robot model type using
PF_TRON1A(please replace with your actual robot type) as an example.echo 'export ROBOT_TYPE=PF_TRON1A' >> ~/.bashrc && source ~/.bashrc
-
-
Activate the conda environment for pointfoot_legged_gym
conda activate pointfoot_legged_gym -
Enter the path where the training code is located and start training.
Parameter options:
- --task=pointfoot_flat: It specifies that the task or environment type is pointfoot_flat.
- --headless: This means running the training in the headless mode, in which no graphical interface will be displayed. This mode is typically used to run on a server without a display, or in situations where efficient computation is required while graphical rendering is not needed.
- --num_envs 1024: It specifies that the number of environments to create is 1024.
Command 1: Run in the headless mode
cd ~/limx_rl/pointfoot-legged-gym
python legged_gym/scripts/train.py --task=pointfoot_flat --headless
Command 2: Run in the graphical mode
cd ~/limx_rl/pointfoot-legged-gym
python legged_gym/scripts/train.py --task=pointfoot_flat
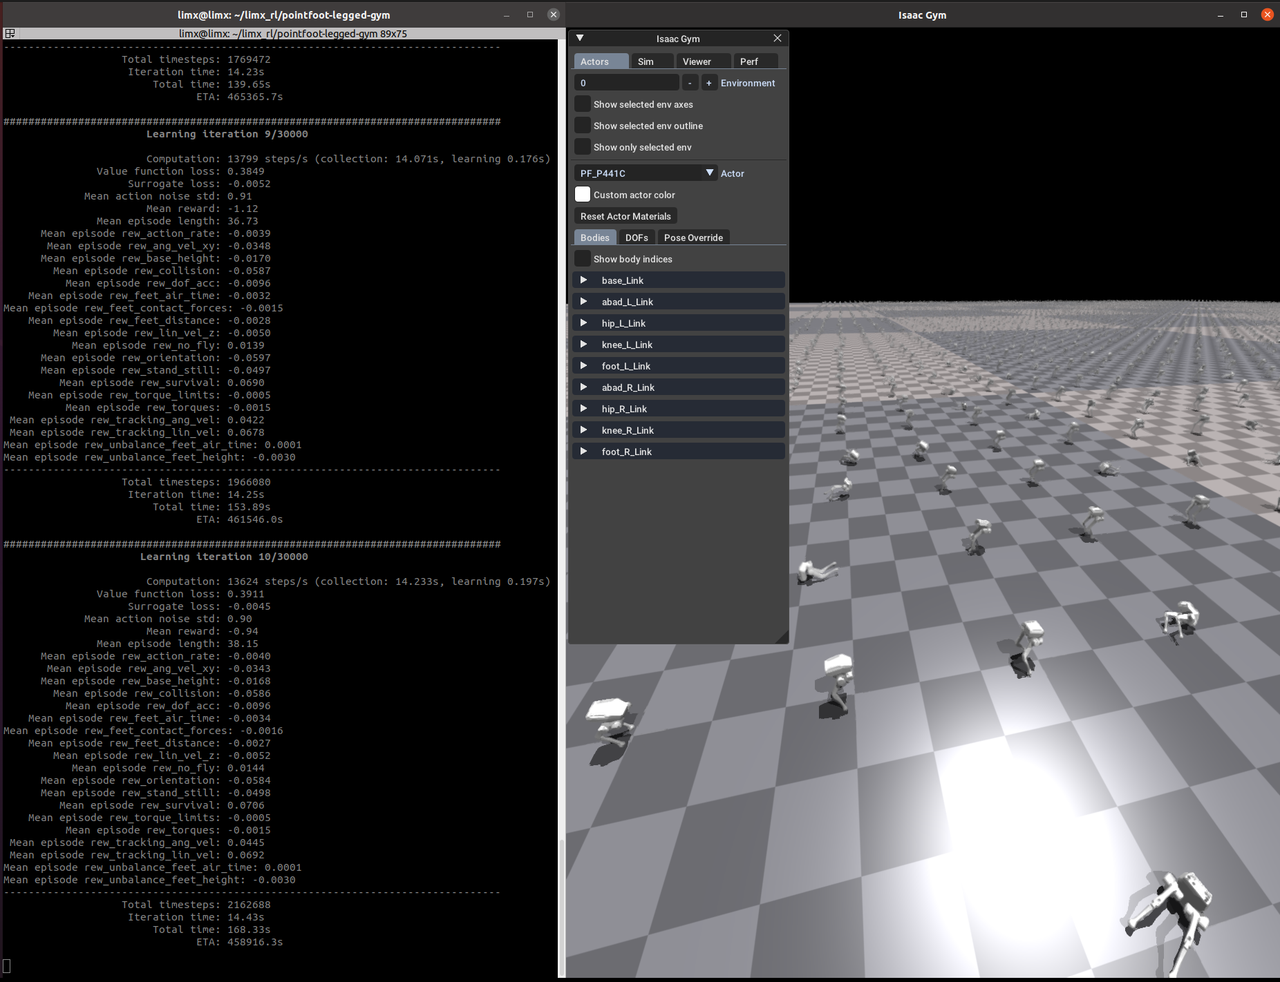
7.2 Training Process
If your training stops halfway, you can specify the location of a checkpoint file and later resume training.
-
First, you need to activate the pointfoot_legged_gym conda environment
conda activate pointfoot_legged_gym -
Command 1: Resume training in the headless mode
-
cd ~/limx_rl/pointfoot-legged-gym
python legged_gym/scripts/train.py --task=pointfoot_flat --resume --headless --load_run Apr16_16-51-06_ --checkpoint 200
-
-
Command 2: Resume training in the graphical mode
-
cd ~/limx_rl/pointfoot-legged-gym
python legged_gym/scripts/train.py --task=pointfoot_flat --resume --load_run Apr16_16-51-06_ --checkpoint 200
-
-
Parameter options:
-
--load_run:
Description: It specifies the identifier of the training run to load (e.g., the name or ID of the training run). This identifier is typically associated with the training process and is used to locate the corresponding run record or configuration from the logs directory.
How to get it:
-
View
logsdirectory: Go into thelogsdirectory and view the subdirectories or files, which are typically named after the identifier of the training run. -
Example paths:
-
ls -l ~/limx_rl/pointfoot-legged-gym/logs/pointfoot_flat -
You will see directories named after robot types, and training results are stored in their corresponding directories. Taking PF_TRON1A as an example, you will see a directory like
Apr16_16-51-06_, whereApr16_16-51-06_is the value of the--load_runparameter.
-
-
-
--checkpoint:
Description: It specifies the checkpoint file to load. The checkpoint file stores an intermediate state of the model and can be used to resume training or make inferences.
How to get it:
-
View
logsdirectory: Usually there are files that save checkpoints in the corresponding--load_rundirectory under thelogsdirectory. These files typically have a.ptor similar extension, and the filenames may include the training epoch or a timestamp. -
Example paths:
ls -l ~/limx_rl/pointfoot-legged-gym/logs/pointfoot_flat/PF_TRON1A/Apr16_16-51-06_You will see a file like
model_200.pt, where200is the value of the--checkpointparameter.
-
-
7.3 Training Results
-
Open a Terminal (
Ctrl + Alt + T) -
Activate the conda environment for pointfoot_legged-gym
conda activate pointfoot_legged_gym -
Start tensorboard
cd ~/limx_rl/pointfoot-legged-gym tensorboard --logdir=logs/pointfoot_flat -
View training status
Type
http://127.0.0.1:6006in your browser's address bar to view training status.
7.4 Export Training Results
-
Open a Terminal (
Ctrl + Alt + T) -
Install ONNX
If you haven't installed the ONNX library yet, please install it. ONNX allows easy conversion of models between different deep learning frameworks (e.g., PyTorch, TensorFlow, Caffe2, MXNet, etc.).
pip install onnx -
Activate the conda environment for pointfoot_legged-gym
conda activate pointfoot_legged_gym -
View training results after completing training
The latest runs and checkpoints are read by default. To select a specific run and checkpoint, enter the
--load_runand--checkpointparameters.-
Parameter option description:
-
--load_run:
Description: It specifies the identifier of the training run to load (e.g., the name or ID of the training run). This identifier is typically associated with the training process and is used to find the corresponding run record or configuration from the
logsdirectory.How to get it:
-
View the
logsdirectory: Go into thelogsdirectory and view the subdirectories or files, which are typically named after the identifier of the training run. -
Example path:
-
ls -l ~/limx_rl/pointfoot-legged-gym/logs/pointfoot_flat -
You will see directories named after robot types, and training results are stored in their corresponding directories. Taking PF_TRON1A as an example, you will see a directory like
Apr16_16-51-06_, whereApr16_16-51-06_is the value of the--load_runparameter.
-
-
-
--checkpoint:
Description: Specifies the checkpoint file to load. Checkpoint files hold an intermediate state of the model and can be used to resume training or for inference.
How to get it:
-
View the
logsdirectory: Files that save checkpoints are typically found in the corresponding--load_rundirectory under thelogsdirectory. These files typically have a.ptor similar extension, and the filenames may include the training epoch or a timestamp. -
Example path:
-
ls -l ~/limx_rl/pointfoot-legged-gym/logs/pointfoot_flat/PF_TRON1A/Apr16_16-51-06_ -
You will see a file like
model_200.pt, where200is the value of the--checkpointparameter.
-
-
-
-
Usage example:
-
cd ~/limx_rl/pointfoot-legged-gym
python legged_gym/scripts/export_policy_as_onnx.py --task=pointfoot_flat --load_run Apr16_16-51-06_ --checkpoint 200
Taking PF_TRON1A as an example, the converted ONNX files are saved in the directory:
~/limx_rl/pointfoot-legged-gym/logs/pointfoot_flat/PF_TRON1A/exported/policiesTo view the exported ONNX files:
ls -l ~/limx_rl/pointfoot-legged-gym/logs/pointfoot_flat/PF_TRON1A/exported/policies -
-
7.5 Start Training in Docker Environment
-
Open a Terminal (
Ctrl + Alt + T) -
Pull the RL Docker container base image
sudo docker pull crpi-yznuflhnzo12tr44.cn-shanghai.personal.cr.aliyuncs.com/limx-rl/base:v10 -
Run the RL container environment
sudo docker run -it --gpus all --rm crpi-yznuflhnzo12tr44.cn-shanghai.personal.cr.aliyuncs.com/limx-rl/base:v10 -
Set Robot Model: Refer to the "View/Set Robot Model" section to check your robot model. If it has not been set yet, follow these steps to set it.
$ cd limx_rl/pointfoot-legged-gym $ tree -L 1 resources/robots/pointfoot/ resources/robots/pointfoot/ ├── PF_P441A ├── PF_P441B ├── PF_P441C ├── PF_P441C2 ├── PF_TRON1A ├── SF_TRON1A └── WF_TRON1A-
Using
PF_TRON1A(please replace with your actual robot type) as an example, set the robot model type:export ROBOT_TYPE=PF_TRON1ANote: Setting environment variables using the export command in the container only takes effect in the current container environment and will not persist after restarting the container. You can use the
-eparameter to include environment variable information, making the environment variables automatically take effect each time you run the RL container environment.sudo docker run -it --gpus all --rm -e ROBOT_TYPE=PF_TRON1A crpi-yznuflhnzo12tr44.cn-shanghai.personal.cr.aliyuncs.com/limx-rl/base:v10
-
-
Enter the path where the training code is located and start training
Parameter options:
- --task=pointfoot_flat: Specifies that the task or environment type is pointfoot_flat.
- --headless: Runs in headless mode, meaning no graphical interface will be displayed. This mode is typically used on servers without displays or when efficient computation is required without graphical rendering.
- --num_envs 1024: Specifies that the number of environments to create is 1024.
Command 1: Run in headless mode
cd limx_rl/pointfoot-legged-gym
python legged_gym/scripts/train.py --task=pointfoot_flat --headless
8. Reinforcement Learning Training Results Deployment
8.1 Python based Deployment
The Python motion control algorithm development interface facilitates the development of algorithms for developers who are not familiar with C++ and ROS. The Python language is easy to learn, features a concise syntax, and boasts a rich collection of third-party libraries that allow developers to quickly get started and efficiently implement algorithms.
Through the Python interface, developers can leverage its dynamic characteristics for rapid prototyping and experimental verification, thereby accelerating the iteration and optimization of algorithms. Additionally, Python's cross-platform nature and robust ecosystem enable motion algorithms to be widely deployed across different platforms and environments.
In addition, the flexibility of Python greatly simplifies the rapid deployment of RL models. Developers can easily integrate RL models into simulated and real hardware to quickly verify and optimize algorithm performance.
8.1.1 Deployment Environment Configuration
-
Configure the Conda environment for Python deployment
Create a dedicated Conda environment for Python deployment runtime (e.g., pointfoot_deploy) and specify the Python version:conda create --name pointfoot_deploy python=3.8 -
Activate the newly created environment:
conda activate pointfoot_deploy
8.1.2 Creating a Workspace
You can follow these steps to create an RL deployment development workspace:
-
Open a Bash terminal.
-
Create a new directory to hold the workspace. For example, you can create a directory called "limx_ws" under the user's home directory:
-
mkdir -p ~/limx_ws
-
-
Download the MuJoCo simulator
-
cd ~/limx_ws
git clone --recurse https://github.com/limxdynamics/pointfoot-mujoco-sim.git
-
-
Download the deployment implementation
-
cd ~/limx_ws
git clone --recurse https://github.com/limxdynamics/rl-deploy-with-python.git
-
-
Install the motion control development library (if not already installed):
-
Linux x86_64 environment
# Activate the pointfoot_deploy conda environment conda activate pointfoot_deploy # Install limxsdk pip install rl-deploy-with-python/pointfoot-sdk-lowlevel/python3/amd64/limxsdk-*-py3-none-any.whl -
Linux aarch64 environment
# Activate the pointfoot_deploy conda environment
conda activate pointfoot_deploy

# Install limxsdk
pip install rl-deploy-with-python/pointfoot-sdk-lowlevel/python3/aarch64/limxsdk-*-py3-none-any.whl
-
-
Set robot model: Refer to the "View/Set robot model" section to view your robot model. If it has not been set yet, follow these steps to do so.
-
List the available robot types via the Shell command
tree -L 1 pointfoot-mujoco-sim/robot-description/pointfoot: -
limx@limx:~$ tree -L 1 pointfoot-mujoco-sim/robot-description/pointfoot pointfoot-mujoco-sim/robot-description/pointfoot ├── PF_P441A ├── PF_P441B ├── PF_P441C ├── PF_P441C2 ├── PF_TRON1A ├── SF_TRON1A └── WF_TRON1A -
Set the robot model type using
PF_TRON1Aas an example. Please replacePF_TRON1Awith your actual robot type. -
echo 'export ROBOT_TYPE=PF_TRON1A' >> ~/.bashrc && source ~/.bashrc
-
8.1.3 Update the RL Training Model
In your workspace, using the PF_TRON1A robot type as an example, the RL model and configuration file are located in the path: ~/limx_ws/rl-deploy-with-python/controllers/model/PF_TRON1A, as shown below. Replace the robot type according to your training results.
tree ~/limx_ws/rl-deploy-with-python/controllers/model/PF_TRON1A
.
├── params.yaml
└── policy
    ├── policy.onnx
    └── encoder.onnx
8.1.4 Simulation Debugging
-
Open a Bash terminal and run the MuJoCo simulator.
-
# Activate the pointfoot_deploy conda environment
conda activate pointfoot_deploy

# Run the simulator
cd ~/limx_ws
python pointfoot-mujoco-sim/simulator.py
-
-
Open a Bash terminal and run the motion control algorithm.
-
If your robot is in a falling state, once you have initiated motion control, click the "Reset" button located on the left menu bar of the MuJoCo simulator to restore the robot to its original position. Subsequently, you will observe the robot recovering and resuming its walking motion.
-
# Activate the pointfoot_deploy conda environment
conda activate pointfoot_deploy

# Run the control algorithm
python rl-deploy-with-python/main.py
-
-
Open a Bash terminal and run the virtual remote controller. During the simulation, you can use this controller to manipulate the robot's motion. The left joystick controls the robot's forward and backward movement, as well as its left or right turning. The right joystick, on the other hand, controls the robot's lateral motion, allowing it to move left and right.
-
./pointfoot-mujoco-sim/robot-joystick/robot-joystick -
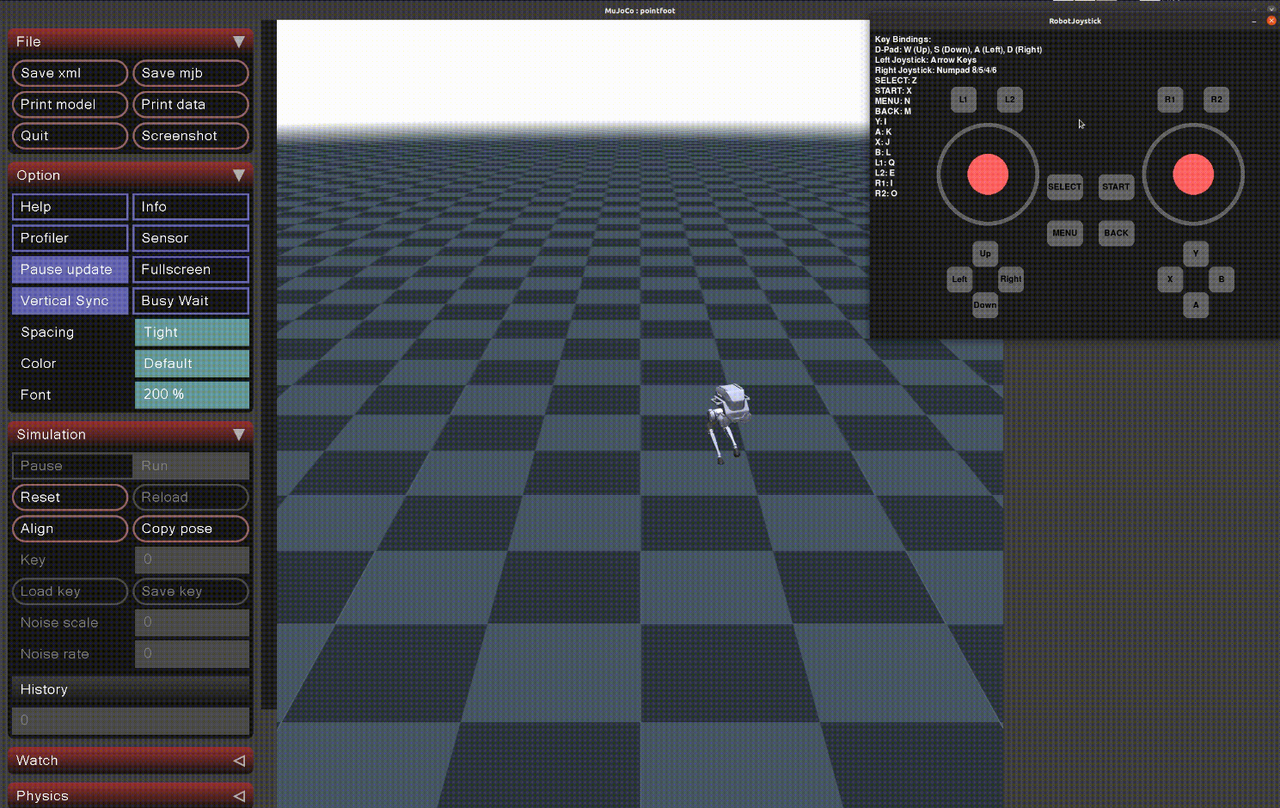
-
8.1.5 Robot Debugging
-
Modify the developer computer IP: Make sure that your development computer and the robot are connected through an external Ethernet port. Set the IP address of your computer to
10.192.1.200and verify that the robot can successfully respond to the Shell commandping 10.192.1.2to ensure network communication with your computer. Set the IP for your development computer as shown in the following image: -
Turn on the developer mode: Press the
R1 + Leftbuttons on the remote controller simultaneously after the robot boots up. This will automatically restart the robot's host computer and switch it to the developer mode. In this mode, users can develop their own motion control algorithms. The setting will persist even after a power failure or reboot, meaning the robot will remain in developer mode until it is manually switched to another mode. Below is a list of remote controller buttons used to switch between working modes.-
Buttons Mode Instruction R1+Left Developer Mode (under authorization) Users can develop their own motion control algorithms using the motion control development interfaces. R1+Right Remote Control Mode The robot runs the pre-installed motion control algorithm to walk smoothly in complex terrains including going up and down steps and crossing obstacles.
-
-
Perform zero calibration: After the robot is turned on, before executing the motion control program, perform zero calibration to make each joint of the robot return to the initial position. The remote controller buttons for zero calibration are L1 and R1.
-
Robot deployment and operation. In the Bash terminal, just run the following Shell command to start the control algorithm (ensuring proper lifting and installation of the robot is crucial during deployment and operation).
-
# Activate the pointfoot_deploy conda environment conda activate pointfoot_deploy # Specify the robot IP address and run the control algorithm python rl-deploy-with-python/main.py 10.192.1.2-
At this time, you can press the remote control buttons
L1 + △ (Y)to turn on the walking function of the robot. The left joystick controls the robot's forward and backward movement, as well as its left or right turning. The right joystick, on the other hand, controls the robot's lateral motion, allowing it to move left and right. -
Press buttons
L1 + □ (X)to turn off the walking function of the robot.
-
-
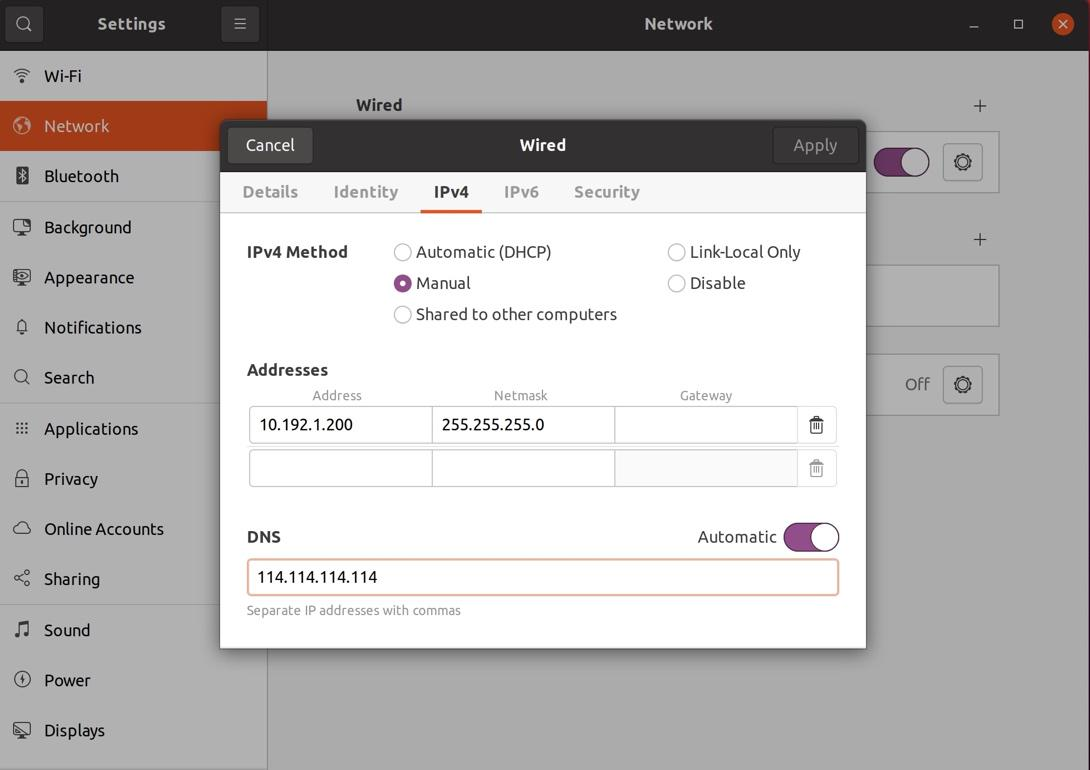
8.1.6 Robot Deployment
After completing simulation and robot debugging, you can deploy your algorithm program to the robot. Always ensure the robot is properly lifted for safety before starting deployment testing, and maintain this safety precaution throughout the entire deployment process. Here are the detailed steps:
-
Preparation work
- Keep the robot in the developer mode: Make sure that the robot is still in the developer mode, so that you can easily deploy and debug the program.
- Network connection: Ensure that the development computer and the robot are connected via an external network (Ethernet), and that the network is stable and communication is normal. Once deployment is complete, the network connection will no longer be required.
-
Copy the algorithm program to the robot
-
On the development computer, open the terminal and enter the working directory where the algorithm program is stored, for example,
~/limx_ws. -
Use the scp command to copy the directory containing the algorithm to the robot. The default robot user is "
guest" and the password is "123456". -
cd ~/limx_ws
scp -r rl-deploy-with-python guest@10.192.1.2:/home/guest
-
-
Install the motion control development library (if not already installed):
-
ssh guest@10.192.1.2 "pip install /home/guest/rl-deploy-with-python/pointfoot-sdk-lowlevel/python3/amd64/limxsdk-*-py3-none-any.whl"
-
-
Configure the algorithm to start automatically
-
SSH into the robot: Use the ssh command to remotely log into the robot system with the password "
123456".-
ssh guest@10.192.1.2
-
-
Modify the auto-launch script:
-
Open the auto-launch script
/home/guest/autolaunch/autolaunch.shfor editing:-
busybox vi /home/guest/autolaunch/autolaunch.sh
-
-
Inside the script, find the command to start
main.py. Make sure the linepython3 /home/guest/rl-deploy-with-python/main.py 10.192.1.2is uncommented (no#comment symbol). When finished, save and exit the editor.-
#!/bin/bash

while true; do
  # To start the Python controller script for controlling the point foot robot
  # The parameter 10.192.1.2 represents the IP address where the robot is located
  # This line is currently commented out. To enable automatic controller startup, you need to uncomment it.
  # Modify this path based on the actual path of your controller script
  # Note: If limxsdk version doesn't match the robot body version, please uninstall limxsdk with pip uninstall and then reinstall with pip install!
  # python3 /home/guest/rl-deploy-with-python/main.py 10.192.1.2

  # Start the robot control algorithm with roslaunch
  # To start the robot control algorithm, uncomment the following line
  # Modify this path based on the actual path of your installation
  # source /home/guest/install/setup.bash
  # roslaunch robot_hw pointfoot_hw.launch

  # Wait 3 seconds before restarting
  sleep 3
done
-
-
Restart the robot: After completing the modifications, power off and restart the robot.
-
-
-
Controlling the robot's motion
- Control Robot Movement
:::warning
During the first time of deployment, the robot may exhibit unexpected movement behavior. Please ensure both the TRON1 and the operator are in a safe state.
:::- Once the system has booted, you will be able to control the robot using the remote controller:
- L1 + △ : Activate the robot's walking function;
- L1 + □ : Deactivate the robot's walking function;
- Left joystick: Controls the robot's forward, backward, left, and right movements;
- Right joystick: Controls the robot's lateral (side-to-side) movements.
- Control Robot Movement
8.2 ROS C++ Based Deployment
8.2.1 Deployment Environment Configuration
-
Install ROS Noetic: We recommend setting up an algorithm development environment based on ROS Noetic on the Ubuntu 20.04 operating system. ROS provides a series of tools and libraries, such as core libraries, communication libraries, and simulation tools (such as Gazebo), which greatly facilitate the development, testing, and deployment of robot algorithms. These resources provide users with a rich and complete algorithm development environment.
-
For ROS Noetic installation, please refer to the documentation: https://wiki.ros.org/noetic/Installation/Ubuntu and select "ros-noetic-desktop-full" for installation.
-
After installing ROS Noetic, enter the following Shell command in the Bash terminal to install the libraries required for the development environment:
-
sudo apt-get update
sudo apt install ros-noetic-urdf \
                 ros-noetic-kdl-parser \
                 ros-noetic-urdf-parser-plugin \
                 ros-noetic-hardware-interface \
                 ros-noetic-controller-manager \
                 ros-noetic-controller-interface \
                 ros-noetic-robot-state-* \
                 ros-noetic-joint-state-* \
                 ros-noetic-controller-manager-msgs \
                 ros-noetic-control-msgs \
                 ros-noetic-ros-control \
                 ros-noetic-gazebo-* \
                 ros-noetic-rqt-gui \
                 ros-noetic-rqt-controller-manager \
                 ros-noetic-plotjuggler* \
                 ros-noetic-joy-teleop ros-noetic-joy \
                 cmake build-essential libpcl-dev libeigen3-dev libopencv-dev libmatio-dev \
                 python3-pip libboost-all-dev libtbb-dev liburdfdom-dev liborocos-kdl-dev -y
-
-
-
Install onnxruntime dependency, download link: https://github.com/microsoft/onnxruntime/releases/tag/v1.10.0. Please choose the appropriate version according to your operating system and platform. For example, on Ubuntu 20.04 x86_64, follow these steps to install:
-
wget https://github.com/microsoft/onnxruntime/releases/download/v1.10.0/onnxruntime-linux-x64-1.10.0.tgz

tar xvf onnxruntime-linux-x64-1.10.0.tgz

sudo cp -a onnxruntime-linux-x64-1.10.0/include/* /usr/include
sudo cp -a onnxruntime-linux-x64-1.10.0/lib/* /usr/lib
-
8.2.2 Creating a Workspace
You can follow these steps to create an RL deployment development workspace:
-
Open a Bash terminal.
-
Create a new directory to hold the workspace. For example, you can create a directory called "limx_ws" under the user's home directory:
-
mkdir -p ~/limx_ws/src
-
-
Download the motion control development interface:
-
cd ~/limx_ws/src
git clone https://github.com/limxdynamics/pointfoot-sdk-lowlevel.git
-
-
Download the Gazebo simulator:
-
cd ~/limx_ws/src
git clone https://github.com/limxdynamics/pointfoot-gazebo-ros.git
-
-
Download the robot model description file:
-
cd ~/limx_ws/src
git clone https://github.com/limxdynamics/robot-description.git
-
-
Download visualization tools:
-
cd ~/limx_ws/src
git clone https://github.com/limxdynamics/robot-visualization.git
-
-
Download the RL deployment source code:
-
cd ~/limx_ws/src
git clone https://github.com/limxdynamics/rl-deploy-ros-cpp.git
-
-
Set the robot model: Refer to the "View/Set Robot Model" section to view your robot model. If it has not been set yet, follow these steps to set it.
-
List the available robot types via the Shell command
tree -L 1 src/robot-description/pointfoot: -
limx@limx:~$ tree -L 1 src/robot-description/pointfoot src/robot-description/pointfoot ├── PF_P441A ├── PF_P441B ├── PF_P441C └── PF_P441C2 └── PF_TRON1A └── SF_TRON1A └── WF_TRON1A -
Set the robot model type using
PF_TRON1Aas an example. Please replacePF_TRON1Awith your actual robot type: -
echo 'export ROBOT_TYPE=PF_TRON1A' >> ~/.bashrc && source ~/.bashrc
-
-
Compile the project:
-
# If you have Conda installed, temporarily disable the Conda environment
# Because Conda may interfere with the ROS runtime environment settings
conda deactivate

cd ~/limx_ws
catkin_make install
-
8.2.3 Update the RL Training Model
In your workspace, using the PF_TRON1A robot type as an example, the RL model and configuration file are located at: ~/limx_ws/src/rl-deploy-ros-cpp/robot_controllers/config/pointfoot/PF_TRON1A, as shown below. Please update and replace according to your training results.
tree ~/limx_ws/src/rl-deploy-ros-cpp/robot_controllers/config/pointfoot/PF_TRON1A
.
├── params.yaml
└── policy
    └── policy.onnx
8.2.4 Simulation Debugging
-
Go to your workspace and complete the compilation:
-
# If you have Conda installed, temporarily disable the Conda environment
# Because Conda may interfere with the ROS runtime environment settings
conda deactivate

cd ~/limx_ws
catkin_make install
-
-
Run the deployment simulation: After starting, you will see an interface as shown below, including the Gazebo simulator and the Robot Steering interaction window.
-
In the Gazebo window, you can use the shortcut
Ctrl + Shift + Rto reset the robot; -
You can also set and publish the topic /cmd_vel through the Robot Steering interaction window to control the robot's movement.
-
# If you have Conda installed, temporarily disable the Conda environment # Because Conda may interfere with the ROS runtime environment settings conda deactivate # Run robot_hw source install/setup.bash roslaunch robot_hw pointfoot_hw_sim.launch -
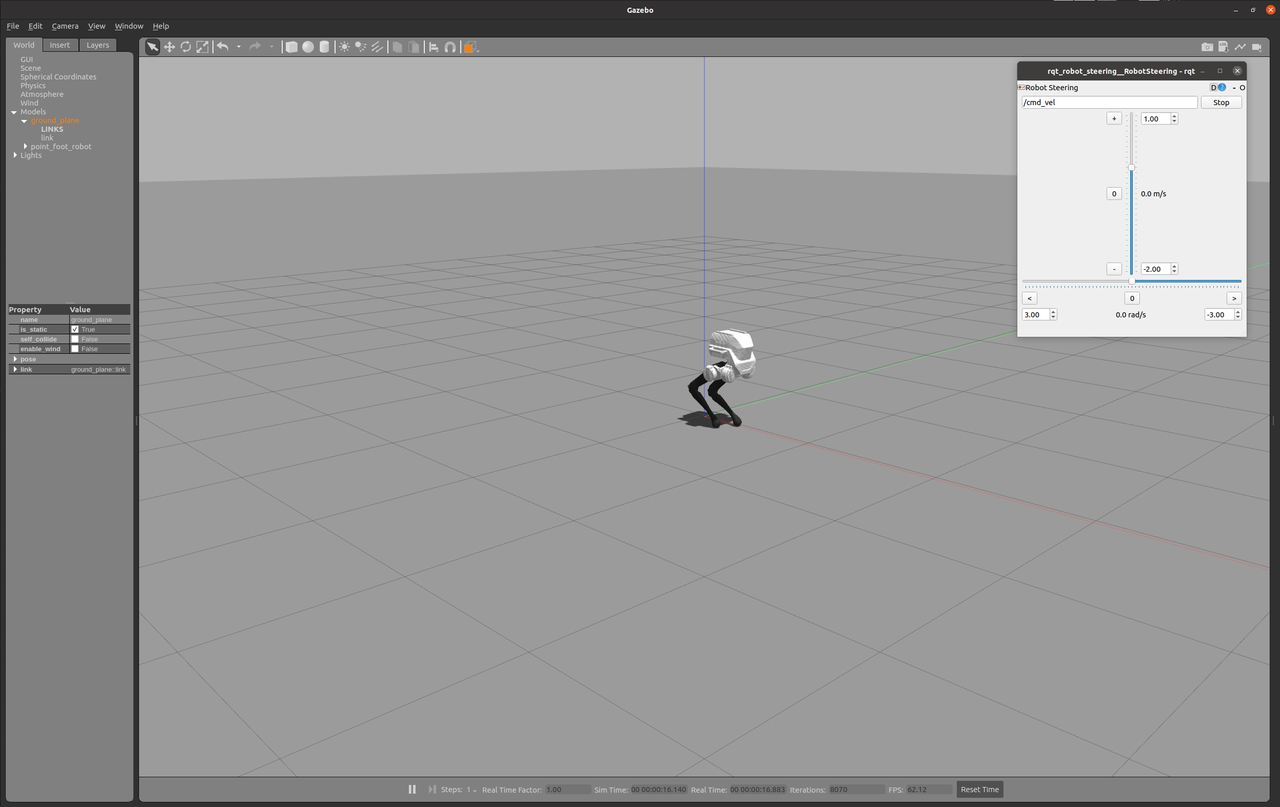
-
-
Virtual Remote Controller: If you find it inconvenient to control the robot using
Robot Steering, you can use a virtual remote controller to simplify the operation. Here are the specific steps for using the virtual remote controller.-
Download and run the virtual remote controller:
-
# Download the virtual remote controller git clone https://github.com/limxdynamics/robot-joystick.git # Run the virtual remote controller ./robot-joystick/robot-joystick -
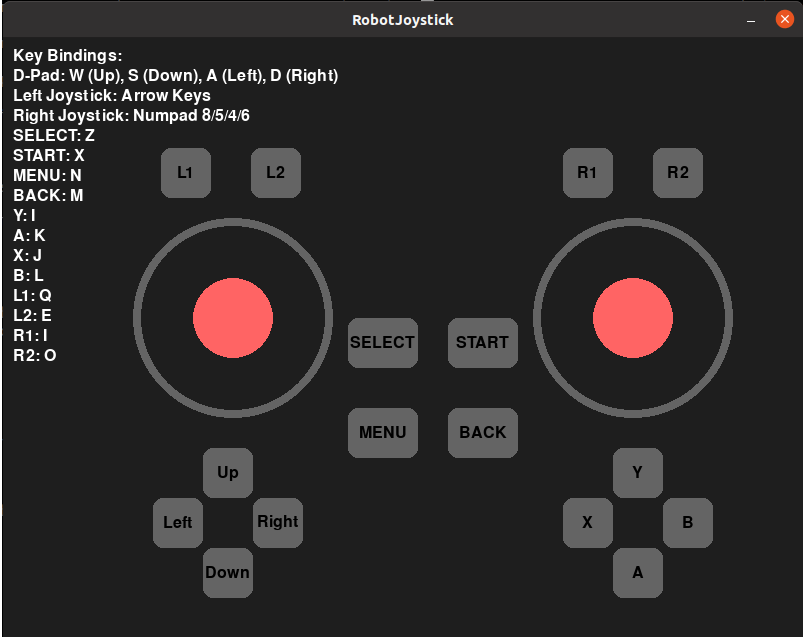
-
-
Now you can use the virtual remote controller to control the robot's movements. The left joystick controls forward/backward/left turn/right turn movements; the right joystick can control the robot's left and right lateral movements.
-
8.2.5 Robot Debugging
-
Modify the developer computer IP: Make sure that your development computer and the robot are connected through an external Ethernet port. Set the IP address of your computer to
10.192.1.200and verify that the robot can successfully respond to the Shell commandping 10.192.1.2to ensure network communication with your computer. Set the IP for your development computer as shown in the following image: -
Go to your workspace, find the
pointfoot_hw.launchlaunch file, and modify the robot's IP address to10.192.1.2, as shown in the following image:-
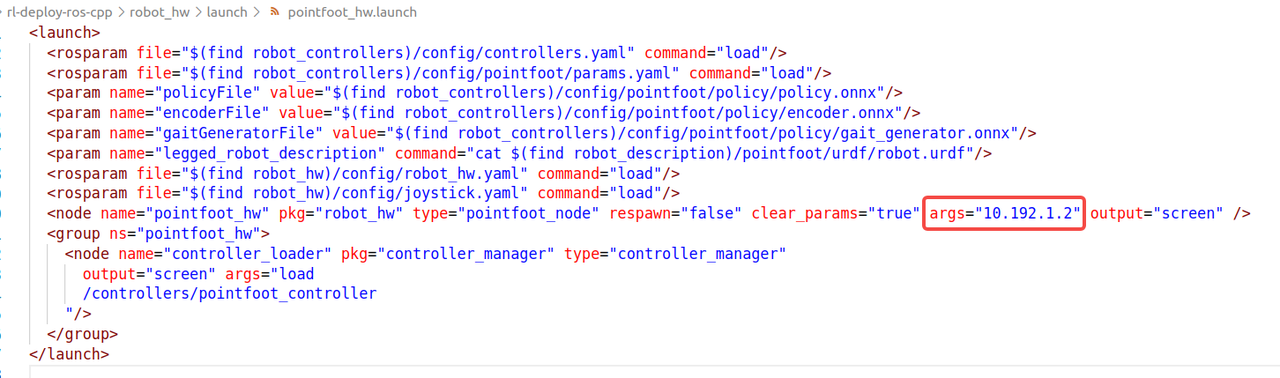
-
After completing the modifications, compile:
-
# If you have Conda installed, temporarily disable the Conda environment
# Because Conda may interfere with the ROS runtime environment settings
conda deactivate

cd ~/limx_ws
catkin_make install
-
-
Turn on the developer mode: Press the
R1 and Leftbuttons on the remote controller simultaneously after the robot boots up. This will automatically restart the robot's host computer and switch it to the developer mode. In this mode, users can develop their own motion control algorithms. The setting will persist even after a power failure or reboot, meaning the robot will remain in developer mode until it is manually switched to another mode. Below is a list of remote controller buttons used to switch between working modes:-
Buttons Mode Instruction R1+Left Developer Mode (under authorization) Users can develop their own motion control algorithms using the motion control development interfaces. R1+Right Remote Control Mode The robot runs the pre-installed motion control algorithm to walk smoothly in complex terrains including going up and down steps and crossing obstacles.
-
-
Perform zero calibration: After the robot is turned on, before executing the motion control program, perform zero calibration to make each joint of the robot return to the initial position. The remote controller buttons for zero calibration are L1+R1.
-
Robot deployment and operation. In the Bash terminal, just run the following Shell command to start the control algorithm (ensuring proper lifting and installation of the robot is crucial during deployment and operation):
-
# If you have Conda installed, temporarily disable the Conda environment
# Because Conda may interfere with the ROS runtime environment settings
conda deactivate

# Run robot_hw
source install/setup.bash
roslaunch robot_hw pointfoot_hw.launch
-
-
At this time, you can press the remote control buttons
L1 + △to turn on the walking function of the robot. The left joystick controls the robot's forward and backward movement, as well as its left or right turning. The right joystick, on the other hand, controls the robot's lateral motion, allowing it to move left and right. -
Press buttons
L1 + □to turn off the walking function of the robot.
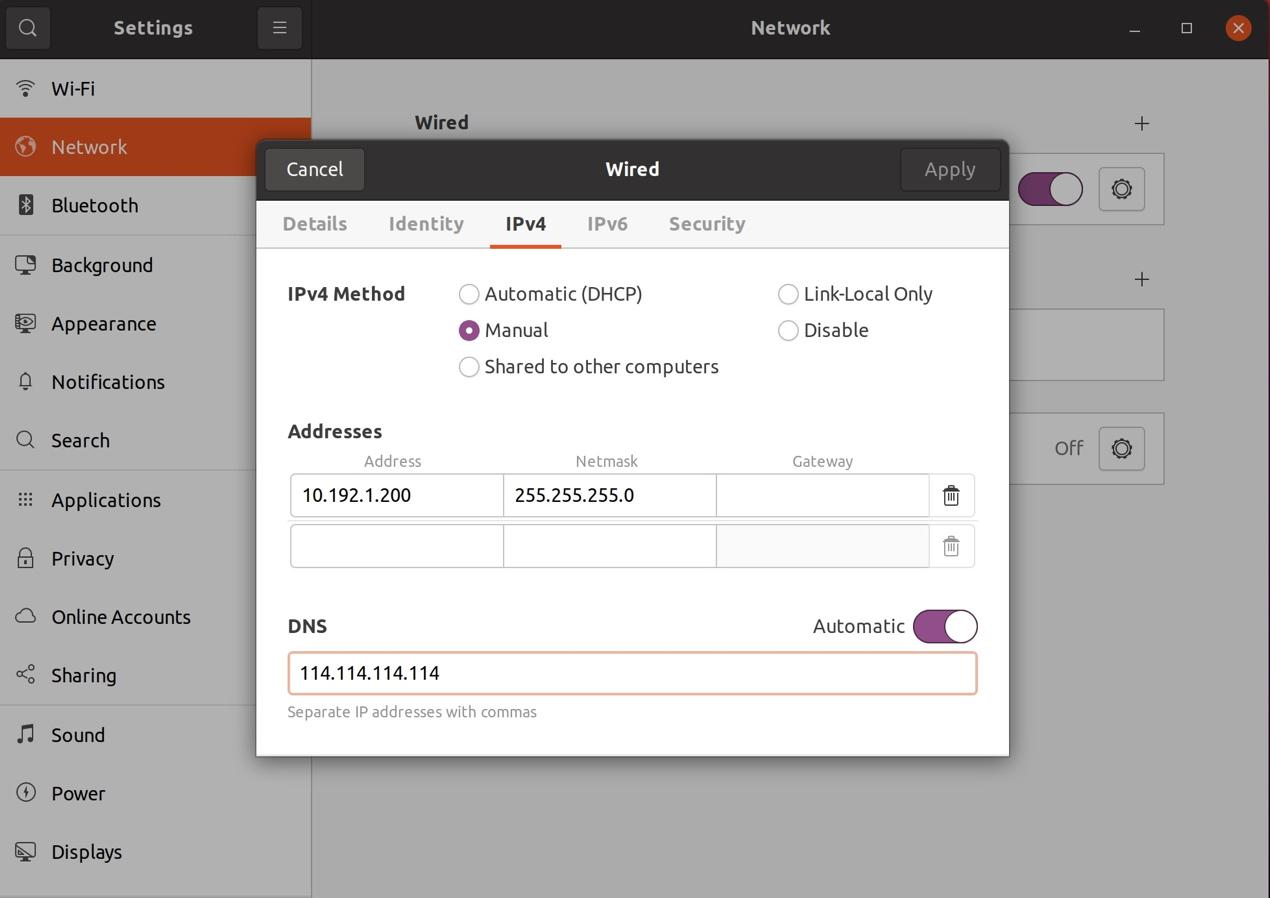
8.2.6 Robot Deployment
After completing simulation and robot debugging, you can deploy your algorithm program to the robot. Always ensure the robot is properly lifted for safety before starting deployment testing, and maintain this safety precaution throughout the entire deployment process. Here are the detailed steps:
-
Preparation work
- Keep the robot in the developer mode: Make sure that the robot is still in the developer mode, so that you can easily deploy and debug the program.
- Network connection: Ensure that the development computer and the robot are connected via an external network (Ethernet), and that the network is stable and communication is normal. Once deployment is complete, the network connection will no longer be required.
-
Copy the algorithm program to the robot
-
On the development computer, open the terminal and enter the working directory where the algorithm program is stored, for example,
~/limx_ws. -
Use the scp command to copy the directory containing the algorithm to the robot. The default robot user is "
guest" and the password is "123456". -
cd ~/limx_ws
scp -r install guest@10.192.1.2:/home/guest
-
-
Configure the algorithm to start automatically
-
SSH into the robot: Use the ssh command to remotely log into the robot system with the password "
123456".-
ssh guest@10.192.1.2
-
-
Modify the auto-launch script:
-
Open the auto-launch script
/home/guest/autolaunch/autolaunch.shfor editing:-
busybox vi /home/guest/autolaunch/autolaunch.sh
-
-
Inside the script, find the command to start
roslaunch. Make sure the linessource /home/guest/install/setup.bashandroslaunch robot_hw pointfoot_hw.launchare uncommented (no#comment symbol). When finished, save and exit the editor.-
#!/bin/bash

while true; do
  # To start the Python controller script for controlling the point foot robot
  # The parameter 10.192.1.2 represents the IP address where the robot is located
  # This line is currently commented out. To enable automatic controller startup, you need to uncomment it.
  # Modify this path based on the actual path of your controller script
  # Note: If limxsdk version doesn't match the robot body version, please uninstall limxsdk with pip uninstall and then reinstall with pip install!
  # python3 /home/guest/rl-deploy-with-python/main.py 10.192.1.2

  # Start the robot control algorithm with roslaunch
  # To start the robot control algorithm, uncomment the following line
  # Modify this path based on the actual path of your installation
  source /opt/ros/noetic/setup.bash
  source /home/guest/install/setup.bash
  roslaunch robot_hw pointfoot_hw.launch

  # Wait 3 seconds before restarting
  sleep 3
done
-
-
Restart the robot: After completing the modifications, power off and restart the robot.
-
-
-
Controlling the robot's motion
- Control Robot Movement
:::warning
During the first robot deployment, the machine may exhibit unexpected movement behavior. Please ensure both the TRON1 and the operator are in a safe state.
:::- Once the system has booted, you will be able to control the robot using the remote controller:
- L1 + △ (Y): Activate the robot's walking function;
- L1 + □ (X): Deactivate the robot's walking function;
- Left joystick: Controls the robot's forward, backward, left, and right movements;
- Right joystick: Controls the robot's lateral (side-to-side) movements.
- Control Robot Movement
9. RealSense Camera
9.1 Overview
The robot is equipped with the RealSense D435i camera, a powerful depth camera that provides both depth and image data.
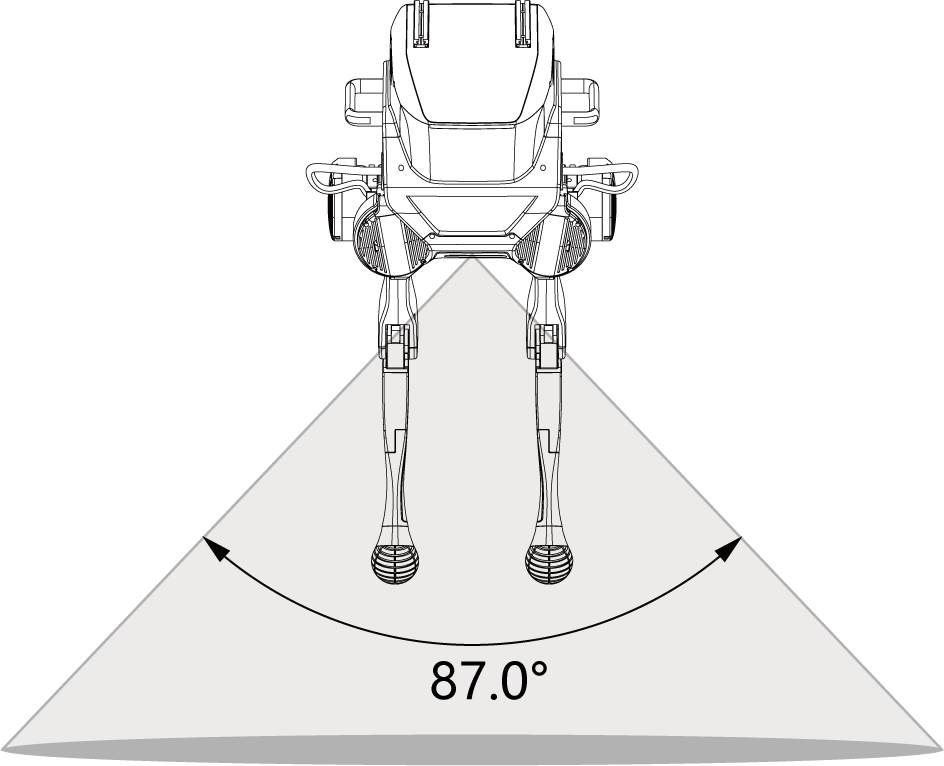
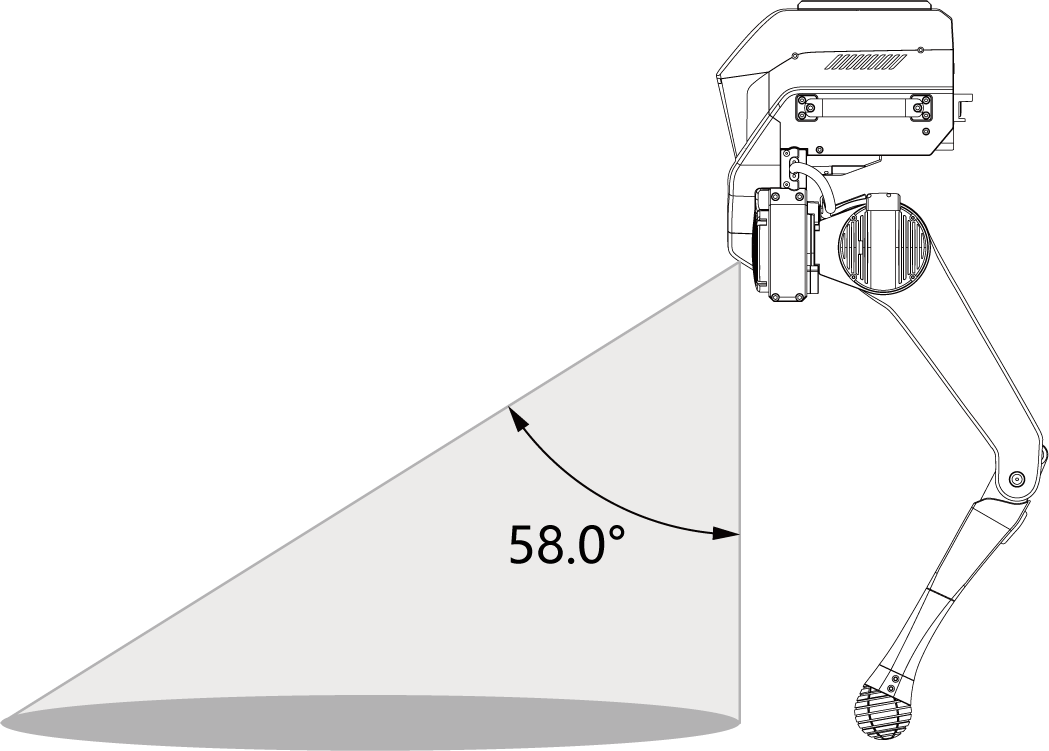
9.2 Installation
In this chapter, you will learn how to acquire data from the RealSense D435i camera using the Noetic version of ROS. The specific steps are as follows:
-
Ensure that your computer is equipped with the Noetic version of ROS (Please refer to https://wiki.ros.org/noetic/Installation/Ubuntu, choose "ros-noetic-desktop-full" and install it.)
-
Configure Network Connection: Ensure that your development computer is connected to the robot via a network interface, and set its IP address to
10.192.1.200. Verify that the robot can successfully respond to the Shell commandping 10.192.1.2to ensure network communication with your computer. Set the IP address for your development computer as shown in the image below. -
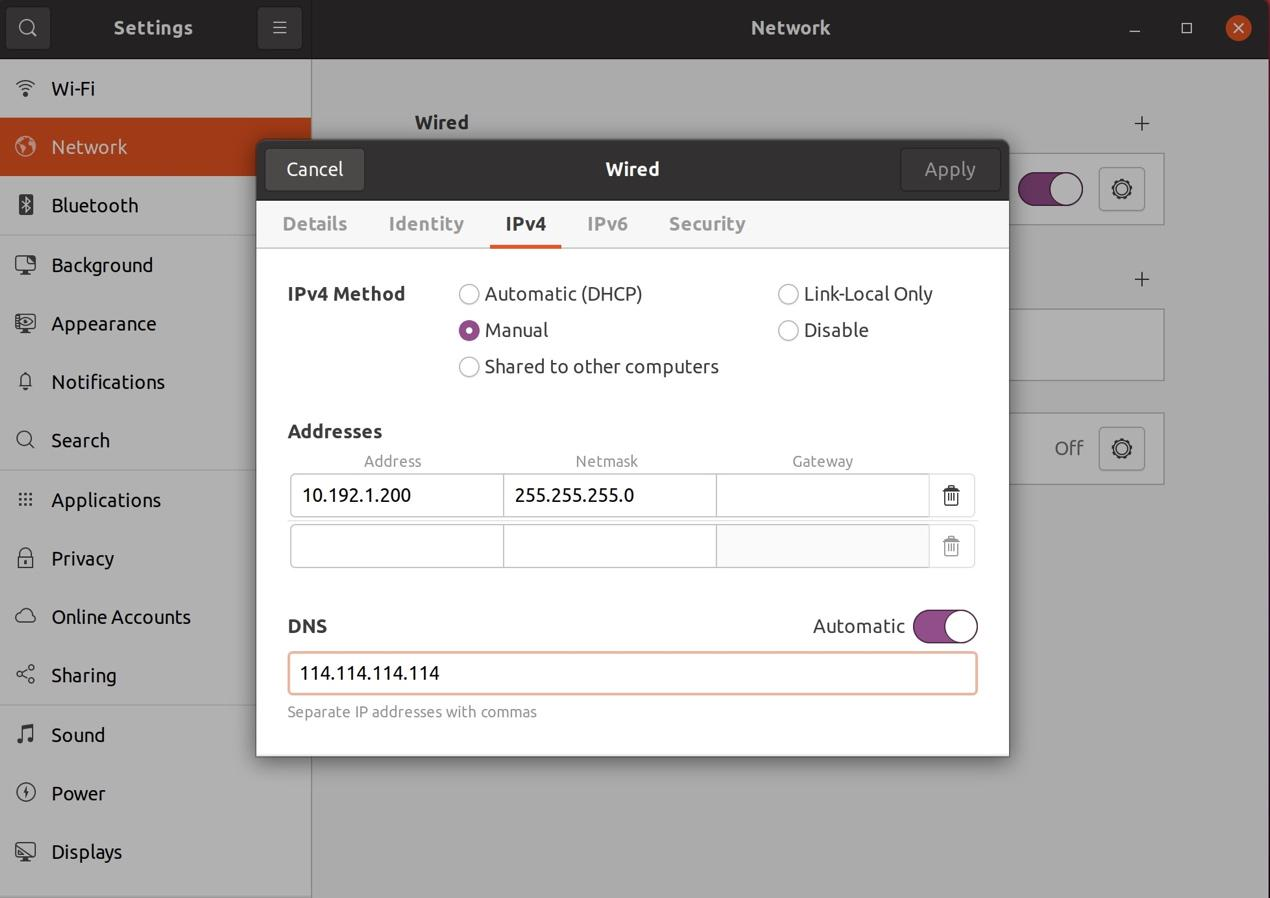
-
Open the camera on the "LimX Robot Manager" page.
If the camera is not activated, you can take the following steps:
- Enter
http://10.192.1.2:8080in the browser to access the "LimX Robot Manager" page. - Navigate to the "Robot Information" page.
- Click "Open the camera" to activate Camera D435i.
- Configure the ROS environment to obtain camera data.
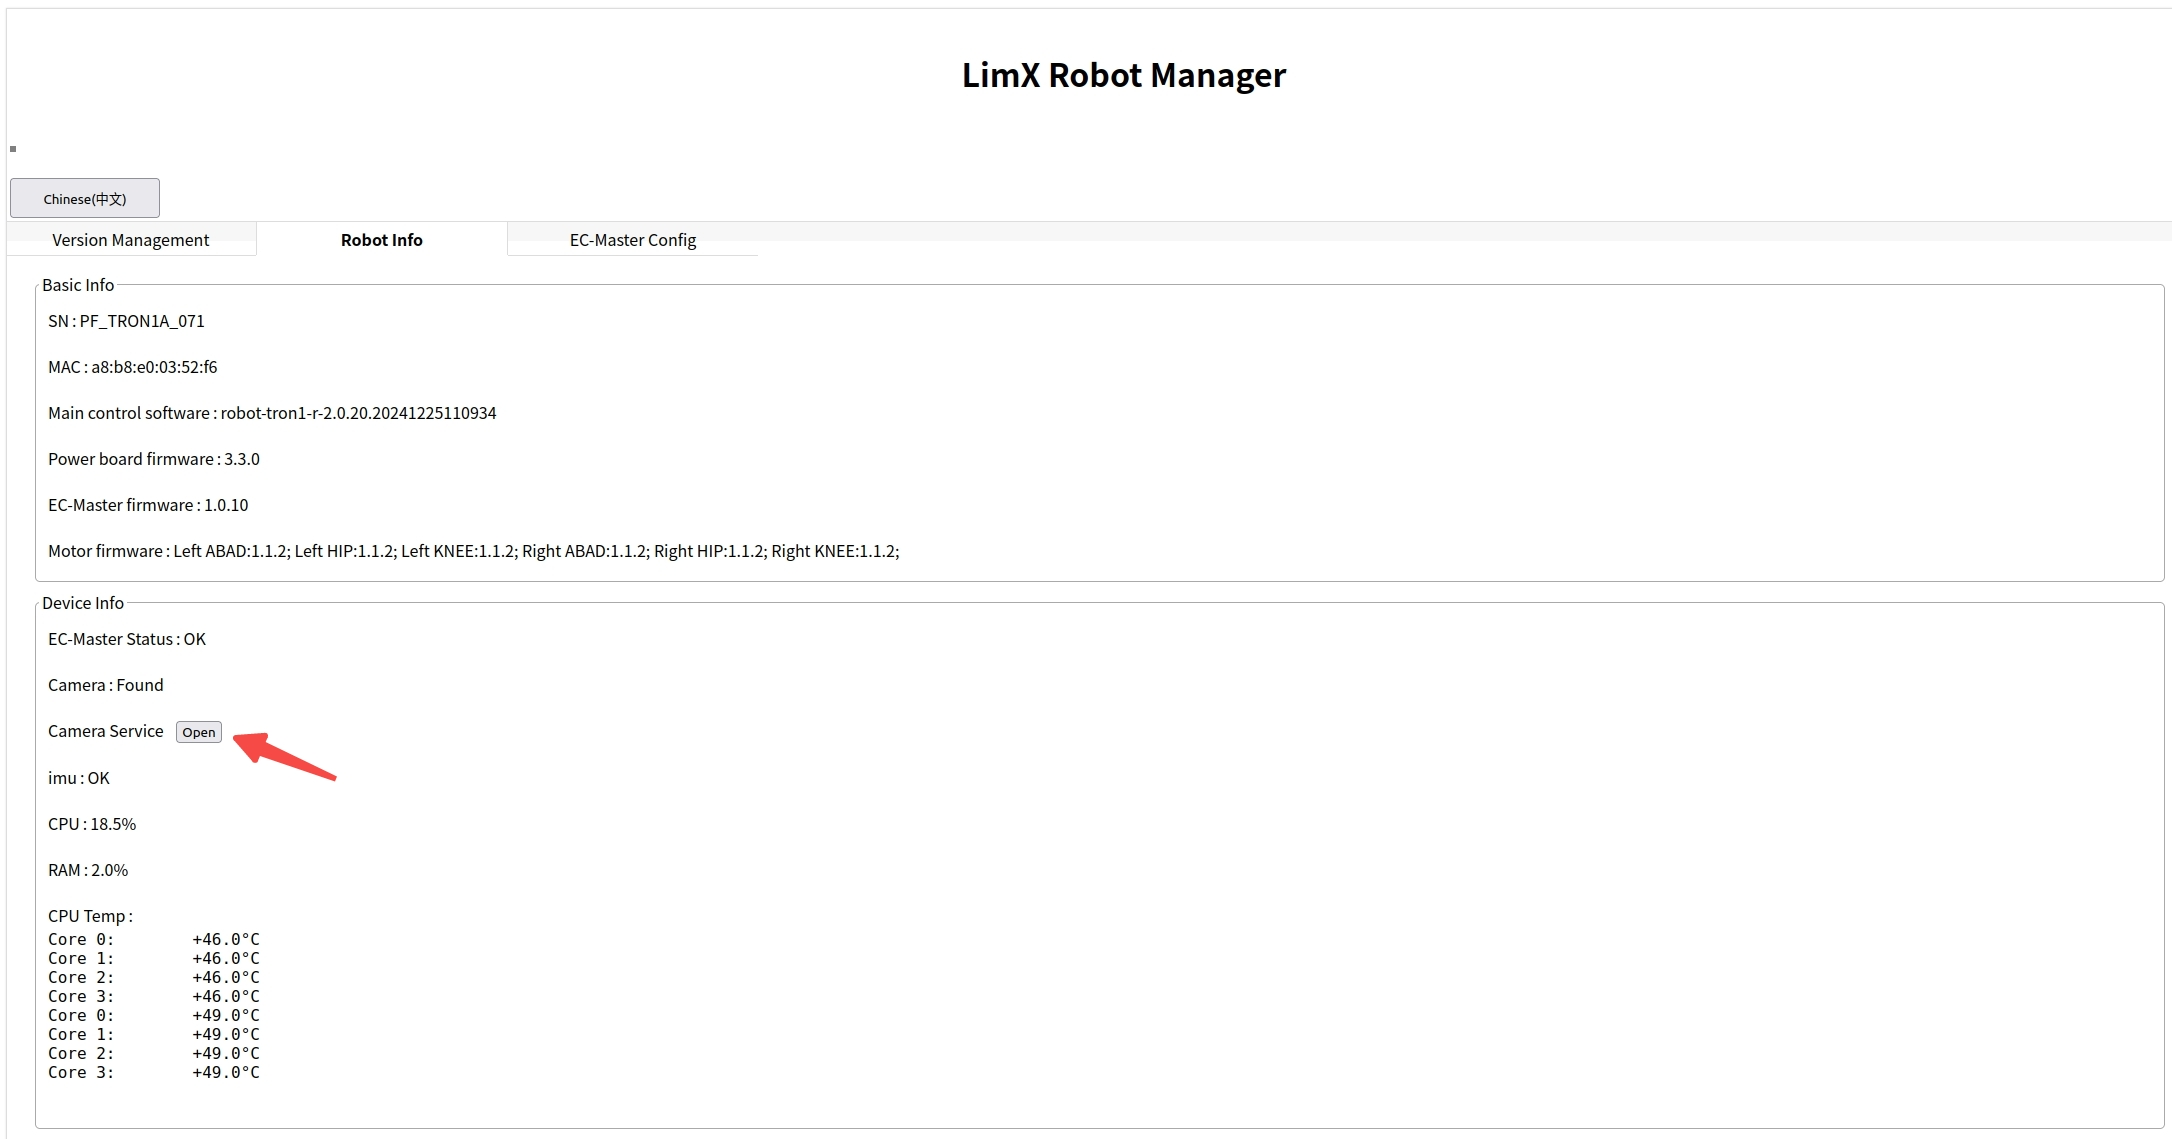
- Enter
-
Configure the ROS environment to acquire camera data.
To enable your computer to receive camera data from the robot through ROS, you need to set up the ROS environment variables correctly:
-
To ensure that your computer can correctly connect to the robot's ROS master node, you need to set the ROS_MASTER_URI and ROS_IP environment variables. You can add the commands to set these variables to your
.bashrcprofile on your computer, so that the settings are automatically applied each time you open a terminal.-
export ROS_MASTER_URI=http://10.192.1.2:11311
export ROS_IP=10.192.1.200
-
-
View data topics published by the Camera D435i via ROS: Use the following command to list all topics published by the camera. You can subscribe to the topics that interest you:
-
rostopic list
-
-
Visualize camera data with rqt or rviz:
Both rqt_image_view and rviz can be utilized to visualize the images and depth data captured by the Camera D435i.
-
Install rqt_image_view:
sudo apt install ros-<ros版本>-rqt-image-viewThen, activate this tool and choose the topic to view data.
rqt_image_view -
Use rviz to view depth data:
rvizAdd the corresponding Image and PointCloud2 displays in rviz, and select the relevant camera topics to visualize the data.
-
10. Robot Software Upgrade
Please go to the LimX Robot Manager page through the browser and select the version of the robot software that you have downloaded in advance to upgrade. The steps are as follows:
- Select the network and connect to your robot's Wi-Fi hotspot with the password "
12345678".
- Visit the LimX Robot Manager page:
- Enter http://10.192.1.2:8080 in the browser address bar to enter the robot management page.
- Select the software and upgrade:
- Select Version Management - > Select the File - > Upgrade
- Once the upgrade is complete, the robot's host computer will restart automatically.