| Version | Revision Date | Modified By | Change Description |
|---|---|---|---|
| V1.0 | 20260415 | damon | Initial draft |
| V1.1 | 20260726 | damon | Upgrade update of main controller V2.1.24 and previous error corrections |
| V1.2 | 20260729 | damon | Information update for main controller V2.2.11 upgrade - Add compliance control switch and parameter setting interface - Add lifting bracket position control interface |
1 SDK Overview
Terminology:
- Low-Level Motion Control Interface: In low-level development mode, you can use the Python and C++ low-level APIs to perform operations such as direct joint control.
- High-Level Application Development Interface: In high-level development mode, you can use LimX's built-in motion-control algorithms to perform tasks such as dual-arm manipulation, forward and backward locomotion, and robot lighting management.
1.1 Communication Architecture Diagram
The following diagram shows the composition of the robot communication architecture and the interactions among its components. The motion-control computer contains motion-control algorithm nodes and application-logic modules, which communicate with the robot through the High-Level Application Development Interface and the Low-Level Motion Control Development Interface. The robot consists of a network switch, a main controller, and various hardware components. The motion-control computer coordinates the operation of these components.
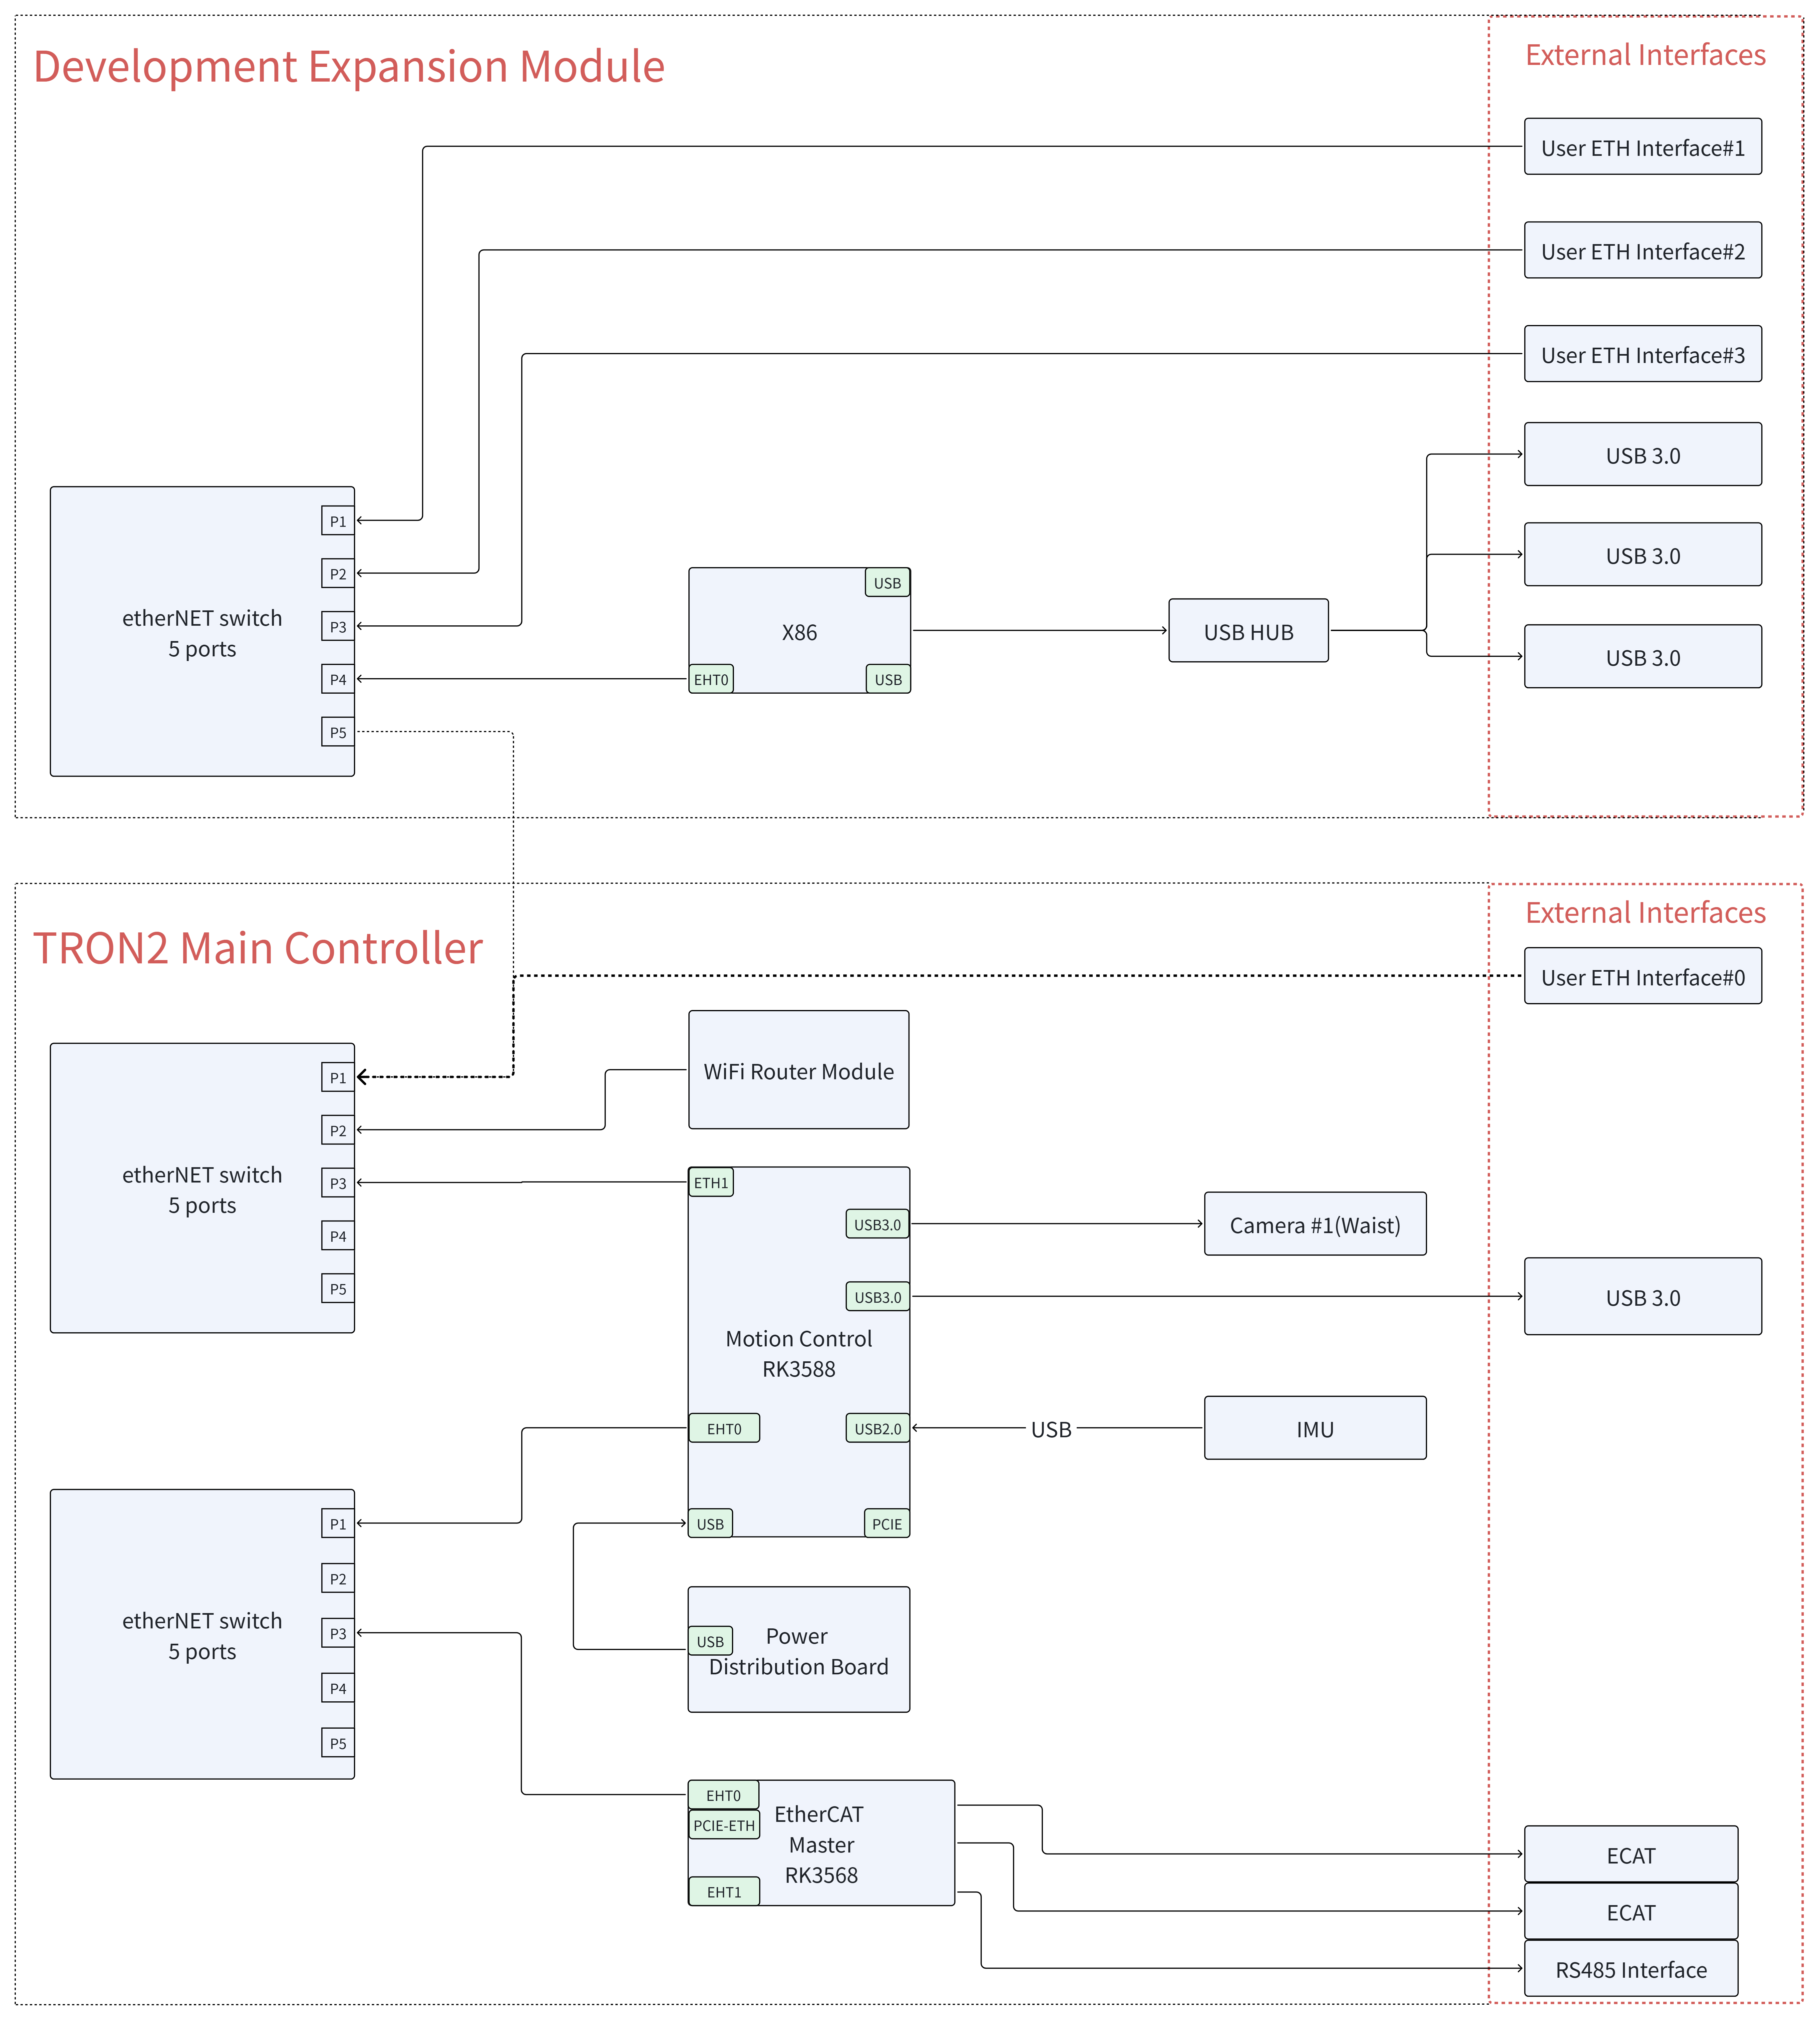
1.2 View/Set the Robot Model
When compiling and running control algorithms and simulator programs, selecting the correct robot model is critical. You can check the robot model and assign it to the ROBOT_TYPE environment variable to ensure that the correct robot configuration is identified and used for different tasks. The following steps describe how to view and configure the robot model.
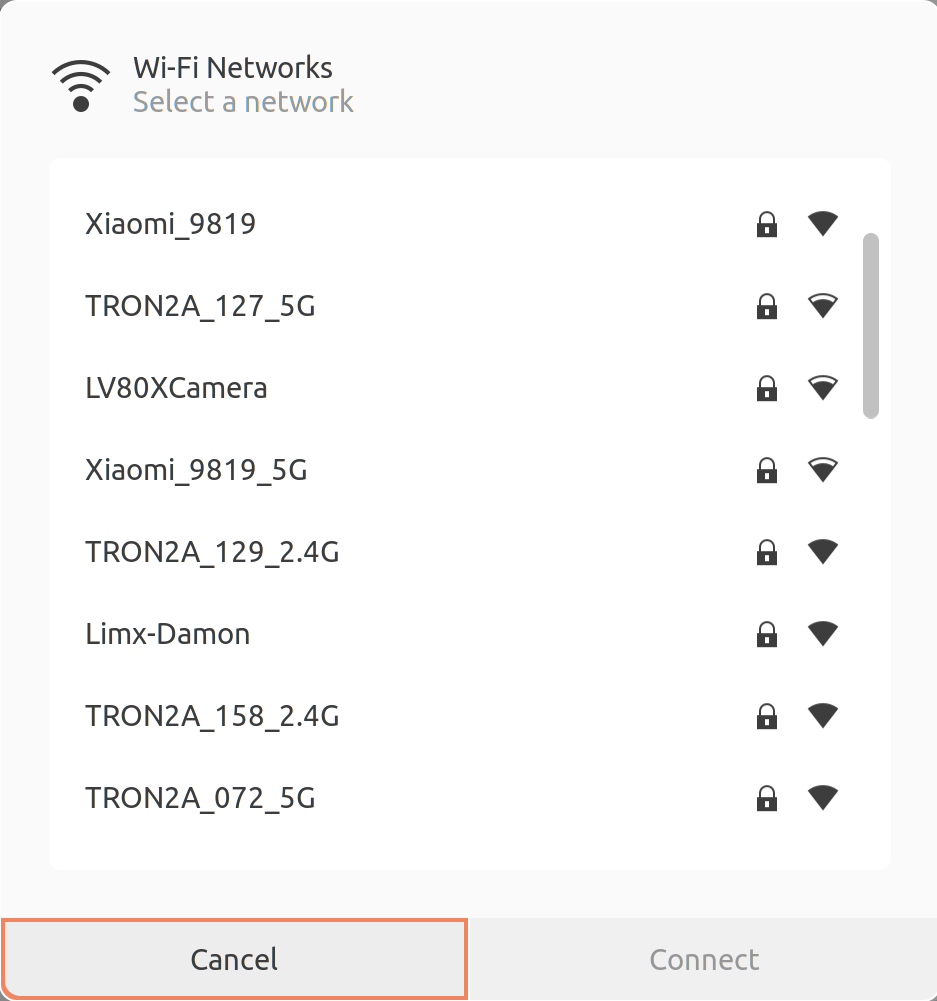
- Select and connect to your robot's Wi-Fi hotspot. The password is
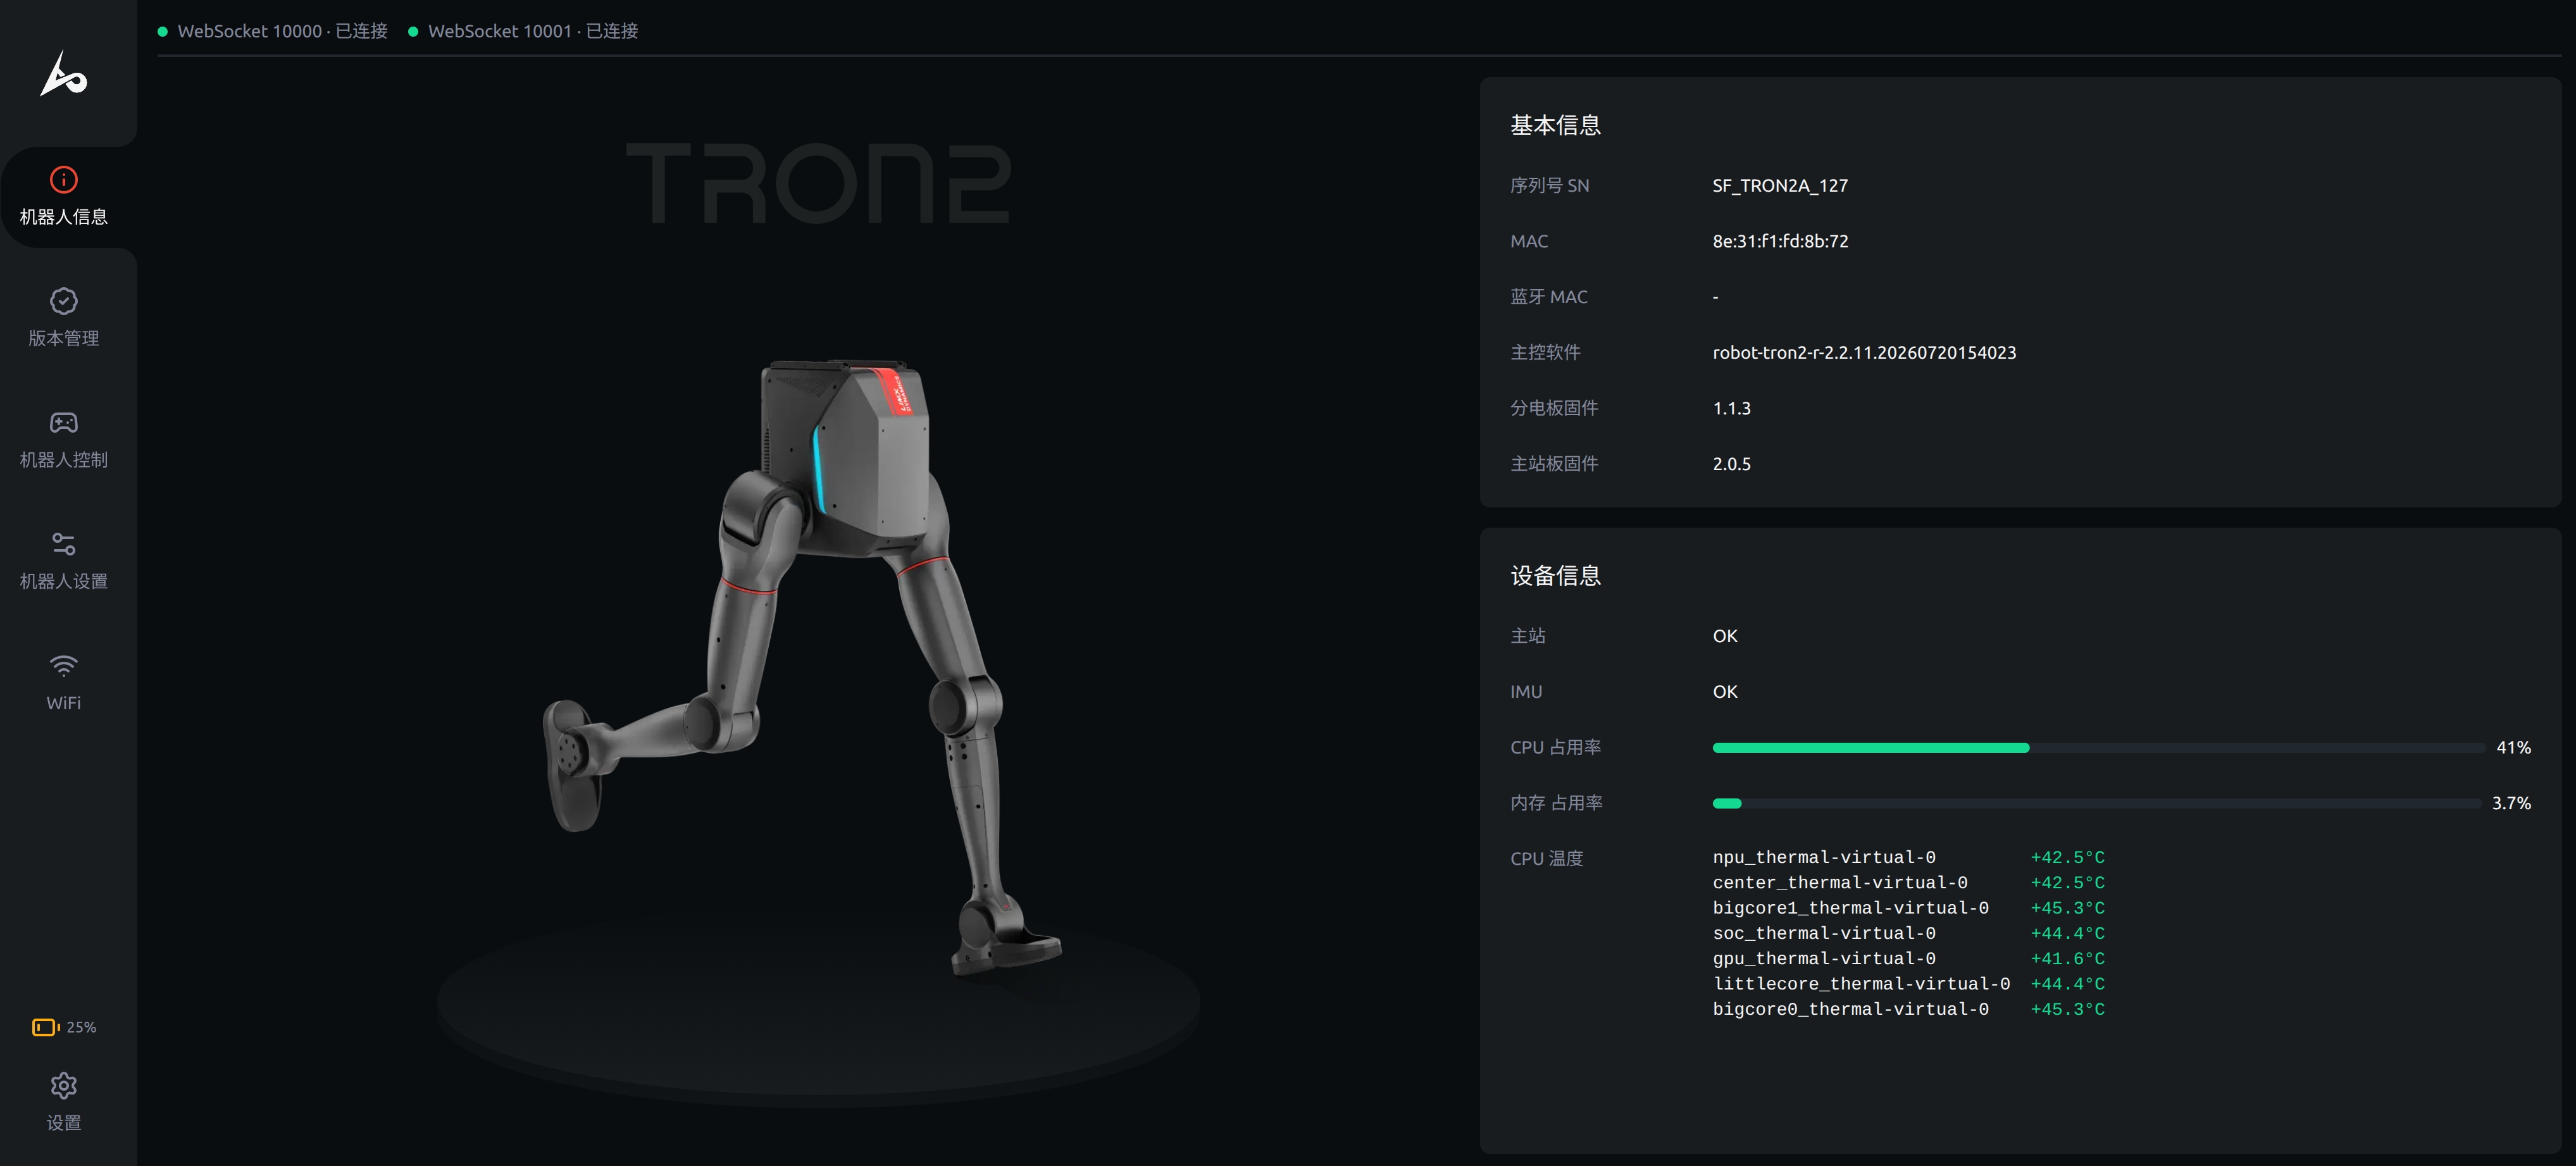
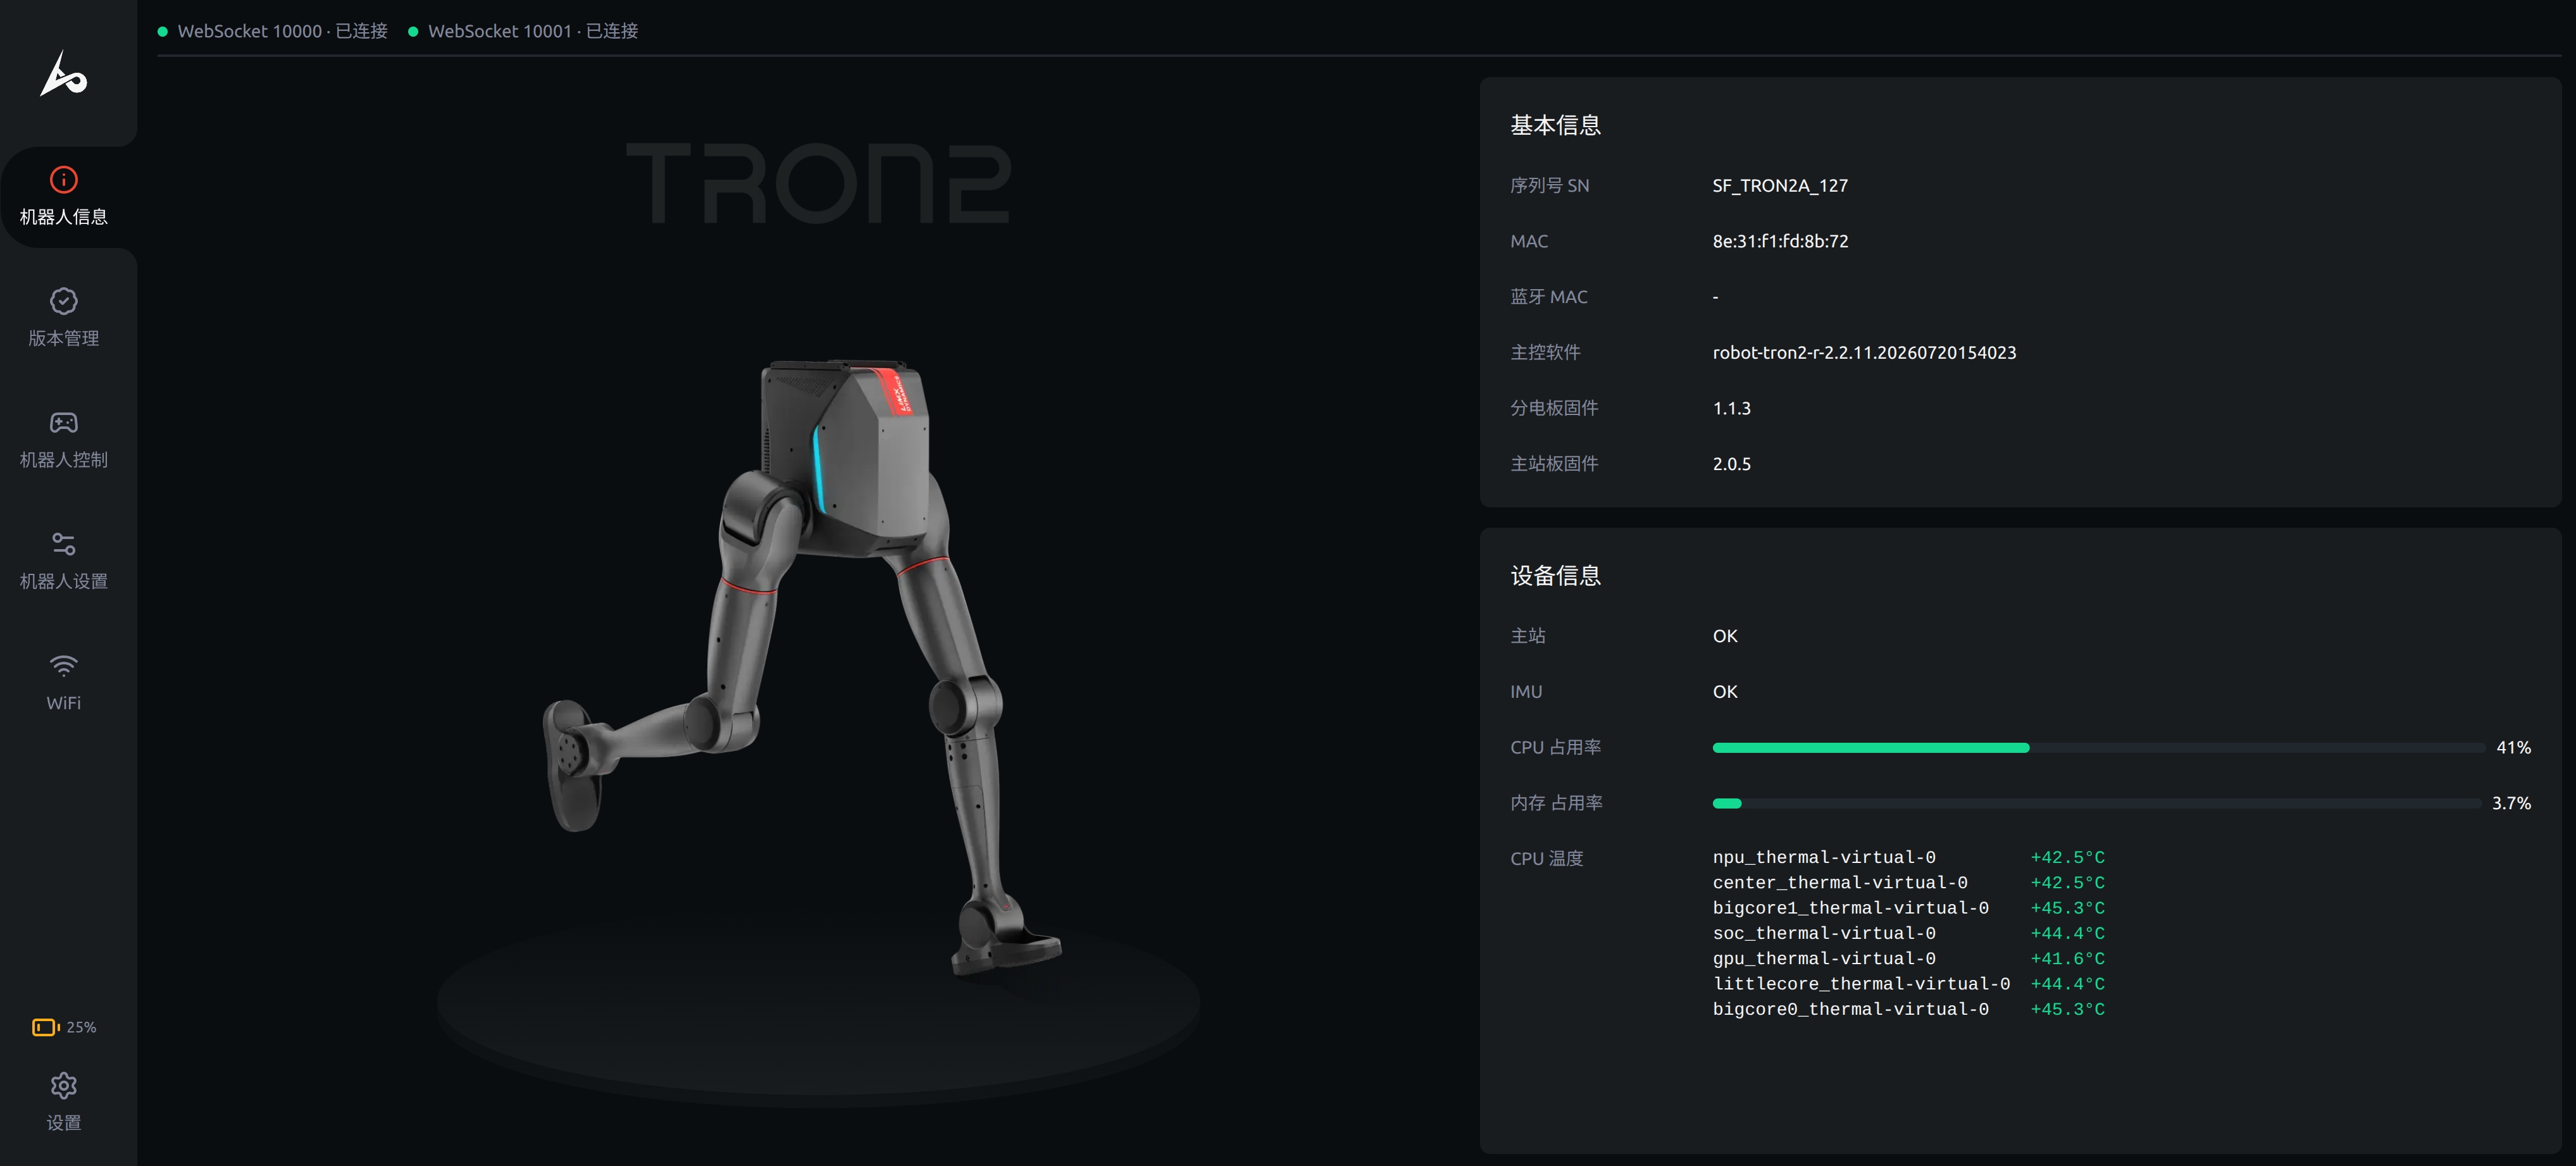
12345678. Enterhttp://10.192.1.2:8080in a browser to open the "Robot Information" page. As shown below, the SN (serial number) isWF_TRON2A_001, whereWF_TRON2Ais the robot model.
- Set the robot model: open a Bash terminal and run the following command. The RL training, control-algorithm, and simulator programs can then obtain the correct robot model information during compilation and execution.
echo 'export ROBOT_TYPE=WF_TRON2A' >> ~/.bashrc && source ~/.bashrc
1.3 Development Expansion Module Computer
The computer built into the development expansion module is primarily used to develop robot-related algorithms and applications. You can connect to the robot's onboard system through Wi-Fi or a wired network and log in to the development computer as follows:
- Select and connect to your robot's Wi-Fi hotspot. The password is
12345678. - Log in to the development computer via SSH:
-
Login address:
10.192.1.4 -
Login password:
123456 -
Run the following command in a terminal. Confirm the host key when connecting for the first time:
ssh guest@10.192.1.4 -
Developer computer system configuration:
- Operating system: Ubuntu 22.04.6 LTS
- ROS 2: ROS 2 Humble is installed by default.
- ROS 1: ROS 1 Noetic is installed by default.
-
2 Low-Level Motion Control Interface
The cross-platform low-level motion-control development interface library provides a unified C++/Python API that is compatible with ROS 1, ROS 2, and non-ROS systems, enabling rapid porting and deployment of motion-control algorithms.
2.1 C++ Motion Control Development Interface
2.1.1 Overview
Through a hardware abstraction layer and standardized communication protocols, the Low-Level Motion Control Development Interface allows developers to switch seamlessly between simulation and physical hardware, significantly reducing the effort required for multi-platform adaptation.
2.1.2 Install the Motion Control Development Library
- Linux x86_64 environment
git clone https://github.com/limxdynamics/limxsdk-lowlevel.git
pip install limxsdk-lowlevel/python3/amd64/limxsdk-*-py3-none-any.whl
- Linux aarch64 environment
 git clone https://github.com/limxdynamics/limxsdk-lowlevel.git
 pip install limxsdk-lowlevel/python3/aarch64/limxsdk-*-py3-none-any.whl
- Windows environment
git clone https://github.com/limxdynamics/limxsdk-lowlevel.git
pip install limxsdk-lowlevel/python3/win/limxsdk-*-py3-none-any.whl
2.1.3 getInstance Interface Description
| Item | Description |
|---|---|
| Function Name | getInstance |
| Function Prototype | static Tron2* getInstance(); |
| Function Overview | Gets a pointer to the singleton instance of the Tron2 robot class |
| Parameters | None |
| Return Value | Tron2*, pointer to a Tron2 instance |
| Remarks | Uses the singleton pattern to ensure that only one Tron2 instance exists in the program |
Code Example:
#include <thread>

// Include the limxsdk::Tron2 header file to use the Tron2 class
#include "limxsdk/tron2.h"

// Use the limxsdk namespace
using namespace limxsdk;

int main(int argc, char *argv[]){
    // Gets the singleton instance of the TRON2 class
    Tron2* robot = Tron2::getInstance();

    // Infinite loop to keep the program running
    while (true)
    {
        // Sleep for 1000 milliseconds
        std::this_thread::sleep_for(std::chrono::milliseconds(1000));
    }

    return 0;
}
2.1.4 init Interface Description
| Item | Description |
|---|---|
| Function Name | init |
| Function Prototype | bool init(const std::string& robot_ip_address = "127.0.0.1"); |
| Function Overview | Initializes the communication runtime environment for the low-level SDK. Call this function in the main function before calling any other interface. |
| Parameters | robot_ip_address: the robot IP address. For simulation, it is usually set to "127.0.0.1"; for a physical robot, set it to "10.192.1.2". |
| Return Value | Returns true on successful initialization; otherwise, returns false. |
| Remarks | None |
Code Example:
#include <thread>

// Include the limxsdk::Tron2 header file to introduce the Tron2 class
#include "limxsdk/tron2.h"

// Use the limxsdk namespace to simplify references to the Tron2 class
using namespace limxsdk;

int main(int argc, char *argv[]){
    // Gets the singleton instance of the Tron2 class
    Tron2* robot = Tron2::getInstance();

    // Default robot IP address
    std::string robot_ip = "127.0.0.1";

    if (argc > 1)
    {
        // If a command-line argument is provided, use it as the robot IP address
        robot_ip = argv[1];
    }

    // Initialize the communication runtime environment for the motion-control algorithm program
    if (!robot->init(robot_ip))
    {
        // If initialization fails, exit the program
        exit(1);
    }

    // Infinite loop to keep the program running
    while (true)
    {
        // Sleep for 1000 milliseconds
        std::this_thread::sleep_for(std::chrono::milliseconds(1000));
    }

    return 0;
}
2.1.5 getMotorNumber Interface Description
| Item | Description |
|---|---|
| Function Name | getMotorNumber |
| Function Prototype | uint32_t getMotorNumber(); |
| Function Overview | Gets the number of robot motors. |
| Parameters | None |
| Return Value | Returns an unsigned integer representing the total number of motors in the robot. |
| Remarks | For example, the dual-wheel-leg configuration has 10 motors. |
Code Example:
#include <thread>

// Include the limxsdk::Tron2 header file to introduce the Tron2 class
#include "limxsdk/tron2.h"

// Use the limxsdk namespace to simplify references to the Tron2 class
using namespace limxsdk;

int main(int argc, char *argv[]){
    // Gets the singleton instance of the Tron2 class
    Tron2* robot = Tron2::getInstance();

    // Default robot IP address
    std::string robot_ip = "10.192.1.2";

    if (argc > 1)
    {
        // If a command-line argument is provided, use it as the robot IP address
        robot_ip = argv[1];
    }

    // Initialize the communication runtime environment for the motion-control algorithm program
    if (!robot->init(robot_ip))
    {
        // If initialization fails, exit the program
        exit(1);
    }

    // Get the number of motors in the robot
    uint32_t motor_num = robot->getMotorNumber();

    // Infinite loop to keep the program running
    while (true)
    {
        // Sleep for 1000 milliseconds
        std::this_thread::sleep_for(std::chrono::milliseconds(1000));
    }

    return 0;
}
2.1.6 subscribeImuData Interface Description
| Item | Description |
|---|---|
| Function Name | subscribeImuData |
| Function Prototype | void subscribeImuData(std::function<void(const ImuDataConstPtr&)> cb); |
| Function Overview | Subscribes to robot IMU data and calls the specified callback function when new IMU data is received. |
| Parameters | cb: callback function used to process new IMU data. |
| Return Value | None |
Remarks - ImuData data structure prototype is as follows:
/**
 * @struct ImuData
 *
 * @brief Structure representing robot IMU data based on sensor feedback.
 *
 * This structure encapsulates IMU data, including accelerometer data, gyroscope data, and quaternions.
 */
struct ImuData {
  uint64_t stamp; // Timestamp in nanoseconds, usually indicating when the data was recorded or generated.
  float acc[3];   // Stores IMU accelerometer data to track linear acceleration along the three axes (X, Y, Z).
  float gyro[3];  // Stores IMU gyroscope data to track angular velocity or rotational velocity around the three axes (X, Y, Z).
  float quat[4];  // Stores IMU quaternion data representing orientation in 3D space (w, x, y, z).
};

// Smart pointer type aliases
typedef std::shared_ptr<ImuData> ImuDataPtr;
typedef std::shared_ptr<ImuData const> ImuDataConstPtr;
Code Example:
#include <thread>

// Include the limxsdk::Tron2 header file to introduce the Tron2 class
#include "limxsdk/tron2.h"

// Use the limxsdk namespace to simplify references to the Tron2 class
using namespace limxsdk;

int main(int argc, char *argv[]){
    // Gets the singleton instance of the Tron2 class
    Tron2* robot = Tron2::getInstance();

    // Default robot IP address
    std::string robot_ip = "10.192.1.2";

    if (argc > 1)
    {
        // If a command-line argument is provided, use it as the robot IP address
        robot_ip = argv[1];
    }

    // Initialize the communication runtime environment for the motion-control algorithm program
    if (!robot->init(robot_ip))
    {
        // If initialization fails, exit the program
        exit(1);
    }

    // Subscribe to robot IMU data and specify the callback function
    robot->subscribeImuData([](const ImuDataConstPtr& msg) {
        // Process the received IMU data here
        // For example: read acceleration, angular velocity, or quaternion information
    });

    // Infinite loop to keep the program running
    while (true)
    {
        // Sleep for 1000 milliseconds
        std::this_thread::sleep_for(std::chrono::milliseconds(1000));
    }

    return 0;
}
2.1.7 subscribeRobotState Interface Description
| Item | Description |
|---|---|
| Function Name | subscribeRobotState |
| Function Prototype | void subscribeRobotState(std::function<void(const RobotStateConstPtr&)> cb); |
| Function Overview | Subscribes to and receives robot state updates. |
| Parameters | cb: callback function that is called when a robot state update is received. The callback parameter points to RobotState constant pointer to the object. |
| Return Value | None |
Remarks - RobotState data structure prototype is as follows:
/**
 * @struct RobotState
 *
 * @brief Structure representing robot state based on sensor feedback.
 *
 * This structure encapsulates various data points for monitoring and controlling the robot, including IMU data (accelerometer, gyroscope, quaternion), output torque, current angle, velocity, etc.
 */
struct RobotState {
  // Default constructor
  RobotState() { }
  // Parameterized constructor used to initialize tau, q, and dq vectors with size motor_num, all initialized to 0.0
  RobotState(int motor_num)
  : tau(motor_num, 0.0)
  , q(motor_num, 0.0)
  , dq(motor_num, 0.0) { }
  uint64_t stamp;              // Timestamp, usually indicating when the data was recorded or generated, in nanoseconds
  std::vector<float> tau;      // Vector storing the current estimated output torque in N·m
  std::vector<float> q;        // Vector storing the current angle in radians
  std::vector<float> dq;       // Vector storing the current velocity in rad/s
};

// Smart pointer type aliases
typedef std::shared_ptr<RobotState> RobotStatePtr;
typedef std::shared_ptr<RobotState const> RobotStateConstPtr;
Code Example:
#include <thread>

// Include the limxsdk::Tron2 header file to introduce the Tron2 class
#include "limxsdk/tron2.h"

// Use the limxsdk namespace to simplify references to the Tron2 class
using namespace limxsdk;

int main(int argc, char *argv[]){
    // Gets the singleton instance of the Tron2 class
    Tron2* robot = Tron2::getInstance();

    // Default robot IP address
    std::string robot_ip = "10.192.1.2";

    if (argc > 1)
    {
        // If a command-line argument is provided, use it as the robot IP address
        robot_ip = argv[1];
    }

    // Initialize the communication runtime environment for the motion-control algorithm program
    if (!robot->init(robot_ip))
    {
        // If initialization fails, exit the program
        exit(1);
    }

    // Subscribe to robot state updates and specify the callback function
    robot->subscribeRobotState([](const RobotStateConstPtr& msg) {
        // Process the received RobotState data here
        // For example: read joint angle, velocity, torque, IMU, and other state information
    });

    // Infinite loop to keep the program running
    while (true)
    {
        // Sleep for 1000 milliseconds
        std::this_thread::sleep_for(std::chrono::milliseconds(1000));
    }

    return 0;
}
2.1.8 publishRobotCmd Interface Description
| Item | Description |
|---|---|
| Function Name | publishRobotCmd |
| Function Prototype | bool publishRobotCmd(const RobotCmd& cmd); |
| Function Overview | Publishes a command to control the robot's joints. |
| Parameters | cmd: the required robot command RobotCmd object. |
| Return Value | bool: indicates whether the command was published successfully. |
| Remarks |
Code Example:
#include <thread>

// Include the limxsdk::Tron2 header file to introduce the Tron2 class
#include "limxsdk/tron2.h"

// Use the limxsdk namespace to simplify references to the Tron2 class
using namespace limxsdk;

int main(int argc, char *argv[]){
    // Gets the singleton instance of the Tron2 class
    Tron2* robot = Tron2::getInstance();

    // Default robot IP address
    std::string robot_ip = "10.192.1.2";

    if (argc > 1)
    {
        // If a command-line argument is provided, use it as the robot IP address
        robot_ip = argv[1];
    }

    // Initialize the communication runtime environment for the motion-control algorithm program
    if (!robot->init(robot_ip))
    {
        // If initialization fails, exit the program
        exit(1);
    }

    // Get the number of motors in the robot
    uint32_t motor_num = robot->getMotorNumber();

    // Create a RobotCmd object containing the number of robot motors
    RobotCmd cmd(motor_num);

    // Publish the control command
    robot->publishRobotCmd(cmd);

    // Infinite loop to keep the program running
    while (true)
    {
        // Sleep for 1000 milliseconds
        std::this_thread::sleep_for(std::chrono::milliseconds(1000));
    }

    return 0;
}
2.1.9 subscribeSensorJoy Interface Description
| Item | Description |
|---|---|
| Function Name | subscribeSensorJoy |
| Function Prototype | void subscribeSensorJoy(std::function<void(const SensorJoyConstPtr&)> cb); |
| Function Overview | On a physical robot, this method subscribes to data from the robot's remote controller. When new remote-controller data is received, the specified callback is invoked with a constant SensorJoy pointer containing the data. |
| Parameters | cb: callback used to receive remote-controller data. Its parameter type is SensorJoyConstPtr, a shared pointer to a constant SensorJoy structure. |
| Return Value | None |
| Remarks |
Code Example:
#include <thread>

// Include the limxsdk::Tron2 header file to introduce the Tron2 class
#include "limxsdk/tron2.h"

// Use the limxsdk namespace to simplify references to the Tron2 class
using namespace limxsdk;

int main(int argc, char *argv[]){
    // Gets the singleton instance of the Tron2 class
    Tron2* robot = Tron2::getInstance();

    // Default robot IP address
    std::string robot_ip = "10.192.1.2";

    if (argc > 1)
    {
        // If a command-line argument is provided, use it as the robot IP address
        robot_ip = argv[1];
    }

    // Initialize the communication runtime environment for the motion-control algorithm program
    if (!robot->init(robot_ip))
    {
        // If initialization fails, exit the program
        exit(1);
    }

    // Subscribe to robot remote-controller data
    robot->subscribeSensorJoy([](const SensorJoyConstPtr& joy) {
        // L1 and R1 pressed
        if (joy->buttons[4] == 1 && joy->buttons[7] == 1)
        {
            // Perform related operations here
        }

        // Process joystick data
        double axes_left_horizontal = joy->axes[0];
        double axes_left_vertical = joy->axes[1];
        double axes_right_horizontal = joy->axes[2];
        double axes_right_vertical = joy->axes[3];
    });

    // Infinite loop to keep the program running
    while (true)
    {
        // Sleep for 1000 milliseconds
        std::this_thread::sleep_for(std::chrono::milliseconds(1000));
    }

    return 0;
}
2.1.10 subscribeDiagnosticValue Interface Description
| Item | Description |
|---|---|
| Function Name | subscribeDiagnosticValue |
| Function Prototype | void subscribeDiagnosticValue(std::function<void(const DiagnosticValueConstPtr&)> cb); |
| Function Overview | On a physical robot, this method subscribes to diagnostic values and status information. When the robot publishes diagnostic data, the specified callback is invoked with a constant DiagnosticValue pointer containing the diagnostic data. This allows applications to monitor robot health in real time and respond promptly to possible issues. |
| Parameters | cb: callback function used to receive robot diagnostic values, whose parameter type is DiagnosticValueConstPtr, i.e., a shared pointer to DiagnosticValue constant structure. DiagnosticValue structure contains robot diagnostic-value information, including timestamp, level, name, code, and message fields. |
| Return Value | None |
| Remarks |
Code Example:
#include <thread>
#include <iostream>

// Include the limxsdk::Tron2 header file to introduce the Tron2 class
#include "limxsdk/tron2.h"

// Use the limxsdk namespace to simplify references to the Tron2 class
using namespace limxsdk;

int main(int argc, char *argv[]){
    // Gets the singleton instance of the Tron2 class
    Tron2* robot = Tron2::getInstance();

    // Default robot IP address
    std::string robot_ip = "10.192.1.2";

    if (argc > 1)
    {
        // If a command-line argument is provided, use it as the robot IP address
        robot_ip = argv[1];
    }

    // Initialize the communication runtime environment for the motion-control algorithm program
    if (!robot->init(robot_ip))
    {
        // If initialization fails, exit the program
        exit(1);
    }

    // Subscribe to robot diagnostic data
    robot->subscribeDiagnosticValue([](const DiagnosticValueConstPtr& msg) {
        // Process robot diagnostic values here
        // For example, print or process them according to the diagnostic level and message content

        std::cout << "Diagnostic Value: " << msg->name << std::endl;
        std::cout << "Level: " << msg->level << std::endl;
        std::cout << "Code: " << msg->code << std::endl;
        std::cout << "Message: " << msg->message << std::endl;
    });

    // Infinite loop to keep the program running
    while (true)
    {
        // Sleep for 1000 milliseconds
        std::this_thread::sleep_for(std::chrono::milliseconds(1000));
    }

    return 0;
}
2.1.11 setRobotLightEffect Interface Description
| Item | Description |
|---|---|
| Function Name | setRobotLightEffect |
| Function Prototype | bool setRobotLightEffect(int effect); |
| Function Overview | On a physical robot, this method sets the robot's lighting effect. |
| Parameters | effect: an integer representing the required robot light effect. See Tron2::LightEffect enumeration. |
| Return Value | bool: indicates whether the robot light effect was set successfully. |
Remarks - Light effect enumeration description:
enum LightEffect : int {
    STATIC_RED = 0,        // static red light
    STATIC_GREEN,          // static green light
    STATIC_BLUE,           // static blue light
    STATIC_CYAN,           // static cyan light
    STATIC_PURPLE,         // static purple light
    STATIC_YELLOW,         // static yellow light
    STATIC_WHITE,          // static white light

    LOW_FLASH_RED,         // red flashing (slow)
    LOW_FLASH_GREEN,       // green flashing (slow)
    LOW_FLASH_BLUE,        // blue flashing (slow)
    LOW_FLASH_CYAN,        // cyan flashing (slow)
    LOW_FLASH_PURPLE,      // purple flashing (slow)
    LOW_FLASH_YELLOW,      // yellow flashing (slow)
    LOW_FLASH_WHITE,       // white flashing (slow)

    FAST_FLASH_RED,        // red flashing (fast)
    FAST_FLASH_GREEN,      // green flashing (fast)
    FAST_FLASH_BLUE,       // blue flashing (fast)
    FAST_FLASH_CYAN,       // cyan flashing (fast)
    FAST_FLASH_PURPLE,     // purple flashing (fast)
    FAST_FLASH_YELLOW,     // yellow flashing (fast)
    FAST_FLASH_WHITE       // white flashing (fast)
};
Code Example:
#include <thread>

// Include the limxsdk::Tron2 header file to introduce the Tron2 class
#include "limxsdk/tron2.h"

// Use the limxsdk namespace to simplify references to the Tron2 class
using namespace limxsdk;

int main(int argc, char *argv[]){
    // Gets the singleton instance of the Tron2 class
    Tron2* robot = Tron2::getInstance();

    // Default robot IP address
    std::string robot_ip = "10.192.1.2";

    if (argc > 1)
    {
        // If a command-line argument is provided, use it as the robot IP address
        robot_ip = argv[1];
    }

    // Initialize the communication runtime environment for the motion-control algorithm program
    if (!robot->init(robot_ip))
    {
        // If initialization fails, exit the program
        exit(1);
    }

    // Set the robot light effect to static red light
    robot->setRobotLightEffect(limxsdk::Tron2::STATIC_RED);

    // Infinite loop to keep the program running
    while (true)
    {
        // Sleep for 1000 milliseconds
        std::this_thread::sleep_for(std::chrono::milliseconds(1000));
    }

    return 0;
}
2.1.12 Reference Examples (Coming Soon)
2.2 Python Motion Control Development Interface
2.2.1 Overview
The Python Motion Control Development Interface provides the same functionality as the C++ interface, allowing developers who are unfamiliar with C++ to develop motion-control algorithms in Python.
Python is easy to learn and offers concise syntax and a rich collection of third-party libraries, allowing developers to get started quickly and implement algorithms efficiently. Through the Python interface, developers can use Python's dynamic features for rapid prototyping and experimental validation, accelerating algorithm iteration and optimization. Python's cross-platform capabilities and extensive ecosystem also make motion-control algorithms easier to deploy across different platforms and environments.
Python's flexibility also simplifies rapid deployment to simulation and physical-robot environments. Developers can integrate algorithm models with simulation platforms and physical hardware for rapid iteration and performance validation.
2.2.2 Install the Motion Control Development Library
- Linux x86_64 environment
  git clone https://github.com/limxdynamics/limxsdk-lowlevel.git
  pip install limxsdk-lowlevel/python3/amd64/limxsdk-*-py3-none-any.whl
- Linux aarch64 environment
git clone https://github.com/limxdynamics/limxsdk-lowlevel.git
pip install limxsdk-lowlevel/python3/aarch64/limxsdk-*-py3-none-any.whl
- Windows environment
  git clone https://github.com/limxdynamics/limxsdk-lowlevel.git
  pip install limxsdk-lowlevel/python3/win/limxsdk-*-py3-none-any.whl
2.2.3 __init__ Interface Description
| Item | Description |
|---|---|
| Function Name | __init__ |
| Function Prototype | def __init__(self, robot_type: robot.RobotType) |
| Function Overview | Specifies the robot type during initialization and creates a local robot instance of the corresponding type. |
| Parameters | robot_type: enumeration value representing the robot type, type is RobotType.Tron2. |
| Return Value | None |
| Remarks | None |
Code Example:
import sys
import limxsdk.robot.Robot as Robot
import limxsdk.robot.RobotType as RobotType

if __name__ == '__main__':
    # Create a Robot instance of type Tron2
    robot = Robot(RobotType.Tron2)
2.2.4 init Interface Description
| Item | Description |
|---|---|
| Function Name | init |
| Function Prototype | def init(self, robot_ip: str = "127.0.0.1") |
| Function Overview | Initializes the communication runtime environment for the motion-control algorithm program. Call this function before calling any other interface. |
| Parameters | robot_ip: the robot IP address. For simulation, it is usually set to "127.0.0.1"; for a physical robot, set it to "10.192.1.2". |
| Return Value | Returns True on successful initialization and False on failure. |
| Remarks | None |
Code Example:
import sys
import limxsdk.robot.Robot as Robot
import limxsdk.robot.RobotType as RobotType

if __name__ == '__main__':
    # Create a Robot instance of type Tron2
    robot = Robot(RobotType.Tron2)

    robot_ip = "10.192.1.2"
    # Check whether a command-line argument is provided as the robot IP
    if len(sys.argv) > 1:
        robot_ip = sys.argv[1]

    # Initialize the robot communication runtime environment using the IP address
    if not robot.init(robot_ip):
        sys.exit()
2.2.5 getMotorNumber Interface Description
| Item | Description |
|---|---|
| Function Name | getMotorNumber |
| Function Prototype | def getMotorNumber(self, timeout: float = -1.0) |
| Function Overview | Gets the number of motors in the robot. |
| Parameters | timeout: timeout in seconds. The default value -1.0 means to wait indefinitely. |
| Return Value | Returns an unsigned integer representing the total number of motors in the robot. |
| Remarks | The dual-arm configuration normally has 14 motors. |
Code Example:
import sys
import limxsdk.robot.Robot as Robot
import limxsdk.robot.RobotType as RobotType

if __name__ == '__main__':
    # Create a Robot instance of type Tron2
    robot = Robot(RobotType.Tron2)

    robot_ip = "10.192.1.2"
    # Check whether a robot IP command-line argument is provided
    if len(sys.argv) > 1:
        robot_ip = sys.argv[1]

    # Initialize the robot with robot_ip
    if not robot.init(robot_ip):
        sys.exit()

    # Get the number of motors in the robot
    motor_number = robot.getMotorNumber()
2.2.6 subscribeImuData Interface Description
| Item | Description |
|---|---|
| Function Name | subscribeImuData |
| Function Prototype | def subscribeImuData(self, callback: Callable[[datatypes.ImuData], Any]) |
| Function Overview | Subscribes to robot IMU data and calls the specified callback function when new IMU data is received. |
| Parameters | callback: callback function used to process new IMU data. |
| Return Value | Returns True on success and continuously outputs IMU data; returns False on failure. |
Remarks - datatypes.ImuData data structure prototype is as follows:
import sys
from functools import partial
import limxsdk.robot.Robot as Robot
import limxsdk.robot.RobotType as RobotType
import limxsdk.datatypes as datatypes

class RobotReceiver:
    # Subscribe to robot IMU data
    def imuDataCallback(self, imu: datatypes.ImuData):
        print("\n------\nrobot_state:" + \
              "\n  stamp: " + str(imu.stamp) + \
              "\n  acc: " + str(imu.acc) + \
              "\n  gyro: " + str(imu.gyro) + \
              "\n  quat: " + str(imu.quat))

if __name__ == '__main__':
    # Create a Robot instance of type Tron2
    robot = Robot(RobotType.Tron2)

    robot_ip = "10.192.1.2"
    # Check whether a robot IP command-line argument is provided
    if len(sys.argv) > 1:
        robot_ip = sys.argv[1]

    # Initialize the robot with robot_ip
    if not robot.init(robot_ip):
        sys.exit()

    # Create a RobotReceiver instance to handle callbacks
    receiver = RobotReceiver()

    # Create a partial function for the callback
    imuDataCallback = partial(receiver.imuDataCallback)

    # Subscribe to robot IMU data
    robot.subscribeImuData(imuDataCallback)

    # Sleep for 1 second to prevent the program from exiting
    import time
    while True:
        time.sleep(1)
2.2.7 subscribeRobotState Interface Description
| Item | Description |
|---|---|
| Function Name | subscribeRobotState |
| Function Prototype | def subscribeRobotState(self, callback: Callable[[datatypes.RobotState], Any]) |
| Function Overview | Subscribes to and receives robot state updates. |
| Parameters | callback: callback function that is called when a robot state update is received. The callback parameter points to datatypes.RobotState object. |
| Return Value | Returns True on success and False on failure. |
| Remarks | None |
Code Example:
import sys
from functools import partial
import limxsdk.robot.Robot as Robot
import limxsdk.robot.RobotType as RobotType
import limxsdk.datatypes as datatypes

class RobotReceiver:
    # callback function used to receive robot state
    def robotStateCallback(self, robot_state: datatypes.RobotState):
        print("\n------\nrobot_state:" + \
              "\n  stamp: " + str(robot_state.stamp) + \
              "\n  tau: " + str(robot_state.tau) + \
              "\n  q: " + str(robot_state.q) + \
              "\n  dq: " + str(robot_state.dq))

if __name__ == '__main__':
    # Create a Robot instance of type Tron2
    robot = Robot(RobotType.Tron2)

    robot_ip = "10.192.1.2"
    # Check whether a robot IP command-line argument is provided
    if len(sys.argv) > 1:
        robot_ip = sys.argv[1]

    # Initialize the robot with robot_ip
    if not robot.init(robot_ip):
        sys.exit()

    # Create a RobotReceiver instance to handle callbacks
    receiver = RobotReceiver()

    # Create a partial function for the callback
    robotStateCallback = partial(receiver.robotStateCallback)

    # Subscribe to robot state
    robot.subscribeRobotState(robotStateCallback)

    # Sleep for 1 second to prevent the program from exiting
    import time
    while True:
        time.sleep(1)
2.2.8 publishRobotCmd Interface Description
| Item | Description |
|---|---|
| Function Name | publishRobotCmd |
| Function Prototype | def publishRobotCmd(self, cmd: datatypes.RobotCmd) |
| Function Overview | Publishes a command to control robot motion. |
| Parameters | cmd: the required robot command datatypes.RobotCmd object. |
| Return Value | Returns True on success and False on failure. |
| Remarks | None |
Code Example:
import sys
import time
import limxsdk.robot.Rate as Rate
import limxsdk.robot.Robot as Robot
import limxsdk.robot.RobotType as RobotType
import limxsdk.datatypes as datatypes

if __name__ == '__main__':
    # Create a Robot instance
    robot = Robot(RobotType.Tron2)

    # For simulation, use "127.0.0.1"; for a physical robot, use "10.192.1.2"
    robot_ip = "10.192.1.2"
    # Check whether a robot IP command-line argument is provided
    if len(sys.argv) > 1:
        robot_ip = sys.argv[1]

    # Initialize the robot with robot_ip
    if not robot.init(robot_ip):
        sys.exit()

    # Get motor-count information
    motor_number = robot.getMotorNumber()

    # Main loop to continuously publish robot commands
    rate = Rate(300) # 300Hz
    cmd_msg = datatypes.RobotCmd()
    while True:
        # Set default values for timestamp, control mode, joint position, velocity, torque, Kp, and Kd
        # motor_names corresponds to the joint names you want to control
        # Note: the following is only a format example. Fill in specific parameters during actual use.
        cmd_msg.stamp = time.time_ns()
        cmd_msg.mode = [0.0 for _ in range(16)] # No change is required in actual use
        cmd_msg.q = [0.0 for _ in range(16)]    # Fill in the planned angles; control frequency is 300 Hz
        cmd_msg.dq = [0.0 for _ in range(16)]   # No change is required in actual use
        cmd_msg.tau = [0.0 for _ in range(16)]  # No change is required in actual use
        cmd_msg.Kp = [420,420,300,300,200,200,200,420,420,300,300,200,200,200]
        cmd_msg.Kd = [12,12,15,15,10,10,10,12,12,15,15,10,10,10,3,3]
        cmd_msg.motor_names = ["" for _ in range(16)]   # No change is required in actual use
        robot.publishRobotCmd(cmd_msg)  # Publish robot command
        rate.sleep()  # Control loop frequency
2.2.9 subscribeSensorJoy Interface Description
| Item | Description |
|---|---|
| Function Name | subscribeSensorJoy |
| Function Prototype | def subscribeSensorJoy(self, callback: Callable[[datatypes.SensorJoy], Any]) |
| Function Overview | On a physical robot, this method subscribes to data from the robot's remote controller. When new data is received, the specified callback is invoked with a datatypes.SensorJoy object containing the remote-controller data. |
| Parameters | callback: callback used to receive remote-controller data. Its parameter type is datatypes.SensorJoy. |
| Return Value | Returns True on success and False on failure. |
| Remarks | None |
Code Example:
import sys
import time
from functools import partial
import limxsdk.robot.Robot as Robot
import limxsdk.robot.RobotType as RobotType
import limxsdk.datatypes as datatypes

class RobotReceiver:
    # callback function used to receive remote-controller data
    def sensorJoyCallback(self, sensor_joy: datatypes.SensorJoy):
        print("\n------\nsensor_joy:" + \
              "\n  stamp: " + str(sensor_joy.stamp) + \
              "\n  axes: " + str(sensor_joy.axes) + \
              "\n  buttons: " + str(sensor_joy.buttons))

if __name__ == '__main__':
    # Create a Robot instance of type Tron2
    robot = Robot(RobotType.Tron2)

    robot_ip = "10.192.1.2"
    # Check whether a robot IP command-line argument is provided
    if len(sys.argv) > 1:
        robot_ip = sys.argv[1]

    # Initialize the robot with robot_ip
    if not robot.init(robot_ip):
        sys.exit()

    # Create a RobotReceiver instance to handle callbacks
    receiver = RobotReceiver()

    # Create a partial function for the callback
    sensorJoyCallback = partial(receiver.sensorJoyCallback)

    # Subscribe to robot remote-control data
    robot.subscribeSensorJoy(sensorJoyCallback)

    # Sleep for 1 second to prevent the program from exiting
    import time
    while True:
        time.sleep(1)
2.2.10 subscribeDiagnosticValue Interface Description
| Item | Description |
|---|---|
| Function Name | subscribeDiagnosticValue |
| Function Prototype | def subscribeDiagnosticValue(self, callback: Callable[[datatypes.DiagnosticValue], Any]) |
| Function Overview | On a physical robot, this method subscribes to diagnostic values and status information. When diagnostic data is published, the specified callback is invoked with a datatypes.DiagnosticValue object containing the diagnostic data. This allows applications to monitor robot health in real time and respond promptly to possible issues. |
| Parameters | callback: callback function used to receive robot diagnostic values, whose parameter type is datatypes.DiagnosticValue. datatypes.DiagnosticValue structure contains robot diagnostic-value information, including timestamp, level, name, code, and message fields. |
| Return Value | Returns True on success and False on failure. |
| Remarks | None |
Code Example:
import sys
from functools import partial
import limxsdk.robot.Robot as Robot
import limxsdk.robot.RobotType as RobotType
import limxsdk.datatypes as datatypes

class RobotReceiver:
    # callback function used to receive diagnostic values
    def diagnosticValueCallback(self, diagnostic_value: datatypes.DiagnosticValue):
        print("\n------\ndiagnostic_value:" + \
              "\n  stamp: " + str(diagnostic_value.stamp) + \
              "\n  name: " + diagnostic_value.name + \
              "\n  level: " + str(diagnostic_value.level) + \
              "\n  code: " + str(diagnostic_value.code) + \
              "\n  message: " + diagnostic_value.message)

if __name__ == '__main__':
    # Create a Robot instance of type Tron2
    robot = Robot(RobotType.Tron2)

    robot_ip = "10.192.1.2"
    # Check whether a robot IP command-line argument is provided
    if len(sys.argv) > 1:
        robot_ip = sys.argv[1]

    # Initialize the robot with robot_ip
    if not robot.init(robot_ip):
        sys.exit()

    # Create a RobotReceiver instance to handle callbacks
    receiver = RobotReceiver()

    # Create a partial function for the callback
    diagnosticValueCallback = partial(receiver.diagnosticValueCallback)

    # Subscribe to robot diagnostic information
    robot.subscribeDiagnosticValue(diagnosticValueCallback)

    # Sleep for 1 second to prevent the program from exiting
    import time
    while True:
        time.sleep(1)
Return Value: |
/home/damon/PyCharmMiscProject/.venv/bin/python /home/damon/PyCharmMiscProject/testsdk.py
INFO: RobotIPAddress - "10.192.1.2"

------
diagnostic_value:
  stamp: 980020701021
  name: battery
  level: 0
  code: 100
  message: 100

------
diagnostic_value:
  stamp: 980016991896
  name: battery_charge
  level: 0
  code: 0
  message: 1

------
diagnostic_value:
  stamp: 980016965062
  name: battery_cost
  level: 0
  code: 0
  message: 100

------
diagnostic_value:
  stamp: 980016998021
  name: battery_voltage
  level: 0
  code: 0
  message: 56

------
diagnostic_value:
  stamp: 590572955807
  name: controller
  level: 0
  code: 1
  message: manipulation_damping controller is ready

------
diagnostic_value:
  stamp: 980017064521
  name: current_12v
  level: 0
  code: 0
  message: 0

------
diagnostic_value:
  stamp: 980017054604
  name: current_15v
  level: 0
  code: 0
  message: 2

------
diagnostic_value:
  stamp: 980017043229
  name: current_24v
  level: 0
  code: 0
  message: 0

------
diagnostic_value:
  stamp: 13302781672
  name: ecm_version
  level: 0
  code: 0
  message: 1.0.25

------
diagnostic_value:
  stamp: 24524362677
  name: ethercat
  level: 0
  code: 0
  message: ethercat ok!

------
diagnostic_value:
  stamp: 14114416512
  name: imu
  level: 0
  code: 0
  message: OK

------
diagnostic_value:
  stamp: 14059836923
  name: lan_index
  level: 0
  code: 0
  message: 1

------
diagnostic_value:
  stamp: 24534264177
  name: left end-effector
  level: 0
  code: 3
  message: limx 2F gripper

------
diagnostic_value:
  stamp: 980017021646
  name: motor1_current
  level: 0
  code: 0
  message: 0

------
diagnostic_value:
  stamp: 980017015812
  name: motor1_voltage
  level: 0
  code: 0
  message: 55

------
diagnostic_value:
  stamp: 980017032437
  name: motor2_current
  level: 0
  code: 0
  message: 0

------
diagnostic_value:
  stamp: 980017027187
  name: motor2_voltage
  level: 0
  code: 0
  message: 55

------
diagnostic_value:
  stamp: 980017010854
  name: motor_current
  level: 0
  code: 0
  message: 0

------
diagnostic_value:
  stamp: 23464742635
  name: motor_version
  level: 0
  code: 0
  message: 1: 1.2.23; 2: 1.2.23; 3: 1.2.23; 4: 1.2.23; 5: 1.2.23; 6: 1.2.23; 7: 1.2.23; 8: 1.2.23; 9: 1.2.23; 10: 1.2.23; 11: 1.2.23; 12: 1.2.23; 13: 1.2.23; 14: 1.2.23; 15: 1.2.18; 16: 1.2.18;

------
diagnostic_value:
  stamp: 980017005604
  name: motor_voltage
  level: 0
  code: 0
  message: 55

------
diagnostic_value:
  stamp: 24543136677
  name: right end-effector
  level: 0
  code: 3
  message: limx 2F gripper

------
diagnostic_value:
  stamp: 13993435499
  name: rotate_status
  level: 0
  code: 0
  message: 0

------
diagnostic_value:
  stamp: 13983715707
  name: version
  level: 0
  code: 0
  message: robot-tron2-r-1.2.20.20251225182226

------
diagnostic_value:
  stamp: 980017059562
  name: voltage_12v
  level: 0
  code: 0
  message: 12

------
diagnostic_value:
  stamp: 980017049646
  name: voltage_15v
  level: 0
  code: 0
  message: 16

------
diagnostic_value:
  stamp: 980017037687
  name: voltage_24v
  level: 0
  code: 0
  message: 25

------
diagnostic_value:
  stamp: 14044807630
  name: vr_follow_head
  level: 0
  code: 0
  message: disable vr follow head

------
diagnostic_value:
  stamp: 50767494403
  name: working_mode
  level: 0
  code: 0
  message: developer_mode

------
diagnostic_value:
  stamp: 1010017039577
  name: battery_cost
  level: 0
  code: 0
  message: 100

------
diagnostic_value:
  stamp: 1010017068743
  name: battery_charge
  level: 0
  code: 0
  message: 1

------
diagnostic_value:
  stamp: 1010017076910
  name: battery_voltage
  level: 0
  code: 0
  message: 56

------
diagnostic_value:
  stamp: 1010017083035
  name: motor_voltage
  level: 0
  code: 0
  message: 55

------
diagnostic_value:
  stamp: 1010017088577
  name: motor_current
  level: 0
  code: 0
  message: 0

------
diagnostic_value:
  stamp: 1010017093243
  name: motor1_voltage
  level: 0
  code: 0
  message: 55

------
diagnostic_value:
  stamp: 1010017099077
  name: motor1_current
  level: 0
  code: 0
  message: 0

------
diagnostic_value:
  stamp: 1010017104327
  name: motor2_voltage
  level: 0
  code: 0
  message: 55

------
diagnostic_value:
  stamp: 1010017108993
  name: motor2_current
  level: 0
  code: 0
  message: 0

------
diagnostic_value:
  stamp: 1010017114243
  name: voltage_24v
  level: 0
  code: 0
  message: 25

------
diagnostic_value:
  stamp: 1010017119785
  name: current_24v
  level: 0
  code: 0
  message: 0

------
diagnostic_value:
  stamp: 1010017125618
  name: voltage_15v
  level: 0
  code: 0
  message: 16

------
diagnostic_value:
  stamp: 1010017130285
  name: current_15v
  level: 0
  code: 0
  message: 2

------
diagnostic_value:
  stamp: 1010017134952
  name: voltage_12v
  level: 0
  code: 0
  message: 12

------
diagnostic_value:
  stamp: 1010017139618
  name: current_12v
  level: 0
  code: 0
  message: 0

------
diagnostic_value:
  stamp: 1010020746952
  name: battery
  level: 0
  code: 100
  message: 100

------
diagnostic_value:
  stamp: 1040017682549
  name: battery_cost
  level: 0
  code: 0
  message: 100

------
diagnostic_value:
  stamp: 1040017712591
  name: battery_charge
  level: 0
  code: 0
  message: 1

------
diagnostic_value:
  stamp: 1040017719008
  name: battery_voltage
  level: 0
  code: 0
  message: 56

------
diagnostic_value:
  stamp: 1040017725424
  name: motor_voltage
  level: 0
  code: 0
  message: 55

------
diagnostic_value:
  stamp: 1040017730966
  name: motor_current
  level: 0
  code: 0
  message: 0

------
diagnostic_value:
  stamp: 1040017736216
  name: motor1_voltage
  level: 0
  code: 0
  message: 55

------
diagnostic_value:
  stamp: 1040017741758
  name: motor1_current
  level: 0
  code: 0
  message: 0

------
diagnostic_value:
  stamp: 1040017747299
  name: motor2_voltage
  level: 0
  code: 0
  message: 55

------
diagnostic_value:
  stamp: 1040017752549
  name: motor2_current
  level: 0
  code: 0
  message: 0

------
diagnostic_value:
  stamp: 1040017758674
  name: voltage_24v
  level: 0
  code: 0
  message: 25

------
diagnostic_value:
  stamp: 1040017763924
  name: current_24v
  level: 0
  code: 0
  message: 0

------
diagnostic_value:
  stamp: 1040017769174
  name: voltage_15v
  level: 0
  code: 0
  message: 16

------
diagnostic_value:
  stamp: 1040017774133
  name: current_15v
  level: 0
  code: 0
  message: 1

------
diagnostic_value:
  stamp: 1040017779091
  name: voltage_12v
  level: 0
  code: 0
  message: 12

------
diagnostic_value:
  stamp: 1040017783758
  name: current_12v
  level: 0
  code: 0
  message: 0

------
diagnostic_value:
  stamp: 1040021298341
  name: battery
  level: 0
  code: 100
  message: 100

------
diagnostic_value:
  stamp: 1070017263855
  name: battery_cost
  level: 0
  code: 0
  message: 100

------
diagnostic_value:
  stamp: 1070017288647
  name: battery_charge
  level: 0
  code: 0
  message: 1

------
diagnostic_value:
  stamp: 1070017295064
  name: battery_voltage
  level: 0
  code: 0
  message: 56

------
diagnostic_value:
  stamp: 1070017301480
  name: motor_voltage
  level: 0
  code: 0
  message: 55

------
diagnostic_value:
  stamp: 1070017307022
  name: motor_current
  level: 0
  code: 0
  message: 0

------
diagnostic_value:
  stamp: 1070017311980
  name: motor1_voltage
  level: 0
  code: 0
  message: 55

------
diagnostic_value:
  stamp: 1070017317522
  name: motor1_current
  level: 0
  code: 0
  message: 0

------
diagnostic_value:
  stamp: 1070017323939
  name: motor2_voltage
  level: 0
  code: 0
  message: 55

------
diagnostic_value:
  stamp: 1070017328605
  name: motor2_current
  level: 0
  code: 0
  message: 0

------
diagnostic_value:
  stamp: 1070017333855
  name: voltage_24v
  level: 0
  code: 0
  message: 25

------
diagnostic_value:
  stamp: 1070017339105
  name: current_24v
  level: 0
  code: 0
  message: 0

------
diagnostic_value:
  stamp: 1070017344064
  name: voltage_15v
  level: 0
  code: 0
  message: 16

------
diagnostic_value:
  stamp: 1070017348730
  name: current_15v
  level: 0
  code: 0
  message: 1

------
diagnostic_value:
  stamp: 1070017353980
  name: voltage_12v
  level: 0
  code: 0
  message: 12

------
diagnostic_value:
  stamp: 1070017358939
  name: current_12v
  level: 0
  code: 0
  message: 0

------
diagnostic_value:
  stamp: 1070020944689
  name: battery
  level: 0
  code: 100
  message: 100

Process finished with exit code 130 (interrupted by signal 2:SIGINT)
2.2.11 setRobotLightEffect Interface Description
| Item | Description |
|---|---|
| Function Name | setRobotLightEffect |
| Function Prototype | def setRobotLightEffect(self, effect: datatypes.LightEffect) |
| Function Overview | On a physical robot, this method sets the robot's lighting effect. |
| Parameters | effect: enumeration value representing the required robot light effect. See datatypes.LightEffect. |
| Return Value | Returns True on success and False on failure. |
Remarks - Tron2::LightEffect enumeration definition:
enum LightEffect : int {
    STATIC_RED = 0,     // static red light
    STATIC_GREEN,       // static green light
    STATIC_BLUE,        // static blue light
    STATIC_CYAN,        // static cyan light
    STATIC_PURPLE,      // static purple light
    STATIC_YELLOW,      // static yellow light
    STATIC_WHITE,       // static white light
    LOW_FLASH_RED,      // red flashing (slow)
    LOW_FLASH_GREEN,    // green flashing (slow)
    LOW_FLASH_BLUE,     // blue flashing (slow)
    LOW_FLASH_CYAN,     // cyan flashing (slow)
    LOW_FLASH_PURPLE,   // purple flashing (slow)
    LOW_FLASH_YELLOW,   // yellow flashing (slow)
    LOW_FLASH_WHITE,    // white flashing (slow)
    FAST_FLASH_RED,     // red flashing (fast)
    FAST_FLASH_GREEN,   // green flashing (fast)
    FAST_FLASH_BLUE,    // blue flashing (fast)
    FAST_FLASH_CYAN,    // cyan flashing (fast)
    FAST_FLASH_PURPLE,  // purple flashing (fast)
    FAST_FLASH_YELLOW,  // yellow flashing (fast)
    FAST_FLASH_WHITE    // white flashing (fast)
};
Code Example:
import sys
from functools import partial
import limxsdk.robot.Robot as Robot
import limxsdk.robot.RobotType as RobotType
import limxsdk.datatypes as datatypes

class RobotReceiver:

if __name__ == '__main__':
    # Create a Robot instance of type Tron2
    robot = Robot(RobotType.Tron2)

    robot_ip = "10.192.1.2"
    # Check whether a robot IP command-line argument is provided
    if len(sys.argv) > 1:
        robot_ip = sys.argv[1]

    # Initialize the robot with robot_ip
    if not robot.init(robot_ip):
        sys.exit()

    # Set the robot light effect to static red light
    robot.setRobotLightEffect(datatypes.LightEffect.STATIC_RED)
2.2.12 Reference Examples (Coming Soon)
3 High-Level Application Development Interface
3.1 Overview
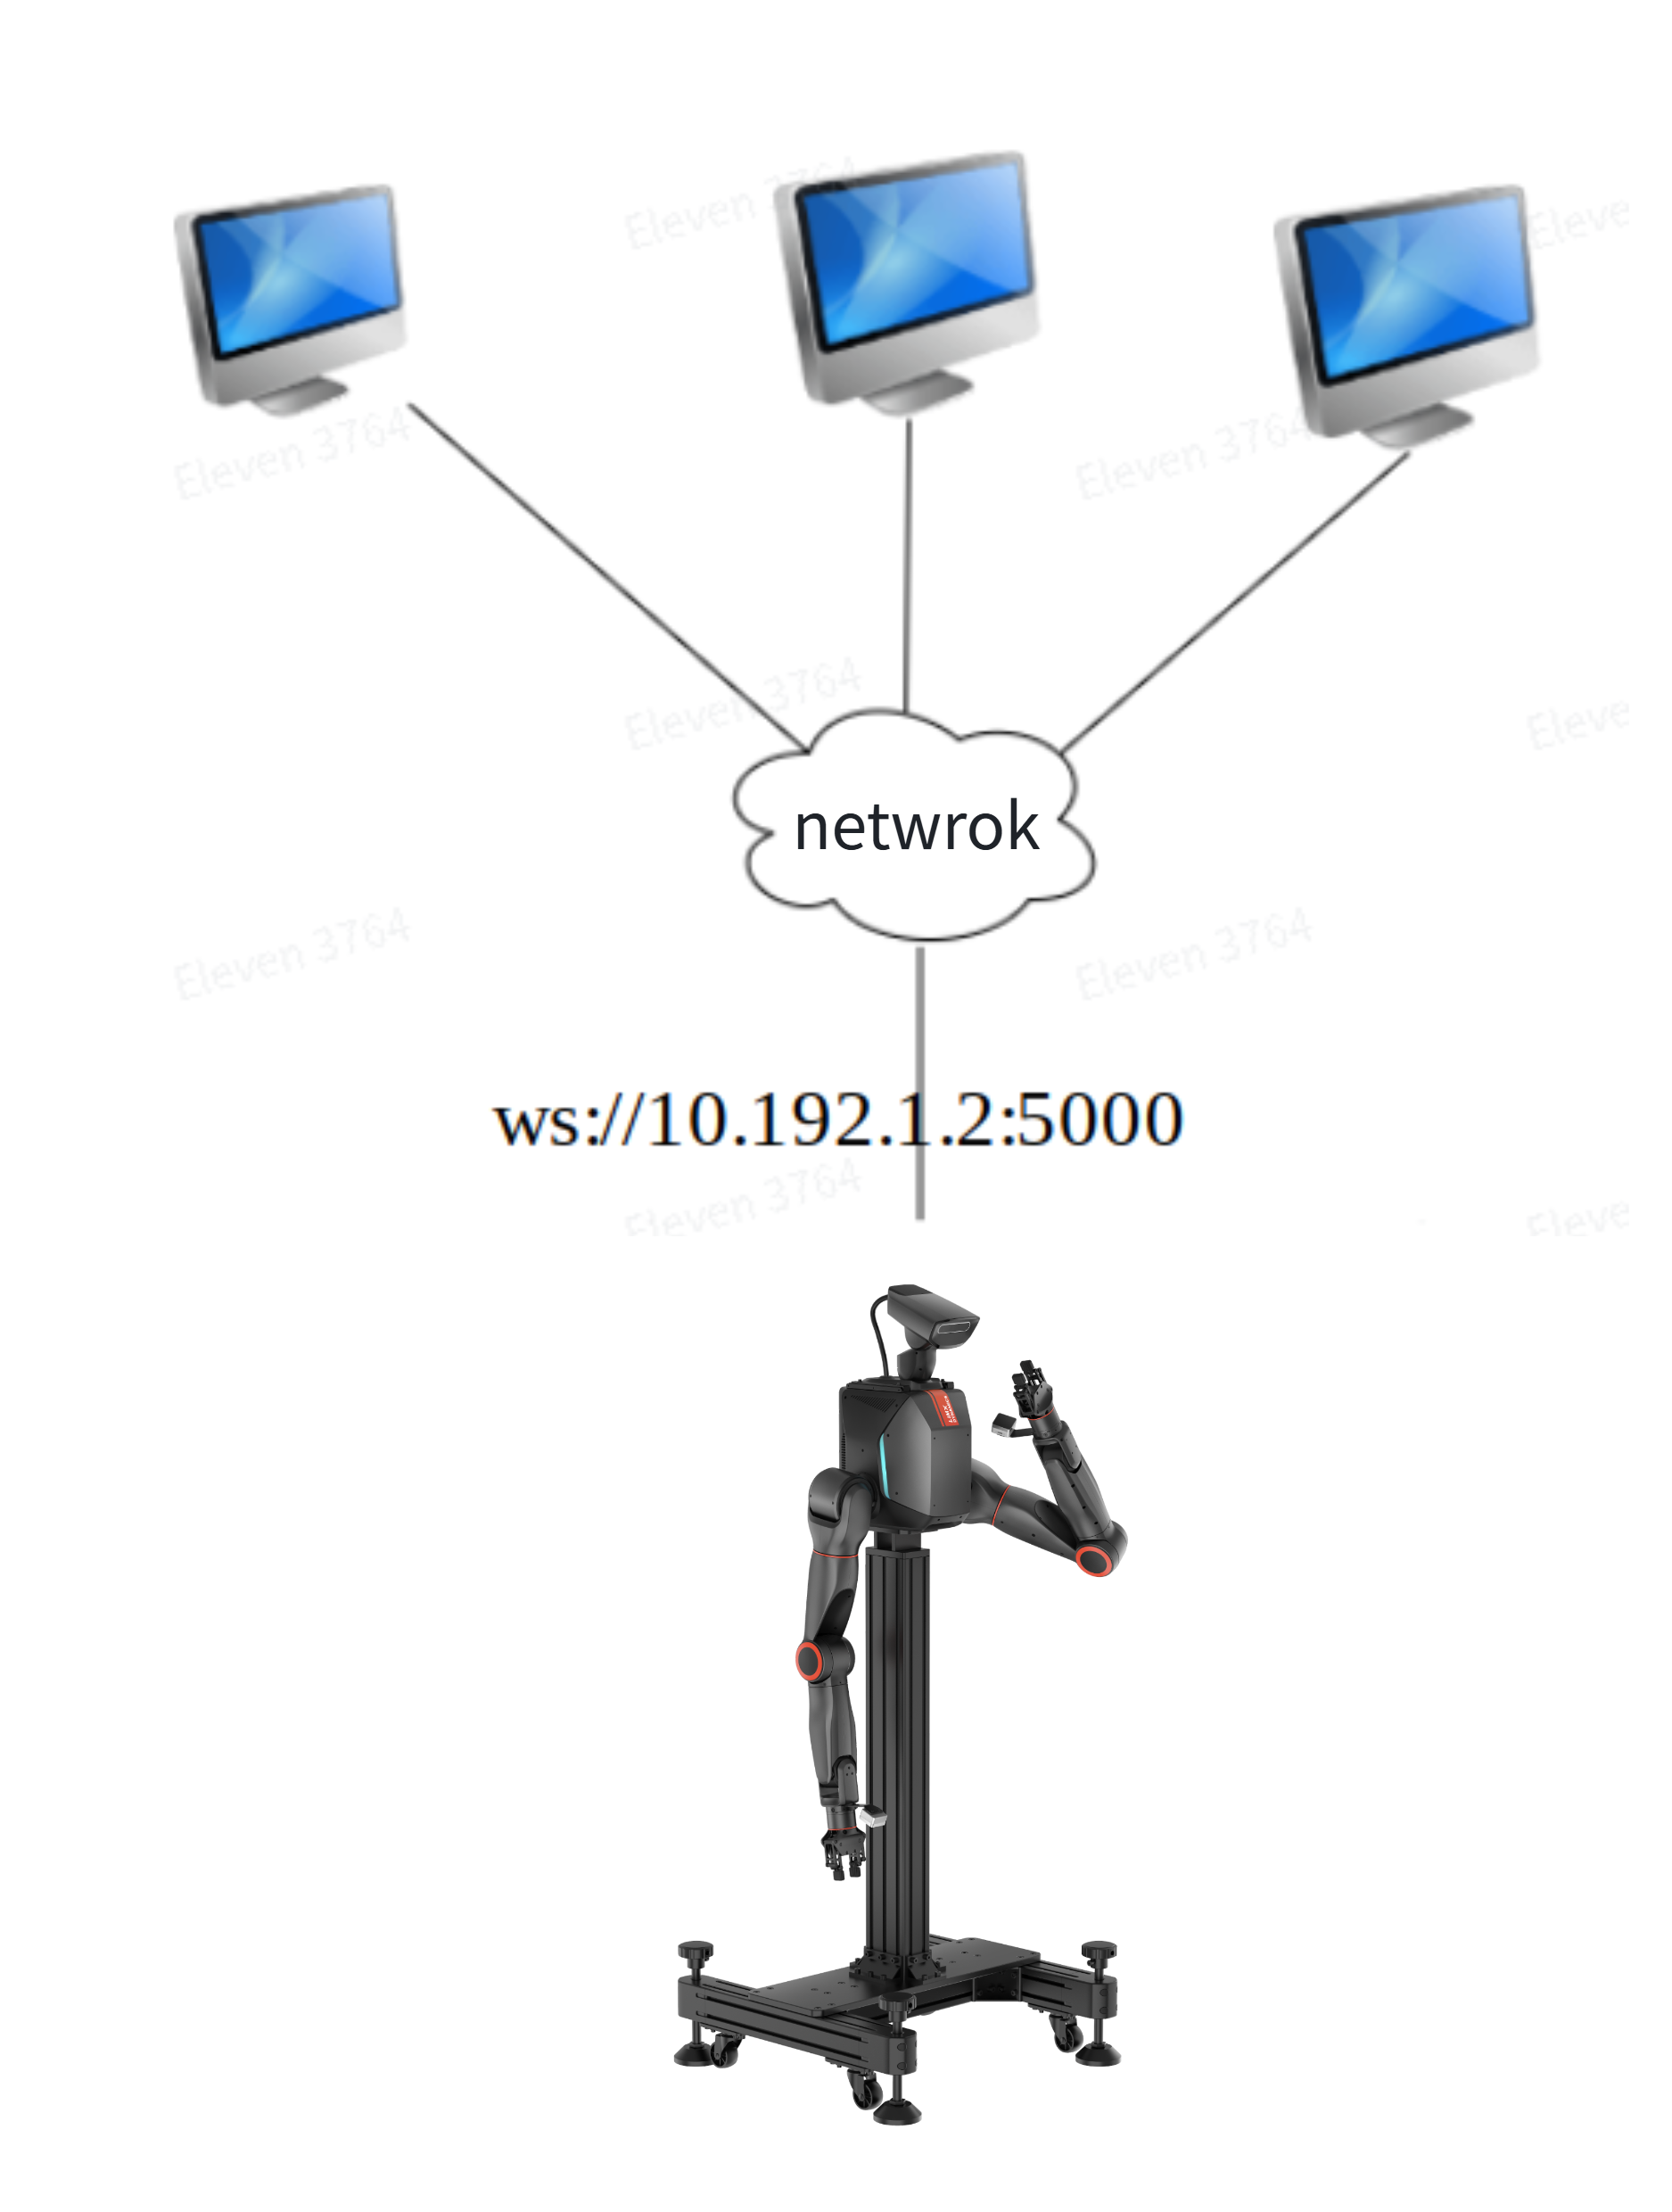
In High-Level Developer Mode, the robot receives client requests through WebSocket port 5000. These requests can command the robot to stand up, sit down, or walk. WebSocket establishes a persistent, real-time connection between the robot and the client, enabling fast and efficient transmission of control commands and data.
3.2 Communication Protocol Format
When the robot receives client commands through WebSocket, it exchanges information in JSON format. WebSocket is a full-duplex communication protocol that establishes a real-time, low-latency connection between the client and server, making it especially suitable for applications that require frequent interaction. JSON provides a concise, readable structure and offers cross-platform and cross-language compatibility. Together, WebSocket and JSON support a wide range of devices and systems while improving development flexibility and maintainability.
- The request data format contains the following fields:
accid: robot serial number; replace it with your robot's serial number;title: command name prefixed withrequest_;timestamp: command transmission timestamp, in milliseconds;guid: unique command identifier used to distinguish requests. For a synchronous interface, the same value must be returned in theguidfield of the correspondingresponse_xxxmessage. The client can compare the responseguidwith the requestguidto determine whether command execution is complete;data: stores the data content of the request command. Multiple subfields may be included as needed, to store the data required by the request command, such as action parameters or text content to be sent;- Example:
{
  "accid": "WF_TRON2A_001", // robot serial number; modify it to your robot serial number
  "title": "request_xxx",   // command name prefixed with"request_"
  "timestamp": 1672373633989, // command transmission timestamp, in milliseconds
  "guid": "746d937cd8094f6a98c9577aaf213d98", // unique command identifier used to distinguish different request commands
  "data": {}  // stores the data content of the request command
}
- The response data format contains the following fields:
accid: robot serial number; replace it with your robot's serial number;title: command name prefixed withresponse_;timestamp: command transmission timestamp, in milliseconds;guid: the same value as theguidin the corresponding request;data: must contain at least aresultsubfield that stores the request result. It may also contain other subfields, such as an error code or error message;- Example:
{
  "accid": "WF_TRON2A_001",   // robot serial number; modify it to your robot serial number
  "title": "response_xxx",  // command name prefixed with"response_"
  "timestamp": 1672373633989, // command transmission timestamp, in milliseconds
  "guid": "746d937cd8094f6a98c9577aaf213d98", // same as the corresponding request commandguidvalue
  "data": { // stores the specific data content of the response message
    "result": "success"  // "result" used to store whether request command processing succeeded, its value is: "success or fail_xxx"
  }
}
- Notification: A notification is information sent proactively by the robot to the client. It may include the robot serial number, current operating state, or executed operations. Its data format contains the following fields:
accid: robot serial number; replace it with your robot's serial number;title: message name prefixed withnotify_;timestamp: message transmission timestamp, in milliseconds;guid: message guid value, uniquely identifying the message;data: stores message data content. Multiple subfields may be included as needed, to store the data required by the request command;- Example:
{
  "accid": "WF_TRON2A_001",   // robot serial number; modify it to your robot serial number
  "title": "notify_xxx",  // message name prefixed with"notify_"
  "timestamp": 1672373633989, // message transmission timestamp, in milliseconds
  "guid": "746d937cd8094f6a98c9577aaf213d98", // message guid value, uniquely identifying this message
  "data": { } // stores message data content
}
3.3 View the Software Serial Number (ACCID)
- Connect to the robot wireless network
-
After the robot has finished booting, use a personal computer to connect to the robot's Wi-Fi network. Its name is usually in the format
WF_TRON2A_xxx. -
Enter the Wi-Fi password:
12345678
-
- Enter
http://10.192.1.2:8080in a browser to open the "Robot Information" page. As shown below, the displayed SN (serial number) isSF_TRON2A_127;SF_TRON2A_127is the robot's software serial number.
3.4 Communication Test Method
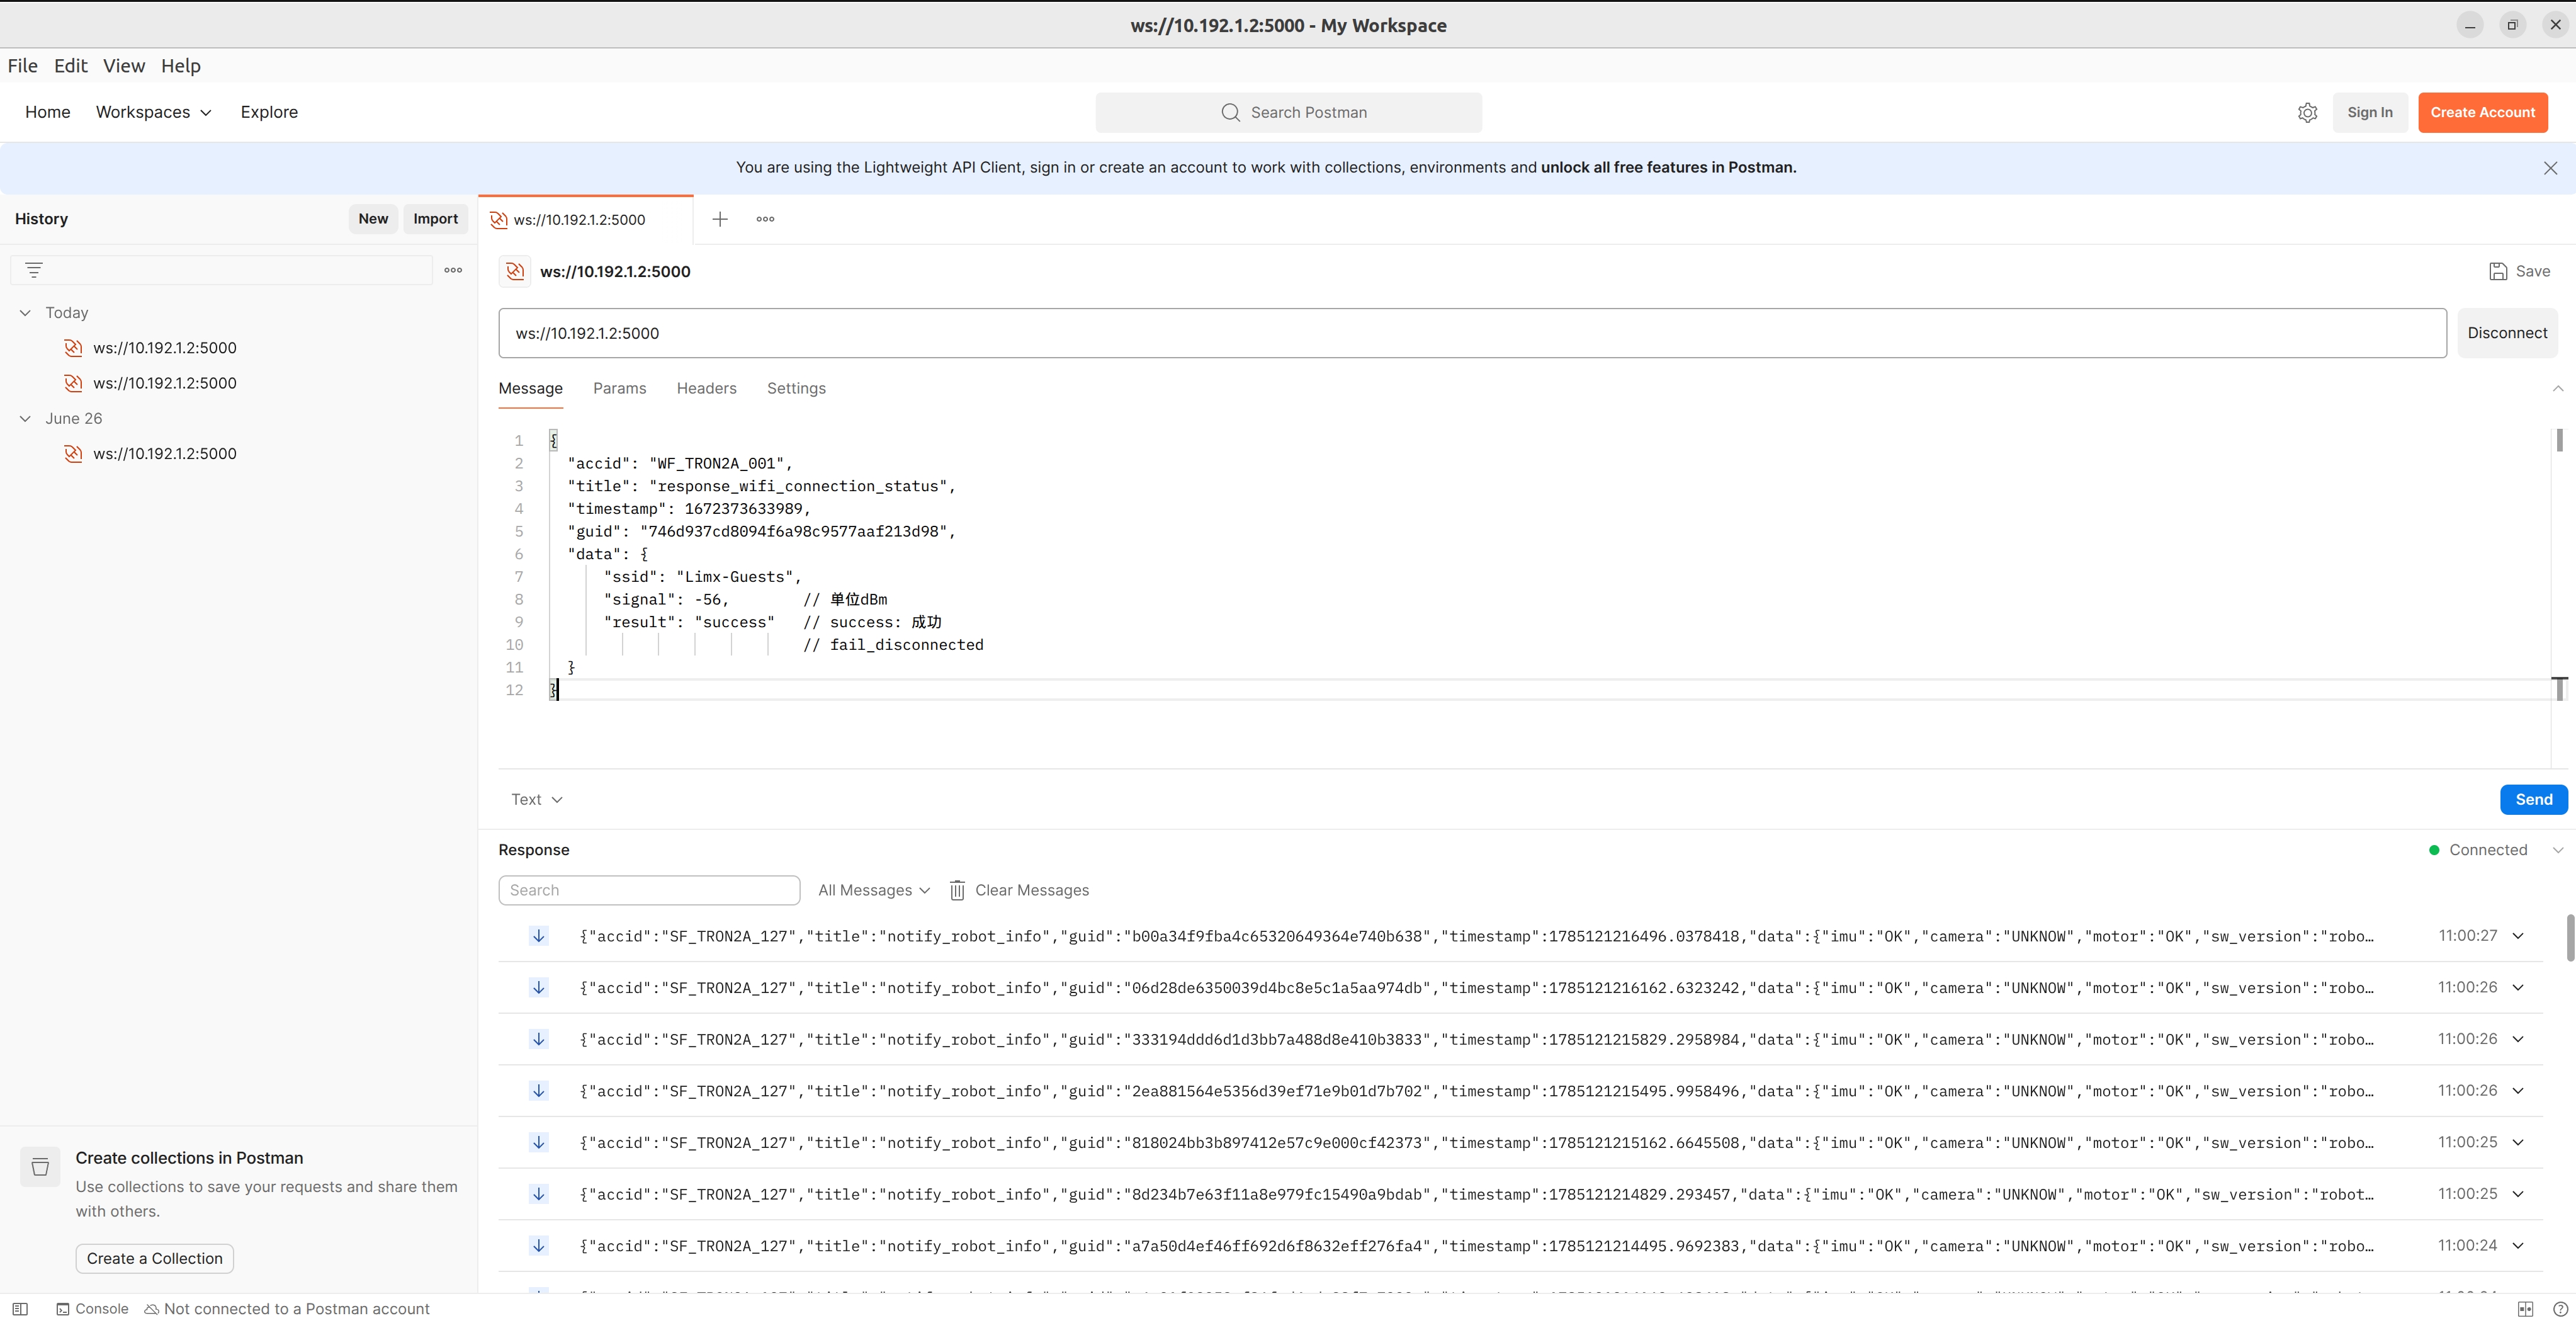
Postman is a popular API testing tool that can be used to test WebSocket interfaces. Follow these steps:
- Install Postman from the official download page.
- Open Postman and create a WebSocket request.
- Connect to the robot wireless network
- After the robot has finished booting, connect a personal computer to the robot's Wi-Fi network. Its name is usually in the format
TRON2A_xxx. - Enter the Wi-Fi password:
12345678.
- After the robot has finished booting, connect a personal computer to the robot's Wi-Fi network. Its name is usually in the format
- Enter the WebSocket address in the request URL, for example,
ws://10.192.1.2:5000. - Enter the request message in the "Message" field.
- Click "Send" to transmit the request.
- After sending the request, view the server response in the Postman response pane and verify that it matches the expected result.
3.5 Common Protocol Interface Definitions
The robot interface design follows the same process and state transitions as remote-controller operation, ensuring that call order, response timing, and state transitions strictly align with remote-controller control logic. Users can obtain an intuitive experience similar to using the remote controller through interface calls, while supporting seamless switching between the remote controller and the interfaces, to achieve unified and stable robot control.
3.5.1 Global Messages
3.5.1.1 Robot Basic Information
Basic robot information is reported once per second and contains the following fields:
- accid: robot serial number
- title: notify_robot_info
- timestamp: message transmission timestamp, in milliseconds
- guid: message guid value, uniquely identifying this message
- data: stores message content, Example:
Example:
{
  "accid": "WF_TRON2A_001",
  "title": "notify_robot_info",
  "timestamp": 1672373633989,
  "guid": "746d937cd8094f6a98c9577aaf213d98",
  "data": {
    "accid": "WF_TRON2A_001",
    "sw_version": "robot-tron2-2.0.10.20241111103012",
    "imu": "OK",    // robot IMU diagnostic information
    "camera": "OK", // robot camera diagnostic information
    "motor": "OK",  // robot motor diagnostic information
    "battery": 95,  // robot battery level
    "status": "WALK" // robot operating mode
  }
}
| Field | Description |
|---|---|
accid |
robot serial number |
sw_version |
robot onboard software version |
imu |
robot IMU diagnostic information |
camera |
robot camera diagnostic information |
motor |
robot motor diagnostic information |
battery |
robot battery level |
status |
robot operating mode, such as STAND, WALK, SIT, DAMPING, ROTATE, STAIR, ERROR_FALLOVER(fallen), RECOVER(fall recovery in progress), ERROR_RECOVER(fall recovery failed) |
3.5.1.2 Invalid Command Message
When the robot receives a request command with an invalid format, it sends this message containing the following content:
- accid: robot serial number
- title: notify_invalid_request
- timestamp: message transmission timestamp, in milliseconds
- guid: message guid value, uniquely identifying this message
- data: stores message content
- Example:
{
  "accid": "WF_TRON2A_001",
  "title": "notify_invalid_request",
  "timestamp": 1672373633989,
  "guid": "746d937cd8094f6a98c9577aaf213d98",
  "data": "Returns the original request command content to help the client troubleshoot the problem"
}
3.5.2 Connect to a Wi-Fi Hotspot
3.5.2.1 Request: request_connect_wifi
This protocol sends a request to the robot router, instructing it to connect to a Wi-Fi hotspot with the specified SSID and return the connection result.
{
  "accid": "WF_TRON2A_001",
  "title": "request_connect_wifi",
  "timestamp": 1672373633989,
  "guid": "746d937cd8094f6a98c9577aaf213d98",
  "data": {
      "wifi_band": 0,  // Wi-Fi band: 0=5GHz, 1=2.4GHz
      "wifi_ssid": "Limx-Guests",  // Target Wi-Fi SSID (Wi-Fi name), case-sensitive and must match the actual hotspot
      "wifi_password": "LimX2024",  // Target Wi-Fi password, using WPA2-PSK encryption
      "router_admin_password": "12345678"  // robot router administrator password
  }
}
3.5.2.2 Response: response_connect_wifi
{
  "accid": "WF_TRON2A_001",
  "title": "response_connect_wifi",
  "timestamp": 1672373633989,
  "guid": "746d937cd8094f6a98c9577aaf213d98",
  "data": {
      "result": "success"  // success: success
                           // fail_no_wifi_band: Wi-Fi band not specified
                           // fail_no_wifi_ssid: SSID not specified
                           // fail_no_wifi_password: password not specified
                           // fail_no_router_admin_password: password not specified
  }
}
3.5.2.3 Notification Push: None
3.5.3 Query Wi-Fi Connection Status
3.5.3.1 Request: request_wifi_connection_status
This protocol allows the client to query the Wi-Fi connection status from the robot router. The router returns the connected SSID, signal strength, and connection result, allowing the client to monitor the device's network connection in real time. The request must include the robot router administrator password for authentication.
{
  "accid": "WF_TRON2A_001",
  "title": "request_wifi_connection_status",
  "timestamp": 1672373633989,
  "guid": "746d937cd8094f6a98c9577aaf213d98",
  "data": {
      "router_admin_password": "12345678"  // robot router administrator password
  }
}
3.5.3.2 Response: response_wifi_connection_status
After receiving the query request, the robot router returns the actual current Wi-Fi connection status for client parsing, display, or subsequent business processing.
{
  "accid": "WF_TRON2A_001",
  "title": "response_wifi_connection_status",
  "timestamp": 1672373633989,
  "guid": "746d937cd8094f6a98c9577aaf213d98",
  "data": {
      "ssid": "Limx-Guests",
      "signal": -56,        // unit: dBm
      "result": "success"   // success: success
                            // fail_disconnected
  }
}
3.5.3.3 Notification Push: None
3.5.4 Set Light Effect
3.5.4.1 Request: request_light_effect
{
  "accid": "WF_TRON2A_001",
  "title": "request_light_effect",
  "timestamp": 1672373633989,
  "guid": "746d937cd8094f6a98c9577aaf213d98",
  "data": {
    "effect": 1
  }
}
Request Parameter Description:
| Parameter Name | Type | Description |
|---|---|---|
data.effect |
Number |
Light effect ID corresponding to different light display modes. The mapping is as follows: 1: STATIC_RED(static red)2: STATIC_GREEN(static green)3: STATIC_BLUE(static blue)4: STATIC_CYAN(static cyan)5: STATIC_PURPLE(static purple)6: STATIC_YELLOW(static yellow)7: STATIC_WHITE(static white)8: LOW_FLASH_RED(low-frequency flashing red)9: LOW_FLASH_GREEN(low-frequency flashing green)10: LOW_FLASH_BLUE(low-frequency flashing blue)11: LOW_FLASH_CYAN(low-frequency flashing cyan)12: LOW_FLASH_PURPLE(low-frequency flashing purple)13: LOW_FLASH_YELLOW(low-frequency flashing yellow)14: LOW_FLASH_WHITE(low-frequency flashing white)15: FAST_FLASH_RED(high-frequency flashing red)16: FAST_FLASH_GREEN(high-frequency flashing green)17: FAST_FLASH_BLUE(high-frequency flashing blue)18: FAST_FLASH_CYAN(high-frequency flashing cyan)19: FAST_FLASH_PURPLE(high-frequency flashing purple)20: FAST_FLASH_YELLOW(high-frequency flashing yellow)21: FAST_FLASH_WHITE(high-frequency flashing white)
|
3.5.4.2 Response: response_light_effect
{
  "accid": "DACH_TRON2A_001",
  "title": "response_light_effect",
  "timestamp": 1672373633989,
  "guid": "746d937cd8094f6a98c9577aaf213d98",
  "data": {
    "result": "success"  // success: success, fail_light_effect: failure
  }
}
3.5.4.3 Notification Push: None
3.5.5 Emergency Stop
Note:
Must be called in idle mode; it cannot respond during motion
3.5.5.1 Request: request_emgy_stop
{
  "accid": "DACH_TRON2A_001", // robot serial number; replace it with your robot's serial number
  "title": "request_emgy_stop",
  "timestamp": 1672373633989,
  "guid": "746d937cd8094f6a98c9577aaf213d98",
  "data": {}
}
3.5.5.2 Response: response_emgy_stop
{
  "accid": "DACH_TRON2A_001",
  "title": "response_emgy_stop",
  "timestamp": 1672373633989,
  "guid": "746d937cd8094f6a98c9577aaf213d98",
  "data": {
    "result": "success"  // success: success, fail_imu: IMU error, fail_motor: motor error
  }
}
3.5.5.3 Notification Push: None
3.6 Dual-Arm Configuration Protocol Interface Definitions
3.6.1 MoveJ Interface Description
3.6.1.1 Request: request_movej
Note:
when moveJ is called, each joint angle is checked against its limit. If a limit is exceeded, an over-limit error is reported and this moveJ call is not executed.
moveJ joint limits are ordered from the upper to lower joints of the left arm, then the upper to lower joints of the right arm, unit: rad.
Upper limit: [2.6005, 3.1940, 1.4835, 0.2618, 1.3963, 0.7854, 1.5708, 2.6005, 0.2618, 3.6652, 0.2618, 1.7453, 0.7854, 1.5708]
Lower limit: [-3.1416, -0.2618, -3.6652, -2.6180, -1.7453, -0.7854, -1.5708, -3.1416, -3.1940, -1.4835, -2.6180, -1.3963, -0.7854, -1.5708]
{
  "accid": "DACH_TRON2A_001", // robot serial number; replace it with your robot's serial number
  "title": "request_movej",
  "timestamp": 1672373633989,
  "guid": "746d937cd8094f6a98c9577aaf213d98",
  "data": {
    "time": 2, // move to the specified position in 2 seconds
    "joint": []  //14 joint values, unit: rad
  }
}
3.6.1.2 Response: response_movej
{
  "accid": "DACH_TRON2A_001",
  "title": "response_movej",
  "timestamp": 1672373633989,
  "guid": "746d937cd8094f6a98c9577aaf213d98",
  "data": {
    "result": "success"  // success: success, fail_invalid_cmd:invalid command (missing field)
  }
}
3.6.1.3 Example
{
    "accid": "DACH_TRON2A_026",
    "title": "request_movej",
    "timestamp": 1672373633989,
    "guid": "746d937cd8094f6a98c9577aaf213d98",
    "data": {
        "time": 5,
        "joint": [0,0,0,-1.6,0,0,0,0,0,0,-1.6,0,0,0]
    }
}
3.6.2 MoveH Interface Description
This interface controls the head's two degrees of freedom.
Upper limit: [1.04 ,1.57]
Lower limit: [-0.78, -1.57]
3.6.2.1 Request: request_moveh
{
    "accid": "DACH_TRON2A_026",
    "title": "request_moveh",
    "timestamp": 1672373633989,
    "guid": "746d937cd8094f6a98c9577aaf213d98",
    "data": {
        "time": 5,
        "joint": [0.5,0.5] //pitch,yaw
    }
}
3.6.2.2 Response: response_moveh
{
  "accid": "DACH_TRON2A_001",
  "title": "response_moveh",
  "timestamp": 1672373633989,
  "guid": "746d937cd8094f6a98c9577aaf213d98",
  "data": {
    "result": "success"  // success: success, fail_invalid_cmd:invalid command (missing field)
  }
}
3.6.3 MoveP Interface Description
3.6.3.1 Request: request_movep
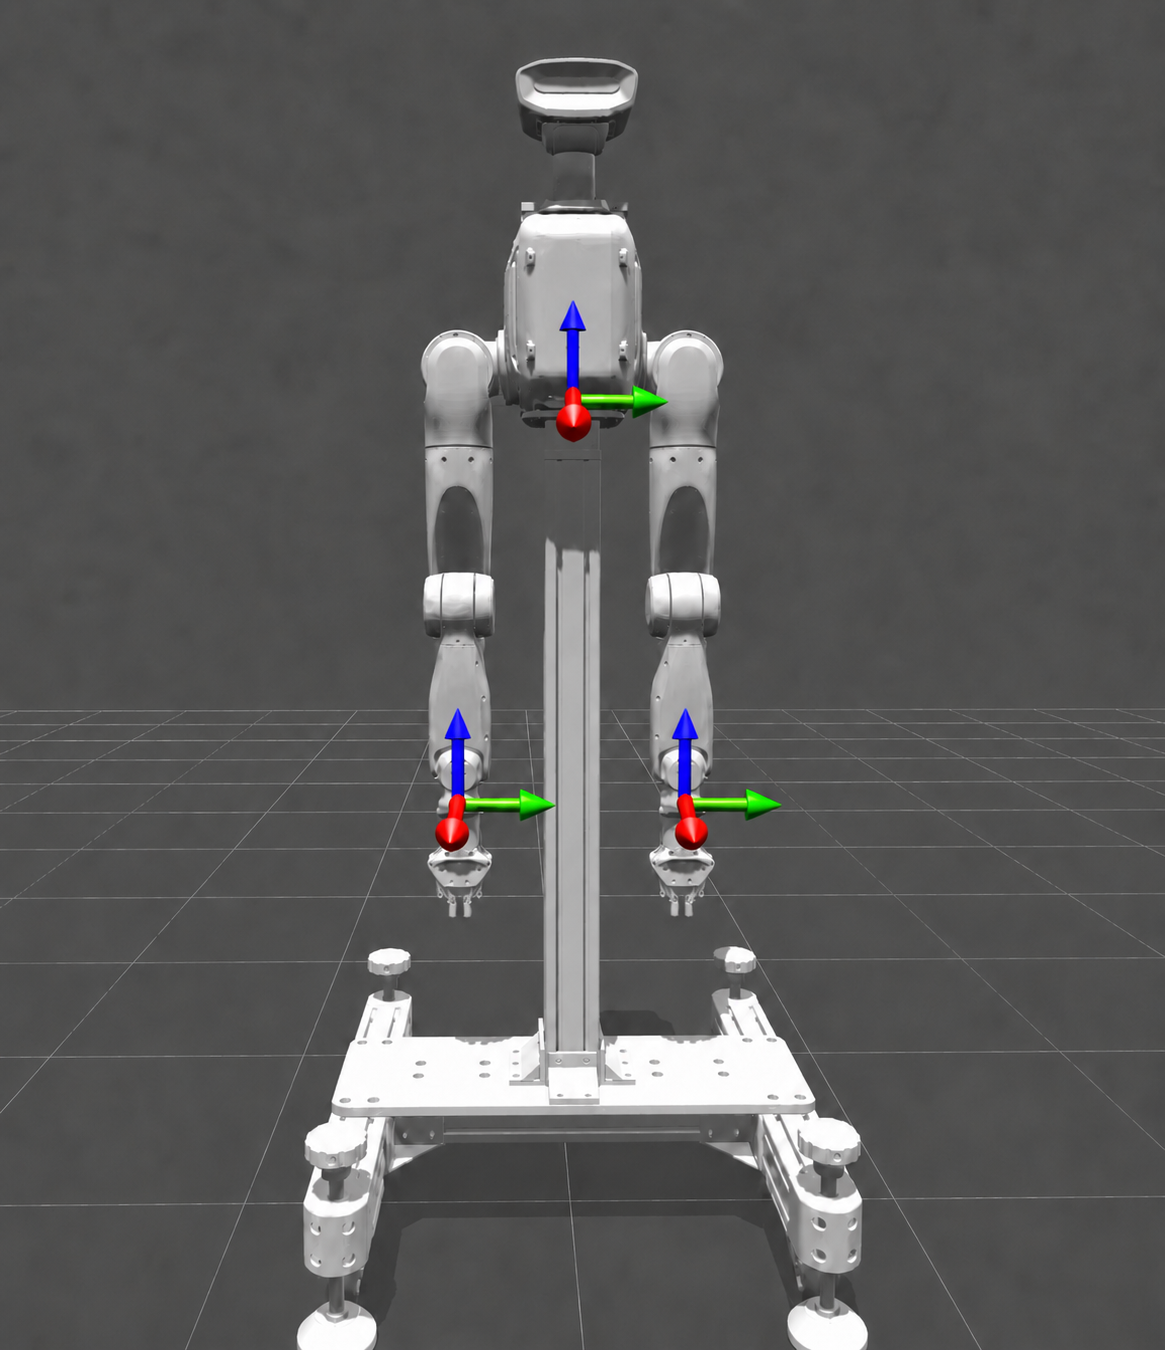
The reference coordinate system is as follows. The coordinate origin is located at the center of the lower plane of the base, and the arm end-effector reference is located at the center of the last joint of the arm.
Note:
when moveP is called, the end-effector positions of the left and right arms are checked to see whether they are within the reachable range. If a limit is exceeded, an over-limit error is reported and this call is not executed.
moveP joint limits (ordered as x_min, x_max, y_min, y_max, z_min, z_max, unit: m)
Left arm: [[0.250, 0.732], [-0.213, 0.900], [-0.673, 0.5]]
Right arm: [[0.250, 0.732], [-0.900, 0.213], [-0.673, 0.5]]
{
  "accid": "DACH_TRON2A_001", // robot serial number; replace it with your robot's serial number
  "title": "request_movep",
  "timestamp": 1672373633989,
  "guid": "746d937cd8094f6a98c9577aaf213d98",
  "data": {
    "time": 1, //move to this position in 1 second
    "pos": []  //[LEFT_POS(3), wxyzPOSE(4) + RIGHT_POS(3), wxyzPOSE(4)]
  }
}
3.6.3.2 Response: response_movep
{
  "accid": "DACH_TRON2A_001",
  "title": "response_movep",
  "timestamp": 1672373633989,
  "guid": "746d937cd8094f6a98c9577aaf213d98",
  "data": {
    "result": "success"  // success: success, fail_invalid_cmd:invalid command (missing field)
  }
}
3.6.3.3 Example
{
  "accid": "DACH_TRON2A_129",
  "title": "request_movep",
  "timestamp": 1672373633989,
  "guid": "746d937cd8094f6a98c9577aaf213d98",
  "data": {
    "time": 5,
    "pos": [  0.5,  0.2, -0.3, 0.7, 0,  -0.7,  0,  0.5,-0.2, -0.3,  0.7,   0,  -0.7,  0  ]
  }
}
3.6.4 ServoJ Control Command
3.6.4.1 Request: request_servoj
It is recommended to control the robot arm motion in a real-time system at a control frequency of 300 Hz to ensure control performance and stability.
{
  "accid": "DACH_TRON2A_001", // robot serial number; modify it to your robot serial number;
  "title": "request_servoj",
  "timestamp": 1672373633989,
  "guid": "746d937cd8094f6a98c9577aaf213d98",
  "data": {
    "filter_ratio": 1.0,//range is 0 to 1; 1 means fully trusting the ground truth (no filtering)
    "q": [ ],  // positions of all joints; fill in 16-dimensional data;
  }
}

// Please replace the above parameters with actual parameters
3.6.4.2 Response: None
3.6.4.3 Notification Push: notify_servoJ
When a ServoJ control operation fails, the server sends this notification to inform the client of the reason.
{
  "accid": "WF_TRON2A_001",
  "title": "notify_servoJ",
  "timestamp": 1672373633989,
  "guid": "746d937cd8094f6a98c9577aaf213d98",
  "data": {
    "result": "fail_invalid_cmd"  // fail_invalid_cmd: invalid command, fail_motor: motor error
  }
}
3.6.5 ServoP Control Command
3.6.5.1 Request: request_servop
Continuously send the position data for the left and right arms.It is recommended to control the robot arm motion in a real-time system at a control frequency of 300 Hz to ensure control performance and stability.
{
 "accid": "DACH_TRON2A_026", // 机器人序列号,注意修为您机器人的序列号;
 "title": "request_servop",
 "timestamp": 1672373633989,
 "guid": "746d937cd8094f6a98c9577aaf213d98",
 "data": {           }     //[LEFT_POS(3)、wxyzPOSE(4) + RIGHT_POS(3)、wxyzPOSE(4)]
}
3.6.5.2 Response: None
3.6.5.3 Notification Push: notify_servop
3.6.6 Get Dual-Arm End-Effector Poses
3.6.6.1 Request: request_get_move_pose
Use this interface to obtain the end-effector poses of both robot arms.
{
  "accid": "DACH_TRON2A_036", // robot serial number; modify it to your robot serial number;
  "title": "request_get_move_pose",
  "timestamp": 1672373633989,
  "guid": "746d937cd8094f6a98c9577aaf213d98",
  "data": {}
}
3.6.6.2 Response: response_get_move_pose
After receiving the request, return information about the current poses of both arms.
{
  "accid": "WF_TRON2A_001",
  "title": "response_get_move_pose",
  "timestamp": 1672373633989,
  "guid": "746d937cd8094f6a98c9577aaf213d98",
  "data": {
      "timestamp": 1672373633989, // data timestamp in milliseconds
      "left_position": [0.0, 0.0, 0.0], // position of the left-arm end effector, in meters, ordered as x, y, z
      "left_quat": [1.0,  0.0, 0.0, 0.0], // orientation of the left-arm end effector, represented by a quaternion, ordered as w, x, y, z
      "right_position": [0.0, 0.0, 0.0], // position of the right-arm end effector, in meters, ordered as x, y, z
      "right_quat": [1.0, 0.0, 0.0, 0.0], // orientation of the right-arm end effector, represented by a quaternion, ordered as w, x, y, z
      "result": "success"  // fail_not_data
  }
}
3.6.7 Get Robot Joint State
3.6.7.1 Request: request_get_joint_state
This request is used to get the state of each robot joint.
{
  "accid": "DACH_TRON2A_001", // robot serial number; replace it with your robot's serial number
  "title": "request_get_joint_state",
  "timestamp": 1672373633989,
  "guid": "746d937cd8094f6a98c9577aaf213d98",
  "data": {}
}
3.6.7.2 Response: response_get_joint_state
After receiving the request, return the current state of each robot joint.
{
  "accid": "DACH_TRON2A_001",
  "title": "response_get_joint_state",
  "timestamp": 1672373633989,
  "guid": "746d937cd8094f6a98c9577aaf213d98",
  "data": {
      "names": [], // names of all joints
      "q": [],     // positions of all joints
      "dq": [],    // velocities of all joints
      "tau": [],   // torques of all joints
      "result": "success"  // fail_not_data
  }
}
3.6.7.3 Notification Push: None
3.6.8 Get Lift Platform State (Mobile Dual-Arm Version Only)
3.6.8.1 Request: request_lifter_state
  {
    "accid": "DACH_TRON2A_001",
    "title": "request_lifter_state",
    "guid": "6f5d2f3c27ac4ef89a4f2c31e8b7f402",
    "timestamp": 1762771201000,
    "data": {}
  }
3.6.8.2 Response: response_lifter_state
  {
    "accid": "DACH_TRON2A_001",
    "title": "response_lifter_state",
    "guid": "6f5d2f3c27ac4ef89a4f2c31e8b7f402",
    "timestamp": 1762771201000,
    "data": {
      "result": "success",
      "q": [0.12],
      "v": [0.00]
    }
  }
3.6.9 Absolute Position Control of the Lift Platform (Mobile Dual-Arm Version Only)
3.6.9.1 Request: request_set_lifter_position
position: target position, in millimeters.duration: time to reach the target, in milliseconds. This value must be an integer. A value of0commands the platform to reach the target at the maximum available speed.
{
  "accid": "DACH_TRON2A_001",
  "title": "request_set_lifter_position",
  "guid": "8b9d7caa48d44b9b9e0d6b2f2b30a101",
  "timestamp": 1762771300000,
  "data": {
    "position": 200.5,
    "duration": 2000
  }
}
3.6.9.2 Response: response_set_lifter_position
{
  "accid": "DACH_TRON2A_001",
  "title": "response_set_lifter_position",
  "guid": "8b9d7caa48d44b9b9e0d6b2f2b30a101",
  "timestamp": 1762771300000,
  "data": {
    "result": "success"
  }
}
3.6.10 Velocity Control of the Lift Platform (Mobile Dual-Arm Version Only)
3.6.10.1 Request: request_set_lifter_velocity
velocity: lift-platform velocity, in millimeters per second. Positive and negative values indicate opposite directions.duration: duration of velocity control, in milliseconds. This value must be an integer greater than0.
{
  "accid": "DACH_TRON2A_001",
  "title": "request_set_lifter_velocity",
  "guid": "8b9d7caa48d44b9b9e0d6b2f2b30a101",
  "timestamp": 1762771300000,
  "data": {
    "velocity": 50,
    "duration": 2000
  }
}
3.6.10.2 Response: response_set_lifter_velocity
{
  "accid": "DACH_TRON2A_001",
  "title": "response_set_lifter_velocity",
  "guid": "8b9d7caa48d44b9b9e0d6b2f2b30a101",
  "timestamp": 1762771300000,
  "data": {
    "result": "success"
  }
}
3.6.11 Get Chassis State (Mobile Dual-Arm Version Only)
3.6.11.1 Request: request_chassis_state
{
  "accid": "DACH_TRON2A_001",
  "title": "request_chassis_state",
  "guid": "b6d6f4d2-6f0f-4f0b-8d8e-8f2f3a5a1c01",
  "timestamp": 1762771200000,
  "data": {}
}
3.6.11.2 Response: response_chassis_state
{
  "accid": "DACH_TRON2A_001",
  "title": "response_chassis_state",
  "guid": "b6d6f4d2-6f0f-4f0b-8d8e-8f2f3a5a1c01",
  "timestamp": 1762771200000,
  "data": {
    "result": "success",
    "data": [0.25, -0.10, 0.03]
  }
}
The data array is ordered as [linear_velocity, angular_velocity, steering_angle].
3.6.12 Set Chassis Motion Mode (Mobile Dual-Arm Version Only)
3.6.12.1 Request: request_set_chassis_mode
{
  "accid": "DACH_TRON2A_001",
  "title": "request_set_chassis_mode",
  "timestamp": 1672373633989,
  "guid": "746d937cd8094f6a98c9577aaf213d98",
  "data": {
    "move_mode": "ackerman"
  }
}
Supported values for move_mode are ackerman, parallel, park, spinning, and emergency_stop.
3.6.12.2 Response: response_set_chassis_mode
{
  "accid": "DACH_TRON2A_001",
  "title": "response_set_chassis_mode",
  "timestamp": 1672373633989,
  "guid": "746d937cd8094f6a98c9577aaf213d98",
  "data": {
    "result": "success"
  }
}
3.6.13 Control Chassis Motion (Mobile Dual-Arm Version Only)
3.6.13.1 Request: request_chassis_move
{
  "accid": "DACH_TRON2A_001",
  "title": "request_chassis_move",
  "timestamp": 1672373633989,
  "guid": "746d937cd8094f6a98c9577aaf213d98",
  "data": {
    "x": 0.3,
    "y": 0.0,
    "yaw": 0.0
  }
}
x: longitudinal velocity command in the range[-1, 1].y: lateral velocity command in the range[-1, 1].yaw: yaw-rate command in the range[-1, 1].
3.6.13.2 Response: response_chassis_move
{
  "accid": "DACH_TRON2A_001",
  "title": "response_chassis_move",
  "timestamp": 1672373633989,
  "guid": "746d937cd8094f6a98c9577aaf213d98",
  "data": {
    "result": "success"
  }
}
Possible values for result include success, fail_imu, and fail_motor.
3.7 Dual-Arm Configuration Protocol Interface Call Examples
3.7.1 C++ Example Implementation
Environment Setup
Using Ubuntu 22.04 as an example, install websocketpp, nlohmann/json and boost dependencies:
sudo apt-get install libboost-all-dev libwebsocketpp-dev nlohmann-json3-dev
Compile the Code
g++ -std=c++11 -o websocket_client websocket_client.cpp -lssl -lcrypto -lboost_system -lpthread
Run the Program
./websocket_client
websocket_client.cpp Implementation
#include <iostream>
#include <atomic>
#include <string>
#include <thread>
#include <chrono>
#include <websocketpp/client.hpp>
#include <websocketpp/config/asio.hpp>
#include <nlohmann/json.hpp>
#include <boost/uuid/uuid.hpp>
#include <boost/uuid/uuid_generators.hpp>
#include <boost/uuid/uuid_io.hpp>

using json = nlohmann::json;
using websocketpp::client;
using websocketpp::connection_hdl;

// Replace this value with the actual serial number (SN) of the robot.
static std::string ACCID = "";

// Replace it with the real IP address of the robot.
// Usually, for simulation, it is: 127.0.0.1
// For a physical robot, use 10.192.1.2
const std::string ROBOT_IP = "10.192.1.2";

// WebSocket client instance
static client<websocketpp::config::asio> ws_client;

// Atomic flag for graceful exit
static std::atomic<bool> should_exit(false);

// Connection handle for sending messages
static connection_hdl current_hdl;

// Generate dynamic GUID
static std::string generate_guid()
{
    boost::uuids::random_generator gen;
    boost::uuids::uuid u = gen();
    return boost::uuids::to_string(u);
}

// Send WebSocket request with title and data
static void send_request(const std::string &title, const json &data = json::object())
{
    json message;

    message["accid"] = ACCID;
    message["title"] = title;
    message["timestamp"] = std::chrono::duration_cast<std::chrono::milliseconds>(
                               std::chrono::system_clock::now().time_since_epoch())
                               .count();
    message["guid"] = generate_guid();
    message["data"] = data;

    std::string message_str = message.dump();

    ws_client.send(current_hdl, message_str, websocketpp::frame::opcode::text);
}

// Handle user commands
void handle_commands()
{
    std::cout << "Enter command ('movej', 'movep', 'light', 'stop') or 'exit' to quit:\n";

    while (!should_exit)
    {
        std::string command;
        std::cin >> command;

        if (command == "exit")
        {
            should_exit = true;
            return;
        }
        else if (command == "movej")
        {
            json data = {
                {"joint", {-0.5, 0.3, -0.2, 0.2, 0.2, 0.2, 0.2,
                           -0.5, -0.3, -0.2, 0.2, 0.2, 0.2, 0.2}},
                {"time", 2}};
            send_request("request_movej", data);
        }
        else if (command == "movep")
        {
            json data = {
                {"pos", {0.3, 0.2, -0.3, 1, 0, 0, 0, 1, 0, 0, 0, 1,
                         0.3, -0.2, -0.3, 1, 0, 0, 0, 1, 0, 0, 0, 1}},
                {"time", 2}};
            send_request("request_movep", data);
        }
        else if (command == "light")
        {
            send_request("request_light_effect", {{"effect", 1}});
        }
        else if (command == "stop")
        {
            send_request("request_emgy_stop");
        }

        std::this_thread::sleep_for(std::chrono::seconds(1));

        std::cout << "Enter command ('movej', 'movep', 'light', 'stop') or 'exit' to quit:\n";
    }
}

// WebSocket open callback
static void on_open(connection_hdl hdl)
{
    std::cout << "Connected!" << std::endl;

    current_hdl = hdl;

    std::thread(handle_commands).detach();
}

// WebSocket TCP initialization handler
static void on_tcp_init(connection_hdl hdl)
{
    auto con = ws_client.get_con_from_hdl(hdl);
    auto &socket = con->get_socket().lowest_layer();

    try
    {
        boost::system::error_code ec;

        const size_t sendBufferSize = 2 * 1024 * 1024;
        socket.set_option(websocketpp::lib::asio::socket_base::send_buffer_size(sendBufferSize), ec);

        if (ec)
        {
            printf("Failed to set send buffer size: %s", ec.message().c_str());
        }

        const size_t recvBufferSize = 2 * 1024 * 1024;
        socket.set_option(websocketpp::lib::asio::socket_base::receive_buffer_size(recvBufferSize), ec);

        if (ec)
        {
            printf("Failed to set receive buffer size: %s", ec.message().c_str());
        }

        socket.set_option(websocketpp::lib::asio::ip::tcp::no_delay(true), ec);

        if (ec)
        {
            printf("Failed to disable Nagle's algorithm: %s", ec.message().c_str());
        }
    }
    catch (const std::exception &e)
    {
        printf("Socket configuration exception: %s", e.what());
    }
}

// WebSocket message callback
static void on_message(connection_hdl hdl, client<websocketpp::config::asio>::message_ptr msg)
{
    json data = json::parse(msg->get_payload());

    if (data.contains("accid") && data["accid"].is_string() && ACCID.empty())
    {
        ACCID = data["accid"].get<std::string>();
    }

    if (msg->get_payload().find("notify_robot_info") == std::string::npos)
    {
        std::cout << "Received message: " << msg->get_payload() << std::endl;
    }
}

// WebSocket close callback
static void on_close(connection_hdl hdl)
{
    std::cout << "Connection closed." << std::endl;
}

// Close WebSocket connection
static void close_connection(connection_hdl hdl)
{
    ws_client.close(hdl, websocketpp::close::status::normal, "Normal closure");
}

int main()
{
    ws_client.init_asio();

    ws_client.set_access_channels(websocketpp::log::alevel::none);

    ws_client.set_open_handler(&on_open);
    ws_client.set_message_handler(&on_message);
    ws_client.set_close_handler(&on_close);
    ws_client.set_tcp_init_handler(&on_tcp_init);

    std::string server_uri = "ws://" + ROBOT_IP + ":5000";

    websocketpp::lib::error_code ec;
    client<websocketpp::config::asio>::connection_ptr con = ws_client.get_connection(server_uri, ec);

    if (ec)
    {
        std::cout << "Error: " << ec.message() << std::endl;
        return 1;
    }

    ws_client.connect(con);

    std::cout << "Press Ctrl+C to exit." << std::endl;

    ws_client.run();

    return 0;
}
3.7.2 Python Example Implementation
Environment Setup
Using Ubuntu 22.04 and Python 3.10.4 as an example, install the following dependencies:
sudo apt install python3-dev python3-pip
pip3 install websocket-client
Run the Script
python3 websocket_client.py
websocket_client.py Implementation
import json
import uuid
import threading
import time
import websocket

# Replace this ACCID value with your robot's actual serial number (SN)
ACCID = None

# Replace it with the real IP address of the robot.
# for a real machine, it is: 10.192.1.2
ROBOT_IP = "10.192.1.2"

# Atomic flag for graceful exit
should_exit = False

# WebSocket client instance
ws_client = None

# Generate dynamic GUID
def generate_guid():
    return str(uuid.uuid4())

# Send WebSocket request with title and data
def send_request(title, data=None):
    global ACCID

    if data is None:
        data = {}

    message = {
        "accid": ACCID,
        "title": title,
        "timestamp": int(time.time() * 1000),
        "guid": generate_guid(),
        "data": data
    }

    message_str = json.dumps(message)

    if ws_client:
        ws_client.send(message_str)

# Handle user commands
def handle_commands():
    global should_exit

    while not should_exit:
        command = input("Enter command ('movej', 'movep', 'light', 'stop') or 'exit' to quit:\n")

        if command == "exit":
            should_exit = True
            break

        elif command == "movej":
            send_request("request_movej", {
                "joint": [
                    0,0,0,-1.6,0,0,0,0,0,0,-1.6,0,0,0
                ],
                "time": 5
            })
        elif command == "movep":
            send_request("request_movep", {
                "pos": [
                    0.5,  0.2, -0.3, 0.7, 0,  -0.7,  0,  0.5,-0.2, -0.3,  0.7,   0,  -0.7,  0
                ],
                "time": 5
            })

        elif command == "light":
            send_request("request_light_effect", {
                "effect": 1
            })

        elif command == "stop":
            send_request("request_emgy_stop", {})

# WebSocket on_open callback
def on_open(ws):
    print("Connected!")
    threading.Thread(target=handle_commands, daemon=True).start()

# WebSocket on_message callback
def on_message(ws, message):
    global ACCID

    root = json.loads(message)
    title = root.get("title", "")

    if ACCID is None:
        ACCID = root.get("accid", None)

    if title != "notify_robot_info":
        print(f"Received message: {message}")

# WebSocket on_close callback
def on_close(ws, close_status_code, close_msg):
    print("Connection closed.")

# Close WebSocket connection
def close_connection(ws):
    ws.close()

def main():
    global ws_client

    ws_client = websocket.WebSocketApp(
        f"ws://{ROBOT_IP}:5000",
        on_open=on_open,
        on_message=on_message,
        on_close=on_close
    )

    print("Press Ctrl+C to exit.")
    ws_client.run_forever()

if __name__ == "__main__":
    main()
3.8 Bipedal/Dual-Wheel-Leg Protocol Interface Definitions
The robot interface design follows the same process and state transitions as remote-controller operation, ensuring that call order, response timing, and state transitions strictly align with remote-controller control logic. Users can obtain an intuitive experience similar to using the remote controller through interface calls, while supporting seamless switching between the remote controller and the interfaces, to achieve unified and stable robot control.
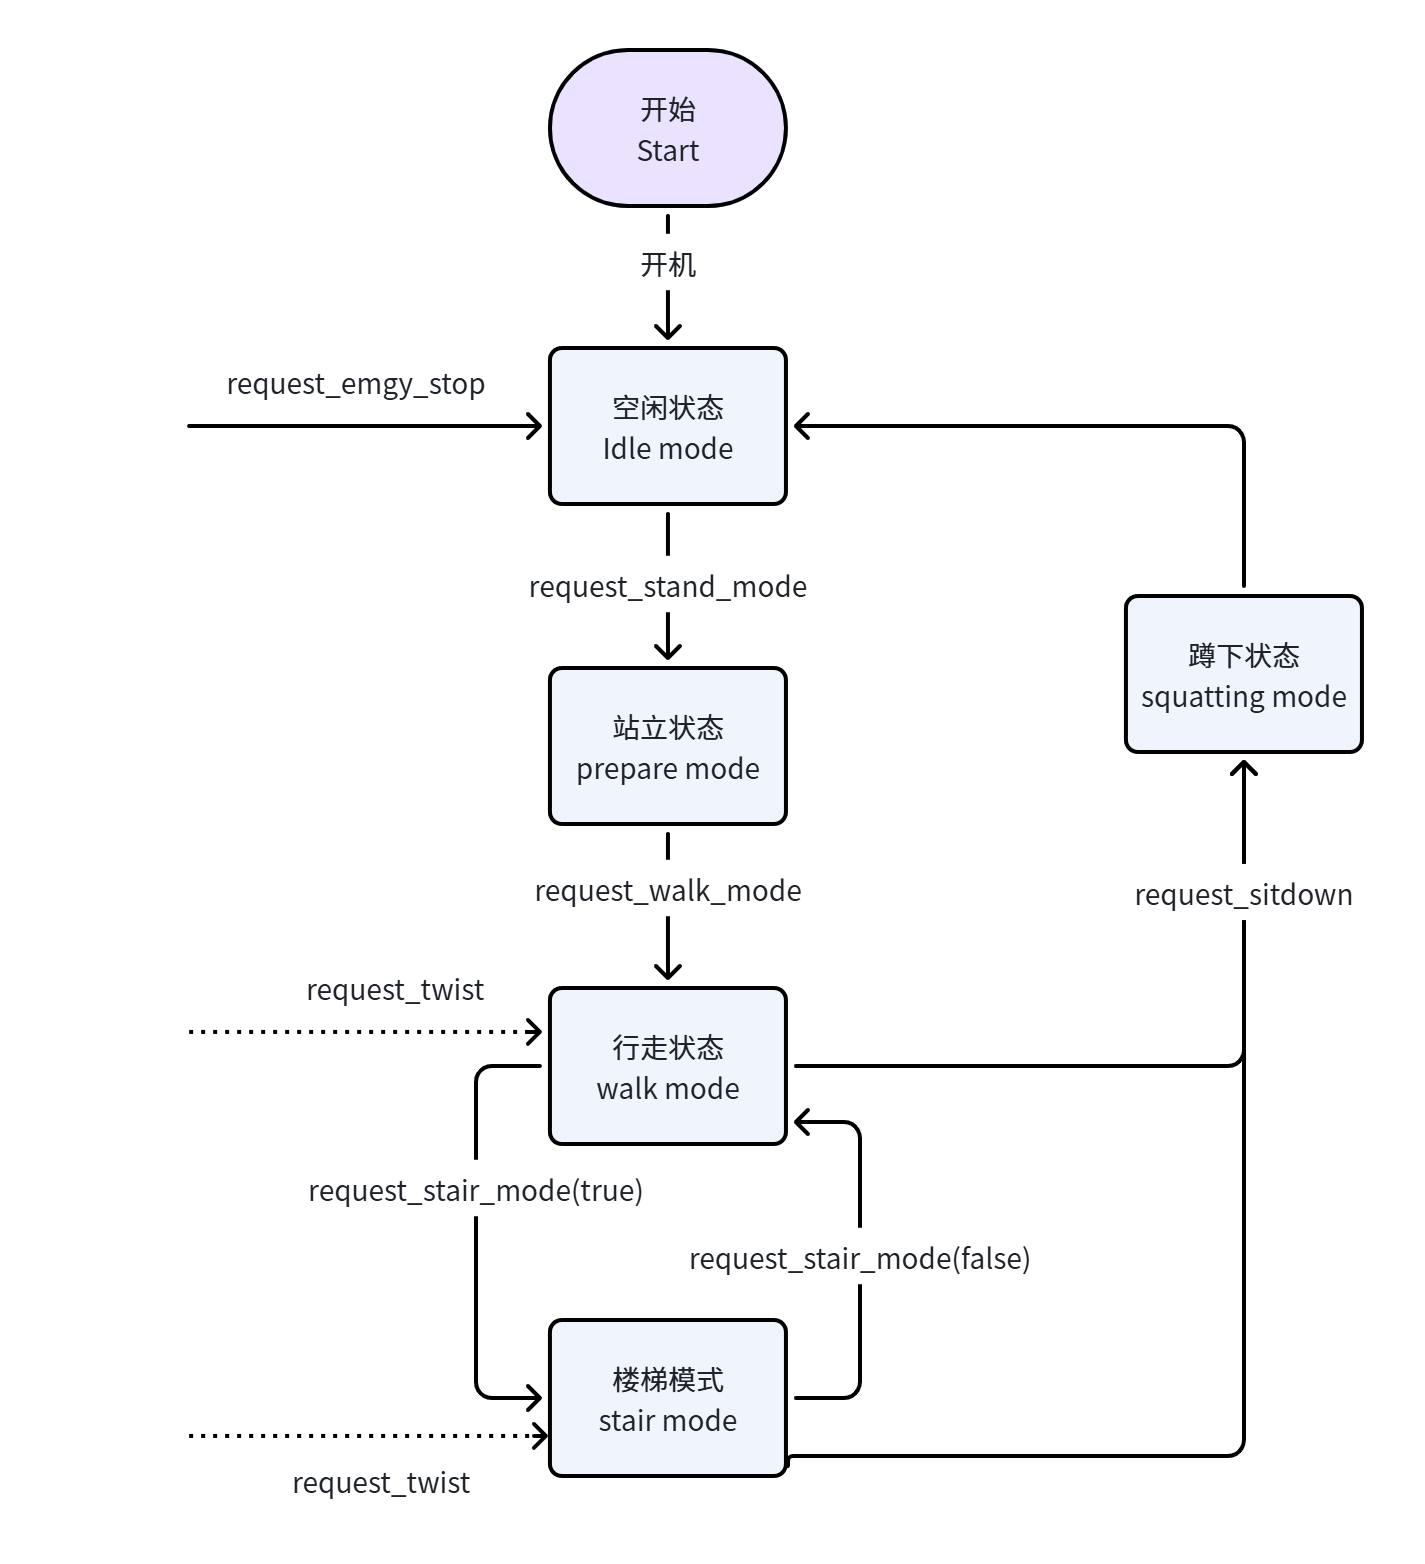
3.8.1 Stand-Up State
3.8.1.1 Request: request_stand_mode
{
  "accid": "SF_TRON2A_001",  // robot serial number; modify it to your robot serial number;
  "title": "request_stand_mode",
  "timestamp": 1672373633989,
  "guid": "746d937cd8094f6a98c9577aaf213d98",
  "data": {
  }
}
3.8.1.2 Response: response_stand_mode
{
  "accid": "SF_TRON2A_001",
  "title": "response_stand_mode",
  "timestamp": 1672373633989,
  "guid": "746d937cd8094f6a98c9577aaf213d98",
  "data": {
    "result": "success"  // success: success, fail_imu: IMU error, fail_motor: motor error
  }
}
3.8.1.3 Notification Push: notify_stand_mode
This notification is sent after the robot stands up or if the stand-up process fails.
{
  "accid": "SF_TRON2A_001",
  "title": "notify_stand_mode",
  "timestamp": 1672373633989,
  "guid": "746d937cd8094f6a98c9577aaf213d98",
  "data": {
    "result": "success"  // success: success, fail_imu: IMU error, fail_motor: motor error
  }
}
3.8.2 Walking State
3.8.2.1 Request: request_walk_mode
{
  "accid": "SF_TRON2A_001", // robot serial number; modify it to your robot serial number;
  "title": "request_walk_mode",
  "timestamp": 1672373633989,
  "guid": "746d937cd8094f6a98c9577aaf213d98",
  "data": {
  }
}
3.8.2.2 Response: response_walk_mode
{
  "accid": "SF_TRON2A_001",
  "title": "response_walk_mode",
  "timestamp": 1672373633989,
  "guid": "746d937cd8094f6a98c9577aaf213d98",
  "data": {
    "result": "success"  // success: success, fail_imu: IMU error, fail_motor: motor error
  }
}
3.8.2.3 Notification Push: notify_walk_mode
This message is sent after the robot enters walking mode or if the transition fails.
{
  "accid": "SF_TRON2A_001",
  "title": "notify_walk_mode",
  "timestamp": 1672373633989,
  "guid": "746d937cd8094f6a98c9577aaf213d98",
  "data": {
    "result": "success"  // success: success, fail_imu: IMU error, fail_motor: motor error
  }
}
3.8.3 Control Walking
3.8.3.1 Request: request_twist
Send commands at 30 Hz or higher.
- Use the following rules in sole-foot mode:
{
  "accid": "SF_TRON2A_001", // robot serial number; modify it to your robot serial number;
  "title": "request_twist",
  "timestamp": 1672373633989,
  "guid": "746d937cd8094f6a98c9577aaf213d98",
  "data": {
    "x": 0.0,   //  forward/backward velocity ratio, range[-1, 1]
    "y": 0.0,   //  lateral walking velocity ratio, range[-1, 1]
    "z": 0.0    //  rotational angular velocity ratio, range[-1, 1]
  }
}
- Use the following rules in wheel-leg mode:
{
  "accid": "WF_TRON1A_075", // robot serial number; modify it to your robot serial number;
  "title": "request_twist",
  "timestamp": 1672373633989,
  "guid": "746d937cd8094f6a98c9577aaf213d98",
  "data": {
    "x": 0.0,   //  forward/backward velocity (m/s), range[-3.0, 3.0]; Note: in stair mode, the commanded velocity must be greater than 1.5, otherwise the robot cannot climb stairs
    "y": 0.0,   //  lateral walking velocity is 0.0 (m/s); lateral movement is not supported in wheel-leg mode
    "z": 0.0    //  rotational angular velocity (rad/s), range[-1.5, 1.5]
  }
}
3.8.3.2 Response: None
3.8.3.3 Notification Push: notify_twist
This notification is sent if robot walking fails.
{
  "accid": "SF_TRON2A_001",
  "title": "notify_twist",
  "timestamp": 1672373633989,
  "guid": "746d937cd8094f6a98c9577aaf213d98",
  "data": {
    "result": "fail_motor"  // fail_imu: IMU error, fail_motor: motor error
  }
}
3.8.4 Adjust Robot Body Height
3.8.4.1 Request: request_base_height
{
  "accid": "SF_TRON2A_001", // robot serial number; modify it to your robot serial number;
  "title": "request_base_height",
  "timestamp": 1672373633989,
  "guid": "746d937cd8094f6a98c9577aaf213d98",
  "data": {
    "direction": -1  // 1: indicates raising, -1: indicates lowering
                     // Each call to this request raises or lowers the robot body height by 5 cm accordingly
  }
}
3.8.4.2 Response: response_base_height
{
  "accid": "SF_TRON2A_001",
  "title": "response_base_height",
  "timestamp": 1672373633989,
  "guid": "746d937cd8094f6a98c9577aaf213d98",
  "data": {
    "result": "success"  // success: success, fail_status: indicates that the current robot state does not allow height adjustment
  }
}
3.8.4.3 Notification Push: None
3.8.5 Sit Down
3.8.5.1 Request: request_sitdown
{
  "accid": "SF_TRON2A_001", // robot serial number; modify it to your robot serial number;
  "title": "request_sitdown",
  "timestamp": 1672373633989,
  "guid": "746d937cd8094f6a98c9577aaf213d98",
  "data": {}
}
3.8.5.2 Response: response_sitdown
{
  "accid": "SF_TRON2A_001",
  "title": "response_sitdown",
  "timestamp": 1672373633989,
  "guid": "746d937cd8094f6a98c9577aaf213d98",
  "data": {
    "result": "success"  // success: success, fail_imu: IMU error, fail_motor: motor error
  }
}
3.8.5.3 Notification Push: notify_sitdown
This notification is sent after the robot sits down or if the sit-down process fails.
{
  "accid": "SF_TRON2A_001",
  "title": "notify_sitdown",
  "timestamp": 1672373633989,
  "guid": "746d937cd8094f6a98c9577aaf213d98",
  "data": {
    "result": "success"  // success: success, fail_imu: IMU error, fail_motor: motor error
  }
}
3.8.6 Enable Stair Mode (Dual-Wheel-Leg Configuration Only)
3.8.6.1 Request: request_stair_mode
{
  "accid": "WF_TRON2A_001", // robot serial number; modify it to your robot serial number;
  "title": "request_stair_mode",
  "timestamp": 1672373633989,
  "guid": "746d937cd8094f6a98c9577aaf213d98",
  "data": {
      "enable": true  // true: enable stair mode, false: disable stair mode
  }
}
3.8.6.2 Response: response_stair_mode
{
  "accid": "WF_TRON2A_001",
  "title": "response_stair_mode",
  "timestamp": 1672373633989,
  "guid": "746d937cd8094f6a98c9577aaf213d98",
  "data": {
    "result": "success"  // success: success, fail_imu: IMU error, fail_motor: motor error
  }
}
3.8.6.3 Notification Push: None
3.8.7 Emergency Stop
3.8.7.1 Request: request_emgy_stop
{
  "accid": "SF_TRON2A_001", // robot serial number; modify it to your robot serial number;
  "title": "request_emgy_stop",
  "timestamp": 1672373633989,
  "guid": "746d937cd8094f6a98c9577aaf213d98",
  "data": {}
}
3.8.7.2 Response: response_emgy_stop
{
  "accid": "SF_TRON2A_001",
  "title": "response_emgy_stop",
  "timestamp": 1672373633989,
  "guid": "746d937cd8094f6a98c9577aaf213d98",
  "data": {
    "result": "success"  // success: success, fail_imu: IMU error, fail_motor: motor error
  }
}
3.8.7.3 Notification Push: None
3.8.8 Enable IMU Data
3.8.8.1 Request: request_enable_imu
This function enables IMU data push. After enabling it, the system actively pushes IMU data.
{
  "accid": "SF_TRON2A_001", // robot serial number; modify it to your robot serial number;
  "title": "request_enable_imu",
  "timestamp": 1672373633989,
  "guid": "746d937cd8094f6a98c9577aaf213d98",
  "data": {
      "enable": true  // true: enable IMU, false: disable IMU
  }
}
3.8.8.2 Response: response_enable_imu
{
  "accid": "SF_TRON2A_001",
  "title": "response_enable_imu",
  "timestamp": 1672373633989,
  "guid": "746d937cd8094f6a98c9577aaf213d98",
  "data": {
    "result": "success"  // success: success, fail_imu: IMU
  }
}
3.8.8.3 Notification Push: notify_imu
After IMU data is enabled, the system actively pushes messages containing IMU status.
{
  "accid": "SF_TRON2A_001",
  "title": "notify_imu",
  "timestamp": 1672373633989,
  "guid": "746d937cd8094f6a98c9577aaf213d98",
  "data": {
      "euler": [0.0, 0.0, 0.0],     // Euler angles [roll, pitch, yaw] in degrees
      "acc": [0.0, 0.0, 0.0],       // acceleration [x, y, z] in m/s²
      "gyro": [0.0, 0.0, 0.0],      // gyroscope angular velocity [x, y, z] in rad/s
      "quat": [0.0, 0.0, 0.0, 0.0]  // quaternion [w, x, y, z]
  }
}
3.8.9 Fall Recovery
3.8.9.1 Request: request_recover
After the robot falls, this interface can be called to make the robot get up automatically and recover to walking mode.
{
  "accid": "SF_TRON2A_001", // robot serial number; modify it to your robot serial number;
  "title": "request_recover",
  "timestamp": 1672373633989,
  "guid": "746d937cd8094f6a98c9577aaf213d98",
  "data": {}
}
3.8.9.2 Response: response_recover
{
  "accid": "SF_TRON2A_001",
  "title": "response_recover",
  "timestamp": 1672373633989,
  "guid": "746d937cd8094f6a98c9577aaf213d98",
  "data": {
    "result": "success"  // success: command received successfully; start recovery and get-up, fail_no_fallover: the robot has not fallen
  }
}
3.8.9.3 Notification Push: notify_recover
This message is pushed after recovery and get-up are completed.
{
  "accid": "SF_TRON2A_001",
  "title": "notify_recover",
  "timestamp": 1672373633989,
  "guid": "746d937cd8094f6a98c9577aaf213d98",
  "data": {
    "result": "success"
  }
}
Possible values for result are success (fall recovery succeeded) and fail_recover (fall recovery failed).
3.9 Bipedal/Dual-Wheel-Leg Protocol Interface Call Examples
3.9.1 Linux C++ Example Implementation
Environment Setup
Using Ubuntu 20.04 as an example, install websocketpp, nlohmann/json and boost dependencies:
sudo apt-get install libboost-all-dev libwebsocketpp-dev nlohmann-json3-dev
Compile the Code
g++ -std=c++11 -o websocket_client websocket_client.cpp -lssl -lcrypto -lboost_system -lpthread
Run the Program
./websocket_client
websocket_client.cpp Implementation
#include <iostream>
#include <atomic>
#include <string>
#include <thread>
#include <chrono>
#include <websocketpp/client.hpp>
#include <websocketpp/config/asio.hpp>
#include <nlohmann/json.hpp>
#include <boost/uuid/uuid.hpp>
#include <boost/uuid/uuid_generators.hpp>
#include <boost/uuid/uuid_io.hpp>

using json = nlohmann::json;
using websocketpp::client;
using websocketpp::connection_hdl;

// Replace this ACCID value with your robot's actual serial number (SN)
static std::string ACCID = "";

// WebSocket client instance
static client<websocketpp::config::asio> ws_client;

// Atomic flag for graceful exit
static std::atomic<bool> should_exit(false);

// Connection handle for sending messages
static connection_hdl current_hdl;

// Generate dynamic GUID
static std::string generate_guid()
{
    boost::uuids::random_generator gen;
    boost::uuids::uuid u = gen();
    return boost::uuids::to_string(u);
}

// Send WebSocket request with title and data
static void send_request(const std::string& title, const json& data = json::object())
{
    json message;

    message["accid"] = ACCID;
    message["title"] = title;
    message["timestamp"] = std::chrono::duration_cast<std::chrono::milliseconds>(
                               std::chrono::system_clock::now().time_since_epoch())
                               .count();
    message["guid"] = generate_guid();
    message["data"] = data;

    std::string message_str = message.dump();

    ws_client.send(current_hdl, message_str, websocketpp::frame::opcode::text);
}

// Handle user commands
static void handle_commands()
{
    while (!should_exit)
    {
        std::string command;
        std::cout << "Enter command ('stand', 'walk', 'twist', 'sit', 'stair', 'stop', 'imu') or 'exit' to quit:" << std::endl;
        std::getline(std::cin, command);

        if (command == "exit")
        {
            should_exit = true;
            break;
        }
        else if (command == "stand")
        {
            send_request("request_stand_mode");
        }
        else if (command == "walk")
        {
            send_request("request_walk_mode");
        }
        else if (command == "twist")
        {
            float x, y, z;
            std::cout << "Enter x, y, z values:" << std::endl;
            std::cin >> x >> y >> z;
            std::cin.ignore();

            send_request("request_twist", {
                {"x", x},
                {"y", y},
                {"z", z}
            });
        }
        else if (command == "sit")
        {
            send_request("request_sitdown");
        }
        else if (command == "stair")
        {
            std::string enable;
            std::cout << "Enable stair mode (true/false):" << std::endl;
            std::cin >> enable;
            std::cin.ignore();

            send_request("request_stair_mode", {
                {"enable", enable == "true"}
            });
        }
        else if (command == "stop")
        {
            send_request("request_emgy_stop");
        }
        else if (command == "imu")
        {
            std::string enable;
            std::cout << "Enable IMU (true/false):" << std::endl;
            std::cin >> enable;
            std::cin.ignore();

            send_request("request_enable_imu", {
                {"enable", enable == "true"}
            });
        }
    }
}

// WebSocket open callback
static void on_open(connection_hdl hdl)
{
    std::cout << "Connected!" << std::endl;

    current_hdl = hdl;

    std::thread(handle_commands).detach();
}

// WebSocket message callback
static void on_message(connection_hdl hdl, client<websocketpp::config::asio>::message_ptr msg)
{
    json data = json::parse(msg->get_payload());

    if (data.contains("accid") && data["accid"].is_string() && ACCID.empty())
    {
        ACCID = data["accid"].get<std::string>();
    }

    std::cout << "Received: " << msg->get_payload() << std::endl;
}

// WebSocket close callback
static void on_close(connection_hdl hdl)
{
    std::cout << "Connection closed." << std::endl;
}

// Close WebSocket connection
static void close_connection(connection_hdl hdl)
{
    ws_client.close(hdl, websocketpp::close::status::normal, "Normal closure");
}

int main()
{
    ws_client.init_asio();

    ws_client.set_open_handler(&on_open);
    ws_client.set_message_handler(&on_message);
    ws_client.set_close_handler(&on_close);

    std::string server_uri = "ws://10.192.1.2:5000";

    websocketpp::lib::error_code ec;
    client<websocketpp::config::asio>::connection_ptr con = ws_client.get_connection(server_uri, ec);

    if (ec)
    {
        std::cout << "Error: " << ec.message() << std::endl;
        return 1;
    }

    connection_hdl hdl = con->get_handle();
    ws_client.connect(con);

    std::cout << "Press Ctrl+C to exit." << std::endl;

    ws_client.run();

    return 0;
}
3.9.2 Python Example Implementation
Environment Setup
Using Ubuntu 20.04 as an example, install the following dependencies:
sudo apt install python3-dev python3-pip
pip3 install websocket-client
Run the Script
python3 websocket_client.py
websocket_client.py Implementation
import json
import uuid
import threading
import time
import websocket


# Replace this ACCID value with your robot's actual serial number (SN)
ACCID = None

# Atomic flag for graceful exit
should_exit = False

# WebSocket client instance
ws_client = None


# Generate dynamic GUID
def generate_guid():
    return str(uuid.uuid4())


# Send WebSocket request with title and data
def send_request(title, data=None):
    global ACCID
    global ws_client

    if data is None:
        data = {}

    # Create message structure with necessary fields
    message = {
        "accid": ACCID,
        "title": title,
        "timestamp": int(time.time() * 1000),
        "guid": generate_guid(),
        "data": data
    }

    message_str = json.dumps(message)

    # Send the message through WebSocket if client is connected
    if ws_client:
        ws_client.send(message_str)


# Handle user commands
def handle_commands():
    global should_exit

    while not should_exit:
        command = input(
            "Enter command ('stand', 'walk', 'twist', 'sit', 'stair', 'stop', 'imu') or 'exit' to quit:\n"
        )

        if command == "exit":
            should_exit = True
            break

        elif command == "stand":
            send_request("request_stand_mode")

        elif command == "walk":
            send_request("request_walk_mode")

        elif command == "twist":
            # Get twist values from user
            x = float(input("Enter x value: "))
            y = float(input("Enter y value: "))
            z = float(input("Enter z value: "))

            # Send twist command at 30 Hz for 1 second
            for _ in range(30):
                send_request("request_twist", {
                    "x": x,
                    "y": y,
                    "z": z
                })
                time.sleep(1 / 30)

        elif command == "sit":
            send_request("request_sitdown")

        elif command == "stair":
            # Get stair mode enable flag from user
            enable = input("Enable stair mode (true/false): ").strip().lower() == "true"
            send_request("request_stair_mode", {
                "enable": enable
            })

        elif command == "stop":
            send_request("request_emgy_stop")

        elif command == "imu":
            # Get IMU enable flag from user
            enable = input("Enable IMU (true/false): ").strip().lower() == "true"
            send_request("request_enable_imu", {
                "enable": enable
            })


# WebSocket on_open callback
def on_open(ws):
    print("Connected!")

    # Start handling commands in a separate thread
    threading.Thread(target=handle_commands, daemon=True).start()


# WebSocket on_message callback
def on_message(ws, message):
    global ACCID

    root = json.loads(message)
    ACCID = root.get("accid", None)

    print(f"Received message: {message}")


# WebSocket on_close callback
def on_close(ws, close_status_code, close_msg):
    print("Connection closed.")


# Close WebSocket connection
def close_connection(ws):
    ws.close()


def main():
    global ws_client

    # Create WebSocket client instance
    ws_client = websocket.WebSocketApp(
        "ws://10.192.1.2:5000",
        on_open=on_open,
        on_message=on_message,
        on_close=on_close
    )

    # Run WebSocket client loop
    print("Press Ctrl+C to exit.")
    ws_client.run_forever()


if __name__ == "__main__":
    main()
3.10 Dual-Wheel-Leg Charging Dock Interface
3.10.1 Scan for Charging Docks
Supported on Dual-Wheel-Leg (WF) models only. The request performs a single scan → wait for any ongoing scan to time out → read the list transaction. It does not pair, light up the dock, enable the charging MOSFET, or send EV_GO_DOCKING, nor does it modify the autonomous-charging lifecycle state. The protocol currently returns only a 16-bit little-endian dock_id and has no RSSI field, so the response does not fabricate signal strength.
Scanning is mutually exclusive with charging-dock scan/pairing, docking, charging, and undocking; a conflict returns fail_dock_busy. The list is returned in hardware scan order and deduplicated, and the payload length must be exactly 1 + 2 * raw count. An empty list counts as a successful scan and is clearly distinguished from a hardware/protocol scan failure.
- Request: request_scan_docks
data must be an empty object:
{
  "accid": "WF_TRON2A_001",
  "title": "request_scan_docks",
  "guid": "d2c6521699e035949c9276cb17b62bdb",
  "timestamp": 1762771300000,
  "data": {}
}
- Response: response_scan_docks
{
  "accid": "WF_TRON2A_001",
  "title": "response_scan_docks",
  "guid": "d2c6521699e035949c9276cb17b62bdb",
  "timestamp": 1762771300000,
  "data": {
    "success": true,
    "result": "success",
    "message": "charging dock scan completed",
    "docks": [{"dock_id": 0}, {"dock_id": 4660}, {"dock_id": 65535}],
    "count": 3,
    "scanned_at": 1787106660123
  }
}
An empty list still returns success=true / result="success", with docks=[], count=0, and message="no charging docks found". scanned_at is the Unix timestamp in milliseconds when the scan completed; for a rejection response where no hardware scan was actually initiated, it is 0.
result |
Meaning |
|---|---|
success |
The scan transaction succeeded; count may be 0 |
fail_dock_scan |
Failed to start the scan or to read the scan results |
fail_dock_scan_list |
The payload is empty, truncated, contains extra bytes, or has an invalid length. |
fail_dock_busy |
The robot is already scanning, pairing, docking/charging, or undocking |
fail_unsupported_robot |
Non-WF model |
fail_invalid_cmd |
data is not an empty object |
fail_service_call |
/tron2/service is unreachable or the call timed out |
fail_remote |
The Snowball service explicitly rejected the request. |
fail_invalid_response |
The Snowball service returned invalid JSON. The signaling layer does not re-parse the dock list |
3.10.2 Query the Full Charging Dock Status
This interface is a read-only operation that requires no developer mode and triggers no scanning, no controller switching, and no hardware side effects. The signaling layer calls dock/status on the snowball /tron2/service and, after validating the JSON, passes the fields and the message through unchanged.
- Request: request_get_docking_status
{
  "accid": "WF_TRON2A_001",
  "title": "request_get_docking_status",
  "guid": "d2c6521699e035949c9276cb17b62bdb",
  "timestamp": 1762771300000,
  "data": {}
}
- Response: response_get_docking_status
{
  "accid": "WF_TRON2A_001",
  "title": "response_get_docking_status",
  "guid": "d2c6521699e035949c9276cb17b62bdb",
  "timestamp": 1762771300000,
  "data": {
    "success": true,
    "result": "success",
    "message": "waiting for charging confirmation",
    "supported": true,
    "phase": "confirming",
    "robot_state": "ST_GO_DOCKING",
    "in_progress": true,
    "has_dock_id": true,
    "dock_id": 4660,
    "has_requested_dock_id": true,
    "requested_dock_id": 4660,
    "dock_selection": "requested",
    "controller_confirmed": true,
    "charging_confirmed": false,
    "confirm_timeout_sec": 60,
    "confirm_remaining_sec": 42.381,
    "failure_code": 0,
    "failure_source": "",
    "failure_reason": "",
    "previous_failure_code": 7,
    "previous_failure_source": "wheelfoot_gocharge",
    "previous_failure_reason": "docking controller reported an error (code 7)",
    "battery_known": true,
    "battery_percent": 63,
    "minimum_undock_battery_percent": 15,
    "attempt_token": 12,
    "confirm_attempt_token": 2,
    "retry_count": 1,
    "attempt_source": "sdk",
    "updated_at": 1787106660123
  }
}
Field semantics:
-
phaseis a stable business-level enum:idle(no charging attempt has been initiated since the process started),preparing(scanning, dock selection, or pairing),docking(docking with the charging dock or performing an automatic retry),confirming(waiting for both controller and charging conditions),charging(both conditions are satisfied and the robot is inST_DOCKING),undock_preparing,undocking,canceled,failed,manual_undock, andwalking. -
robot_statepreserves the original snowballST_*state. Business phases and raw states are not forced into a one-to-one mapping; for example, after a failure the robot may already be back inST_WALKINGwhilephaseremainsfailed. -
dock_id=nulltogether withhas_dock_id=falsemeans no dock has been selected yet, or the state could not be restored after a process restart. The ID0is a valid value and must not be interpreted as unknown.requested_dock_idreflects only the value requested by the SDK; the final pairing result is determined bydock_id. -
attempt_tokenincrements each time the RC or SDK initiates a new autonomous charging attempt. This clears the previous dock selection and failure records.confirm_attempt_tokennumbers each gocharge dual-condition window; automatic retries update it and incrementretry_count. -
When an automatic retry starts, the errors from the current round move into
previous_failure_*, while the final failure remains infailure_*. A new user attempt clears both failure groups; an explicit success clears the current failure. -
confirm_remaining_secis a number only while the confirmation window is active, andnullotherwise. It is computed from a monotonic clock;updated_atis the Unix timestamp in milliseconds of the most recent business-state update. -
battery_percent=nulltogether withbattery_known=falsemeans no valid battery level has been received yet; an unknown battery level is never fabricated as 0.
On non-WF models, the response returns success=true, supported=false, phase=idle, and an explicit message; the query itself still succeeds.
State transitions:
idle/walking → preparing → docking → confirming → charging → undock_preparing → undocking → walking. Scan/pairing errors, controller errors, confirmation timeouts, low battery, or undocking errors enter failed; offcharge code=-1 enters manual_undock; a user cancellation enters canceled. The controller and charging confirmation signals are order-independent.
Query error codes:
result |
Meaning |
|---|---|
fail_service_call |
/tron2/service is unreachable or the call timed out |
fail_remote |
The snowball service explicitly rejected the query |
fail_invalid_response |
The snowball service returned JSON that could not be parsed or was missing required fields; signaling does not crash and does not rewrite the failure reason |
3.10.3 Start Docking (Dual-Wheel-Leg Only)
- Request: request_start_docking
{
  "accid": "WF_TRON2A_001",
  "title": "request_start_docking",
  "guid": "d2c6521699e035949c9276cb17b62bdb",
  "timestamp": 1762771300000,
  "data": {"dock_id": 4660}  // Optionally specify the ID of the dock to dock with. If `dock_id` is omitted (`"data": {}`), the robot docks with the first charging dock discovered during the scan.
}
- Response: response_start_docking
{
  "accid": "WF_TRON2A_001",
  "title": "response_start_docking",
  "guid": "d2c6521699e035949c9276cb17b62bdb",
  "timestamp": 1762771300000,
  "data": {
    "result": "success",
    "success": true,
    "message": "docking started; docking prepared (dock_id:4660)"
  }
}
3.10.4 Cancel Docking / Cancel Undocking
- Request: request_cancel_docking
{
  "accid": "WF_TRON2A_001",
  "title": "request_cancel_docking",
  "guid": "d2c6521699e035949c9276cb17b62bdb",
  "timestamp": 1762771300000,
  "data": {}
}
- Response: response_cancel_docking
{
  "accid": "WF_TRON2A_001",
  "title": "response_cancel_docking",
  "guid": "d2c6521699e035949c9276cb17b62bdb",
  "timestamp": 1762771300000,
  "data": {
    "result": "success",
    "success": true,
    "message": "docking canceled"
  }
}
3.10.5 Undock (Dual-Wheel-Leg Only)
- Request: request_undock
{
  "accid": "WF_TRON2A_001",
  "title": "request_undock",
  "guid": "d2c6521699e035949c9276cb17b62bdb",
  "timestamp": 1762771300000,
  "data": {}
}
- Response: response_undock
{
  "accid": "WF_TRON2A_001",
  "title": "response_undock",
  "guid": "d2c6521699e035949c9276cb17b62bdb",
  "timestamp": 1762771300000,
  "data": {
    "result": "success",
    "success": true,
    "message": "undocking started"
  }
}
4 External Component Development Interfaces
4.1 Head and Wrist Cameras
For configuration and usage instructions, see the Head and Wrist Camera Guide.
4.2 Waist Camera
The robot is equipped with an Intel RealSense D435i camera. This depth camera provides depth and image data and is primarily used for terrain perception. Follow the instructions below to receive D435i camera data through ROS 1 Noetic.
- Make sure that ROS 1 Noetic is installed on your computer. See the ROS Noetic installation guide and select
ros-noetic-desktop-full. - Configure the network connection:
- Connect the development computer to the robot through the external Ethernet port.
- Set the development computer's IP address to
10.192.1.200. - Run
ping 10.192.1.2and confirm that the robot is reachable.
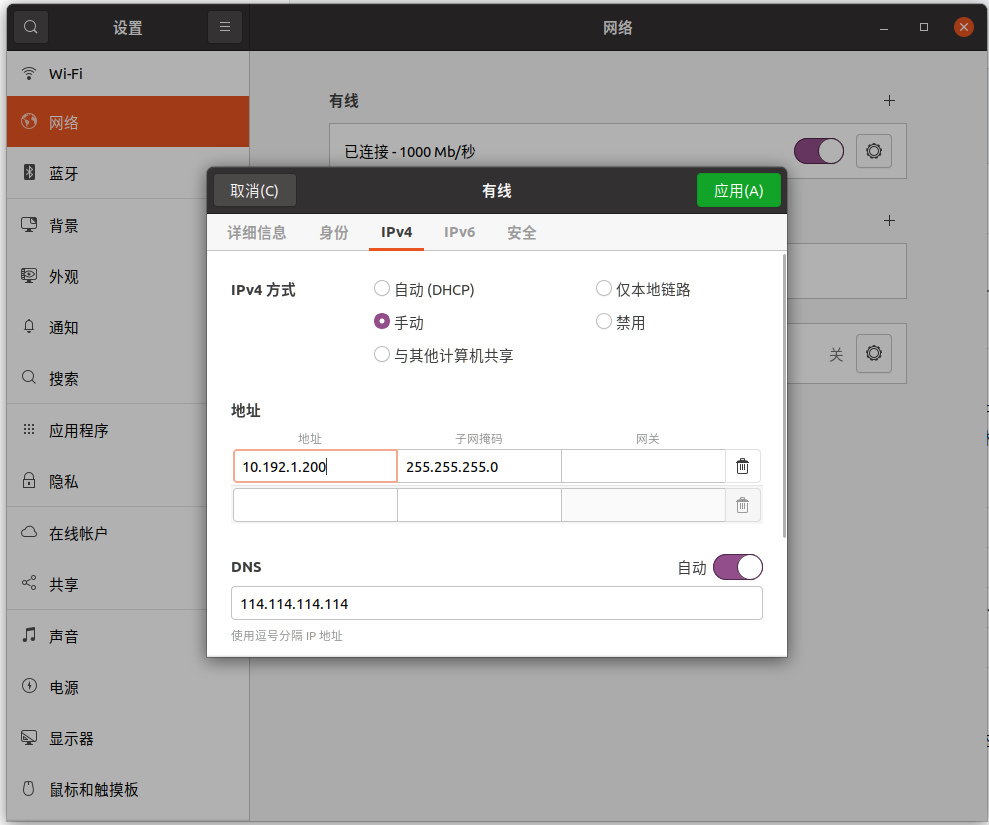
- Configure the ROS environment. Set
ROS_MASTER_URIandROS_IPso that the development computer can connect to the ROS master running on the robot. Add the following commands to the development computer's.bashrcfile to apply them automatically whenever a terminal is opened:
export ROS_MASTER_URI=http://10.192.1.2:11311
export ROS_IP=10.192.1.200
- List the topics published by the D435i camera:
rostopic list
- Visualize the camera data with
rqt_image_viewor RViz:- Install
rqt_image_view:
- Install
sudo apt install ros-noetic-rqt-image-view
- Start the tool and select the required camera topic:
rqt_image_view
- To visualize depth data in RViz, run:
rviz
In RViz, add Image and PointCloud2 displays and select the corresponding camera topics.
4.3 LimX Two-Finger Gripper
4.3.1 Gripper Control Command
4.3.1.1 Request: request_set_limx_2fclaw_cmd
This protocol controls the gripper grasping action.
{
  "accid": "DACH_TRON2A_001",
  "title": "request_set_limx_2fclaw_cmd",
  "timestamp": 1672373633989,
  "guid": "746d937cd8094f6a98c9577aaf213d98",
  "data": {
      // If you provide the following data at the same time, the left gripper will be controlled
      "left_opening": 50,  // opening width, 0-100, dimensionless (0 means fully closed, 100 means fully open)
      "left_speed": 50,    // gripper speed, 0-100, dimensionless (larger value means faster speed)
      "left_force": 50,   //force, gripper holding force, 0-100, dimensionless (larger value means greater force)

      // If you provide the following data at the same time, the right gripper will be controlled
      "right_opening": 50,  // opening width, 0-100, dimensionless (0 means fully closed, 100 means fully open)
      "right_speed": 50,    // gripper speed, 0-100, dimensionless (larger value means faster speed)
      "right_force": 50   //force, gripper holding force, 0-100, dimensionless (larger value means greater force)
  }
}
4.3.1.2 Response: response_set_limx_2fclaw_cmd
{
  "accid": "DACH_TRON2A_001",
  "title": "response_set_limx_2fclaw_cmd",
  "timestamp": 1672373633989,
  "guid": "746d937cd8094f6a98c9577aaf213d98",
  "data": {
    "result": "success"  // success: success, fail_motor: motor error,
  }
}
4.3.1.3 Notification Push: None
4.3.2 Get Gripper State Information
4.3.2.1 Request: request_get_limx_2fclaw_state
{
  "accid": "DACH_TRON2A_001",
  "title": "request_get_limx_2fclaw_state",
  "timestamp": 1672373633989,
  "guid": "746d937cd8094f6a98c9577aaf213d98",
  "data": {
  }
}
4.3.2.2 Response: response_get_limx_2fclaw_state
Returns gripper state information
{
  "accid": "DACH_TRON2A_001",
  "title": "response_get_limx_2fclaw_state",
  "timestamp": 1672373633989,
  "guid": "746d937cd8094f6a98c9577aaf213d98",
  "data": {
      "timestamp": 1672373633989, // data timestamp in milliseconds

      "left_opening": 50,  // opening width, 0-100, dimensionless (0 means fully closed, 100 means fully open)
      "left_speed": 50,    // gripper speed, 0-100, dimensionless (larger value means faster speed)
      "left_force": 50,   //force, gripper holding force, 0-100, dimensionless (larger value means greater force)

      "right_opening": 50,  // opening width, 0-100, dimensionless (0 means fully closed, 100 means fully open)
      "right_speed": 50,    // gripper speed, 0-100, dimensionless (larger value means faster speed)
      "right_force": 50,   //force, gripper holding force, 0-100, dimensionless (larger value means greater force)

      "result": "success"  // success: success, fail_motor: motor error
  }
}
4.3.2.3 Notification Push: None
4.4 BrainCo Revo 2 Dexterous Hand (Basic Version)
4.4.1 Dexterous Hand Control Command
4.4.1.1 Request: request_set_brainco2_hand_cmd
{
  "accid": "DACH_TRON2A_001",
  "title": "request_set_brainco2_hand_cmd",
  "timestamp": 1672373633989,
  "guid": "746d937cd8094f6a98c9577aaf213d98",
  "data": {
      // Left hand:
      // Indexes 0-5 correspond to: thumb tip, thumb base, index finger, middle finger, ring finger, and little finger
      // left_mode: control mode
      //            0: exit control
      //            1: position-time mode; must specify left_pos, left_time value
      //            2: position-velocity mode; must specify left_pos, left_vel value
      //           3: force-control mode; must specify left_current value
      // left_pos: target position of each finger, unit: rad
      //           respective ranges: 0-1.0297, 0-1.5707, 0-1.4137, 0-1.4137, 0-1.4137, 0-1.4137
      // left_vel: target velocity of each finger, unit: rad/s
      //           respective ranges: 0-2.5367, 0-2.6180, 0-2.2689, 0-2.2689, 0-2.2689, 0-2.2689
      // left_current: target current of each finger, unit: mA, range: ±1000 mA
      // left_time: control time of each finger, unit: ms, range: 1-2000 ms

      "left_mode": 1,
      "left_pos": [0.5, 0.5, 0.5, 0.5, 0.5, 0.5],
      "left_vel": [0.5, 0.5, 0.5, 0.5, 0.5, 0.5],
      "left_current": [500, 500, 500, 500, 500, 500],
      "left_time": [1000, 1000, 1000, 1000, 1000, 1000],

      // Right hand:
      // Indexes 0-5 correspond to: thumb tip, thumb base, index finger, middle finger, ring finger, and little finger
      // right_mode: control mode
      //            0: exit control
      //            1: position-time mode; must specify right_pos, right_time value
      //            2: position-velocity mode; must specify right_pos, right_vel value
      //            3: force-control mode; must specify right_current value
      // right_pos: target position of each finger, unit: rad
      //           respective ranges: 0-1.0297, 0-1.5707, 0-1.4137, 0-1.4137, 0-1.4137, 0-1.4137
      // right_vel: target velocity of each finger, unit: rad/s
      //           respective ranges: 0-2.5367, 0-2.6180, 0-2.2689, 0-2.2689, 0-2.2689, 0-2.2689
      // right_current: target current of each finger, unit: mA, range: ±1000 mA
      // right_time: control time of each finger, unit: ms, range: 1-2000 ms

      "right_mode": 1,
      "right_pos": [0.5, 0.5, 0.5, 0.5, 0.5, 0.5],
      "right_vel": [0.5, 0.5, 0.5, 0.5, 0.5, 0.5],
      "right_current": [500, 500, 500, 500, 500, 500],
      "right_time": [1000, 1000, 1000, 1000, 1000, 1000]
  }
}
4.4.1.2 Response: response_set_brainco2_hand_cmd
{
  "accid": "DACH_TRON2A_001",
  "title": "response_set_brainco2_hand_cmd",
  "timestamp": 1672373633989,
  "guid": "746d937cd8094f6a98c9577aaf213d98",
  "data": {
    "result": "success"  // success: success, fail_motor: motor error, fail_invalid_cmd: invalid command
  }
}
4.4.1.3 Control Example
{
  "accid": "DACH_TRON2A_069",
  "title": "request_set_brainco2_hand_cmd",
  "timestamp": 1672373633989,
  "guid": "746d937cd8094f6a98c9577aaf213d98",
  "data": {
    "left_mode": 1,
    "left_pos": [0.5, 0.5, 0.5, 1, 0.5, 0.5],
    "left_vel": [0.5, 0.5, 0.5, 0.5, 0.5, 0.5],
    "left_current": [500, 500, 500, 500, 500, 500],
    "left_time": [1000, 1000, 1000, 1000, 1000, 1000],
    "right_mode": 1,
    "right_pos": [0.5, 0.5, 0.5, 0.5, 0.5, 0.5],
    "right_vel": [0.5, 0.5, 0.5, 0.5, 0.5, 0.5],
    "right_current": [500, 500, 500, 500, 500, 500],
    "right_time": [1000, 1000, 1000, 1000, 1000, 1000]
  }
}
4.4.2 Get Dexterous Hand State
4.4.2.1 Request: request_get_brainco2_hand_state
{
  "accid": "DACH_TRON2A_001",
  "title": "request_get_brainco2_hand_state",
  "timestamp": 1672373633989,
  "guid": "746d937cd8094f6a98c9577aaf213d98",
  "data": {
  }
}
4.4.2.2 Response: response_get_brainco2_hand_state
{
  "accid": "DACH_TRON2A_001",
  "title": "response_get_brainco2_hand_state",
  "timestamp": 1672373633989,
  "guid": "746d937cd8094f6a98c9577aaf213d98",
  "data": {
      "timestamp": 1672373633989,
      "left_mode": 1,
      "left_pos": [0.5, 0.5, 0.5, 0.5, 0.5, 0.5],
      "left_vel": [0.5, 0.5, 0.5, 0.5, 0.5, 0.5],
      "left_current": [500, 500, 500, 500, 500, 500],
      "left_time": [1000, 1000, 1000, 1000, 1000, 1000],
      "right_mode": 1,
      "right_pos": [0.5, 0.5, 0.5, 0.5, 0.5, 0.5],
      "right_vel": [0.5, 0.5, 0.5, 0.5, 0.5, 0.5],
      "right_current": [500, 500, 500, 500, 500, 500],
      "right_time": [1000, 1000, 1000, 1000, 1000, 1000]
  }
}
5 Digital Assets
5.1 Robot URDF
https://github.com/limx-tron2/robot-description
6 FAQ
| No. | Question | Common Cause | Solution |
|---|---|---|---|
| 1 | No response when accessing http://10.192.1.2:8080 |
The computer is not on the same subnet as 10.192.1.2. |
1. Run ping 10.192.1.2. If the ping succeeds, clear the browser data or try another browser. 2. If the ping fails, configure a static local IP address, disable DHCP, and set DNS to 223.5.5.5 or 8.8.8.8. |
| 2 | How do I configure the camera serial number? | See Camera SN Configuration. | |
| 3 | |||
| 4 | |||
| 5 |
Shenzhen LimX Dynamics Technology Co., Ltd.
Address: 15/F, Building E, Nanshan Zhigu Industrial Park, No. 3157 Shahe West Road, Nanshan District, Shenzhen, China
Website: https://limxdynamics.com/