TRON 2 Dual-Arm Quick Start Guide

TRON 2 EDU Ed.September 9, 2026

Safety Instructions and Disclaimer

Read this notice and the User Manual in full before using the product.

  1. Read and understand the instructions: Before operating the robot, make sure you understand all operating instructions and safety requirements in this guide and the User Manual.
  2. Operator responsibility: This product is an electromechanical device with motor-driven moving parts. The robot arms can move quickly and exert considerable force. Only trained personnel may operate the robot, and the product must be used only for lawful purposes. The user assumes responsibility for personal injury, property damage, or third-party loss caused by failure to follow the instructions, unauthorized modification, or use in a hazardous environment.
  3. Safe operating environment: Keep all personnel outside the robot's operating range. Keep the robot in sight throughout operation. Do not operate the robot in wet, flammable, explosive, or electromagnetically disruptive environments.
  4. Emergency Stop awareness: Before operation, learn the locations and use of the Remote Emergency Stop and the onboard Emergency Stop button. See Sections 3 and 6.
  5. Revisions: This guide and its safety requirements may be revised as the product firmware and features are updated. Always refer to the latest version published by LimX Dynamics.

Video Tutorial

1 Before You Begin

1.1 Required Equipment

Item Requirement
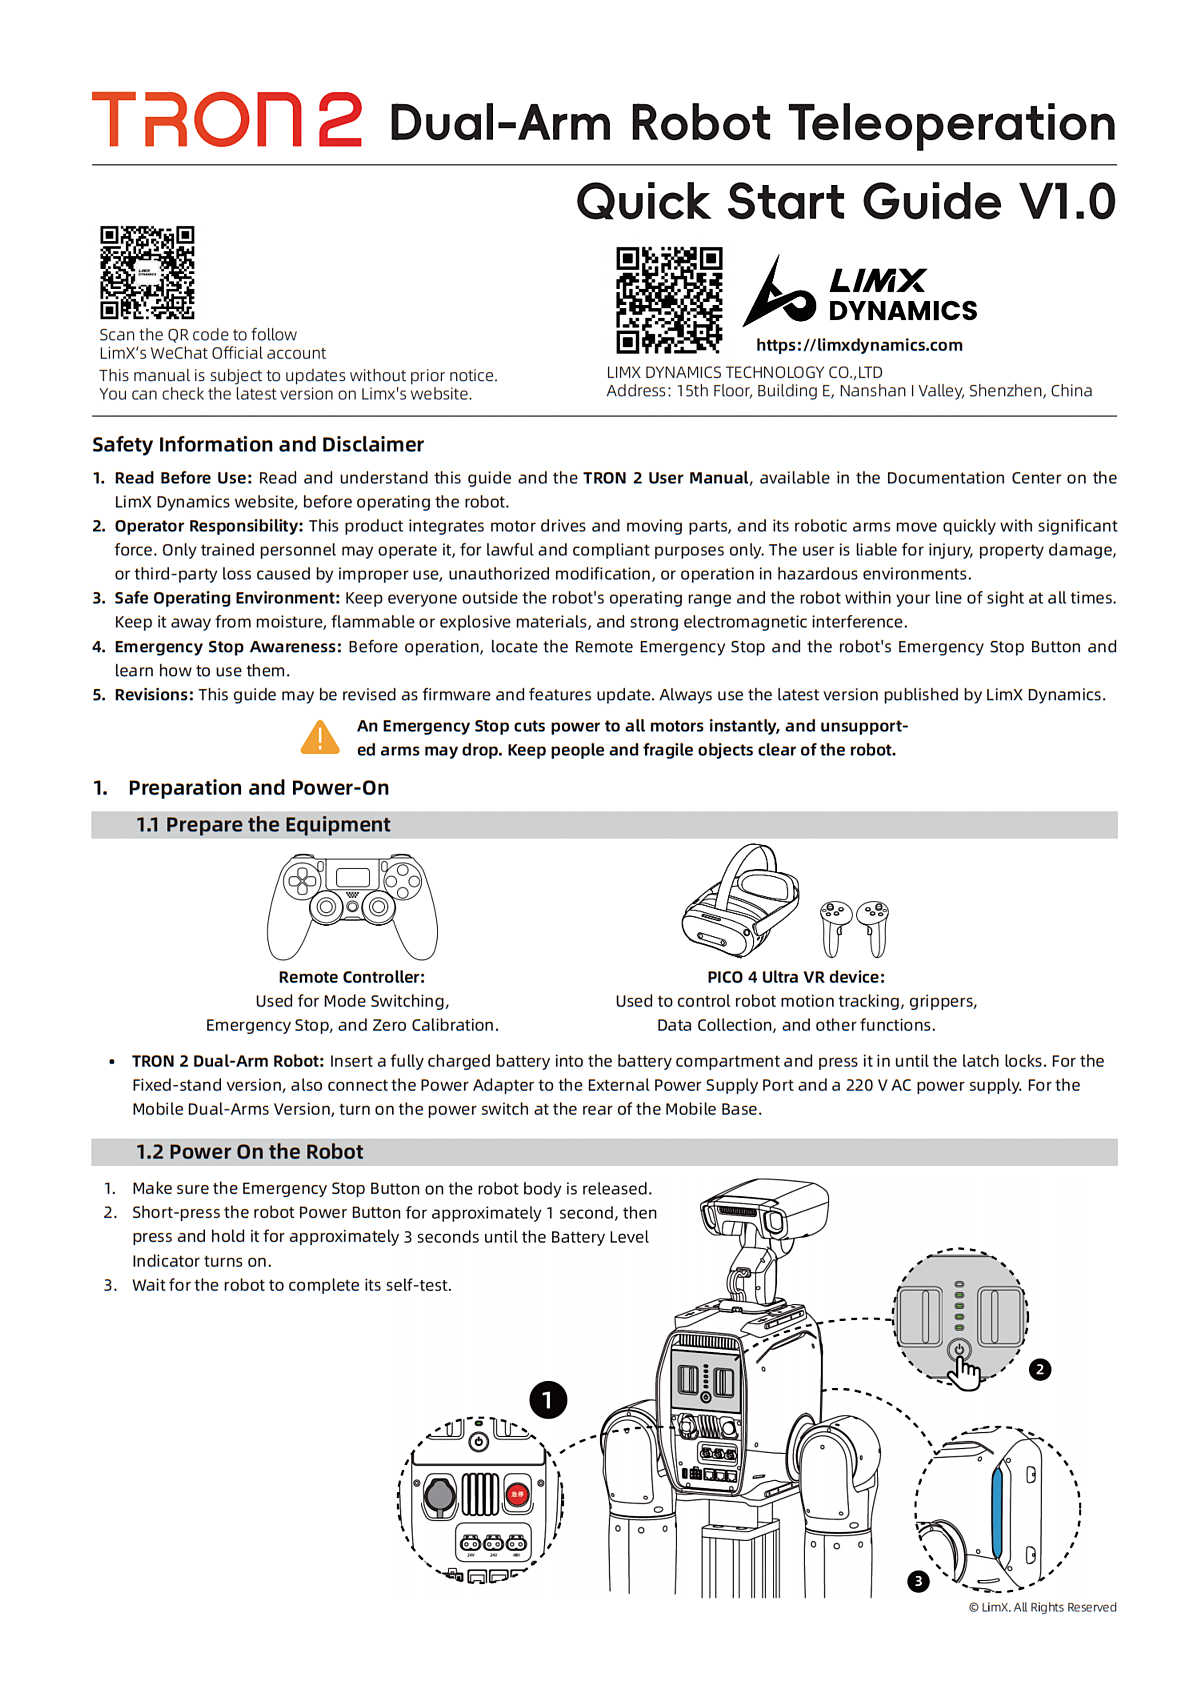
TRON 2 Fixed-Base Dual-Arm Version or Mobile-Base Dual-Arm Version Fully installed with sufficient battery power
Remote Controller Sufficiently charged and paired with the robot
PICO 4 Ultra VR device Headset and both controllers sufficiently charged

1.2 Preparation

  1. Make sure the robot is securely installed. For the Mobile-Base Dual-Arm Version, make sure the battery is installed and securely locked in place.
  2. Connect power. For the Fixed-Base Dual-Arm Version, connect the Power Adapter to the robot's external Power Supply Port, then plug the other end into an AC power outlet. For the Mobile-Base Dual-Arm Version, turn on the power switch at the rear of the Mobile Base.
  3. Check the battery levels of the robot and Remote Controller.
  4. Clear the area around the robot. Keep all personnel, cables, and fragile objects outside the operating ranges of the robot arms and Mobile Base. Keep the robot in sight throughout operation.

⚠️ Before powering on the robot, make sure the onboard Emergency Stop button is released and fully raised. When the button is pressed, power to all motors is cut off and the robot cannot start normally.

1.3 Workflow

2 Powering On the Robot

  • Briefly press the Power Button for approximately 1 second.
  • Then press and hold the Power Button for approximately 3 seconds until the Battery Level Indicator turns on.
  • Wait for the Power-On Self-Test to finish. The Status Indicator flashes white during the self-test.

3 Remote Controller Mode Switching and Safety Operations

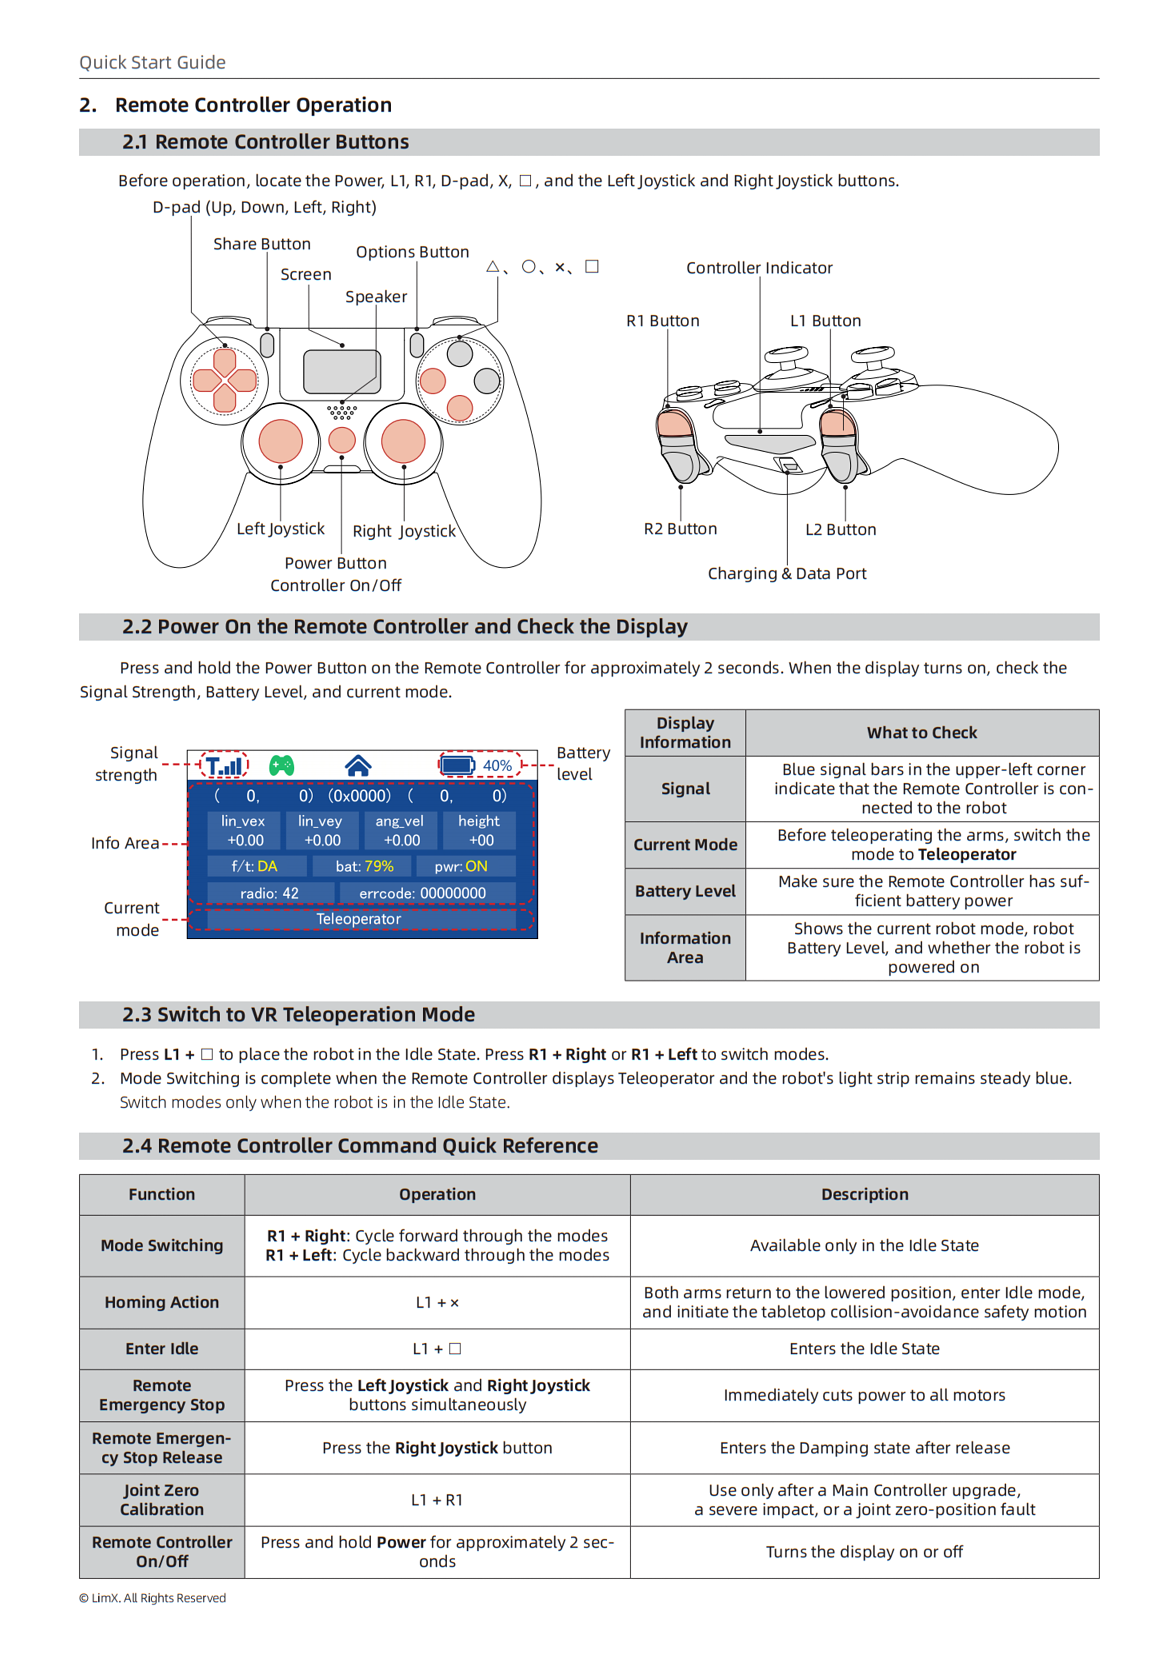
3.1 Remote Controller Buttons

3.2 Powering On the Remote Controller

Press and hold the Power Button for approximately 2 seconds, then wait for the screen to turn on. The blue signal bars in the upper-left corner indicate the pairing status with the robot. If the current mode is Teleoperator, you can proceed directly to VR teleoperation. Otherwise, follow Section 3.3 to switch modes.

Remote Controller screen showing signal status and current mode

3.3 Switching to VR Teleoperation Mode

  1. Press L1 + □ to place the robot in Idle, then press R1 + Right on the D-pad repeatedly to cycle through the modes.
  2. Mode switching is complete when the Remote Controller displays Teleoperator and the robot's Status Indicator remains steady blue.

Note: You can switch modes only when the robot is in Idle.

3.4 Quick Reference

Action Buttons Description
Switch modes R1 + Right on the D-pad Cycles through the modes. Available only in Idle.
Home both arms L1 + X Lowers both arms to their natural rest position, then places the robot
in Idle. Available only in Remote-Control Mode and High-Level Development Mode.
Enter Idle L1 + N/A
Remote Emergency Stop Press the left and right joystick buttons simultaneously Immediately cuts power to all motors. Available in any mode.
Release Remote Emergency Stop Briefly press the right joystick button The robot enters the Damping state after release.
Zero Calibration L1 + R1 Required only after a Main Controller upgrade or a severe impact. See Section 6.
Power the Remote Controller on/off Press and hold Power for approximately 2 seconds N/A

⚠️ An Emergency Stop immediately cuts power to the motors. The robot arms may drop when support is lost. Use Emergency Stop only in an emergency, and make sure there are no people or fragile objects around the robot.

4 VR Teleoperation

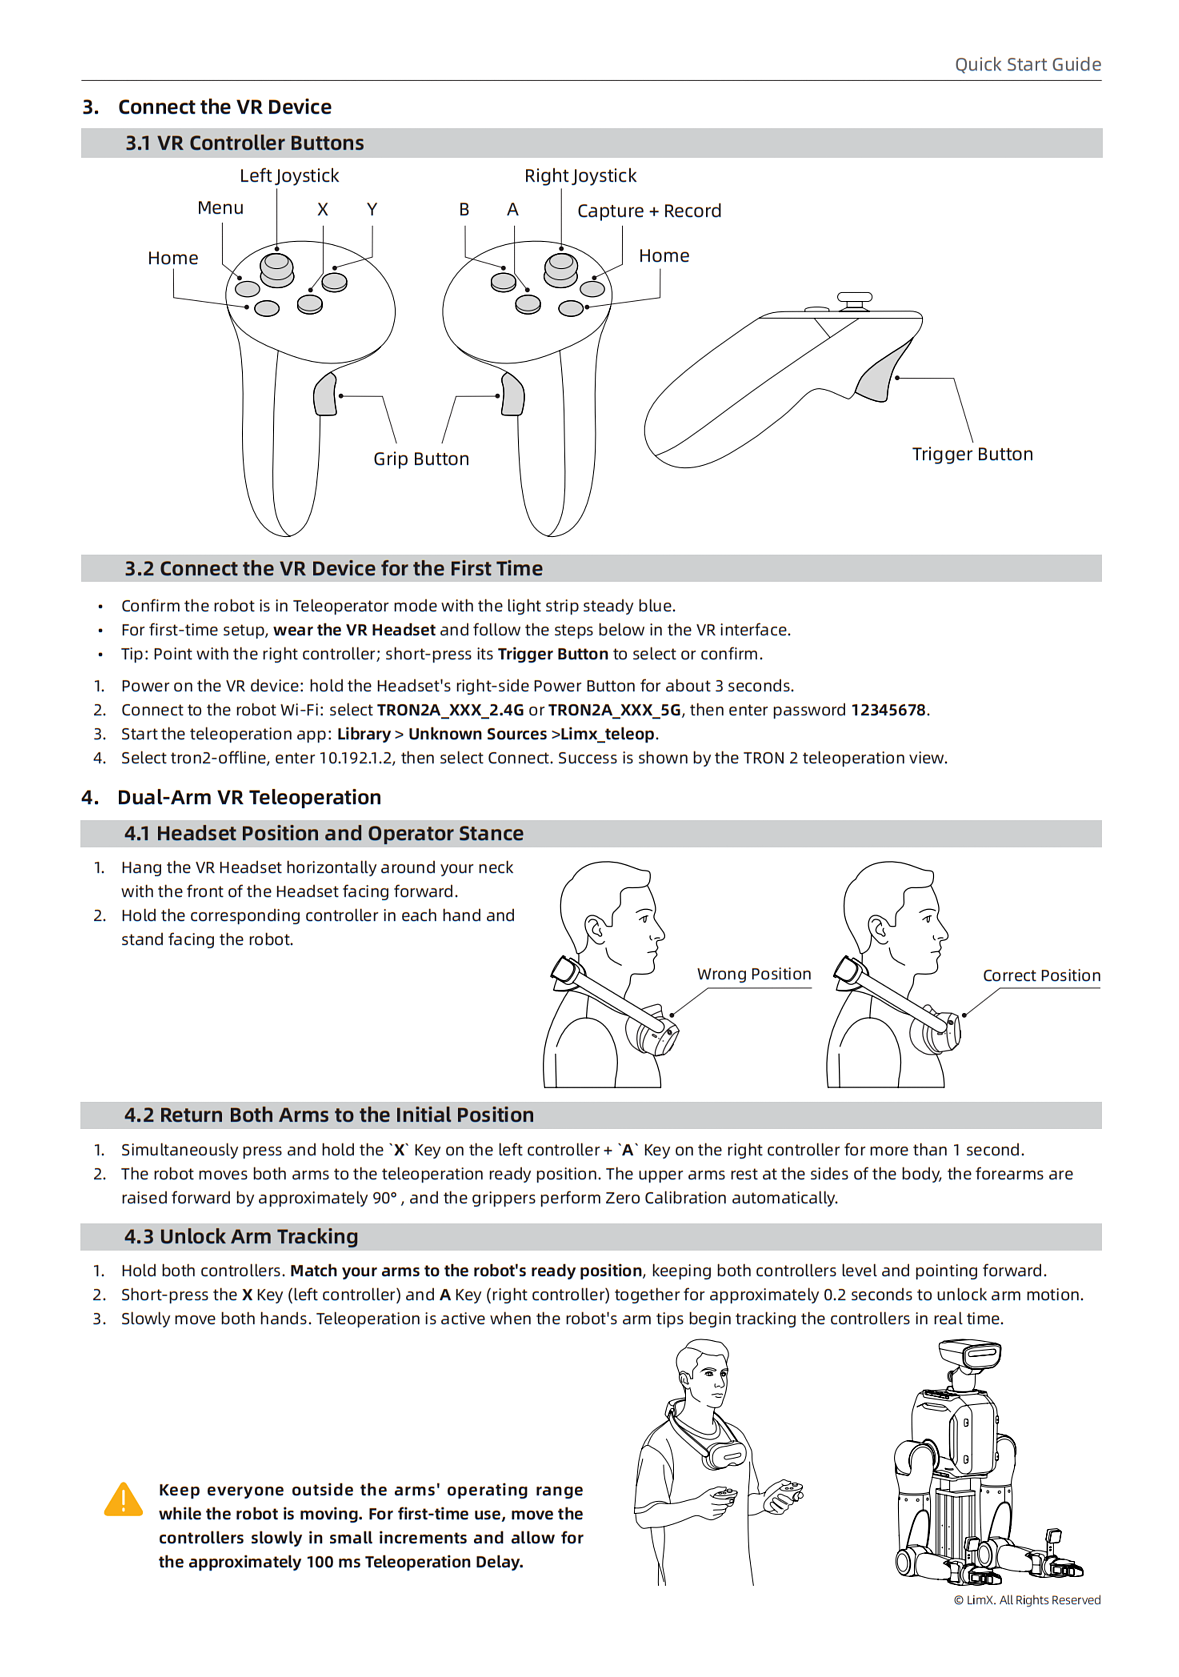
VR controller button layout ### 4.1 Connecting the VR Device for the First Time When connecting the VR device to the robot for the first time, **wear the VR headset** and complete the following setup in the VR interface.
Step Action Illustration
1. Power on the VR device Press and hold the Power Button on the right side of the
headset for approximately 3 seconds. Put on the headset to enter the system home screen.
2. Connect to the robot's Wi-Fi From the Quick Settings panel or Settings, connect to
TRON2A_XXX_2.4G or TRON2A_XXX_5G. Enter password 12345678.
3. Launch the teleoperation app Go to Library > Unknown Sources > Limx_teleop.
4. Configure and connect Select tron2-offline, enter 10.192.1.2 in the
IP field, then select Connect.

Confirming a Successful Connection

The following application screen indicates that the robot is connected.

  • Tracking status: Head ✓, Controller ✓, Hand ✓, and Body ✗. Body tracking is disabled by default.
  • The interface displays the robot's Battery Level, Main Controller version, and motor status.

4.2 Wearing and Standing Position

💡 During teleoperation, take off the headset and wear it around your neck.

  1. Wear the VR headset horizontally around your neck rather than over your eyes, with the front of the headset facing forward.
  2. Hold the corresponding controller in each hand.

4.3 Moving Both Arms to the Teleoperation Ready Position

New operators should stand facing the robot and keep it in sight at all times. Make sure the robot is in Teleoperator mode and its Status Indicator remains steady blue.

  1. Press and hold the X button on the left controller and the A button on the right controller simultaneously for more than 1 second.
  2. The arms move to the teleoperation ready position. The upper arms hang beside the body, the elbows bend to approximately 90 degrees, the forearms extend forward, and the grippers perform Zero Calibration automatically.

⚠️ Do not enter the operating range of the robot arms while the robot is moving.

4.4 Unlocking Dual-Arm Tracking

  1. Hold both controllers and move your arms into approximately the same pose as the robot's ready position, keeping both controllers level and pointing forward.
  2. Briefly press X and A simultaneously for approximately 0.2 seconds to unlock arm movement.
  3. Slowly move your hands. The robot's arm end effectors begin tracking the controllers in real time, and teleoperation starts.

⚠️ For your first operation, use slow movements with a limited range of motion. Avoid sudden or large controller movements, which may cause the robot arms to move rapidly or strike nearby objects. The teleoperation link has a latency of approximately 100 ms. Anticipate this delay when moving the controllers.

4.5 VR Controller Quick Reference

4.5.1 Dual-Arm Teleoperation Controls

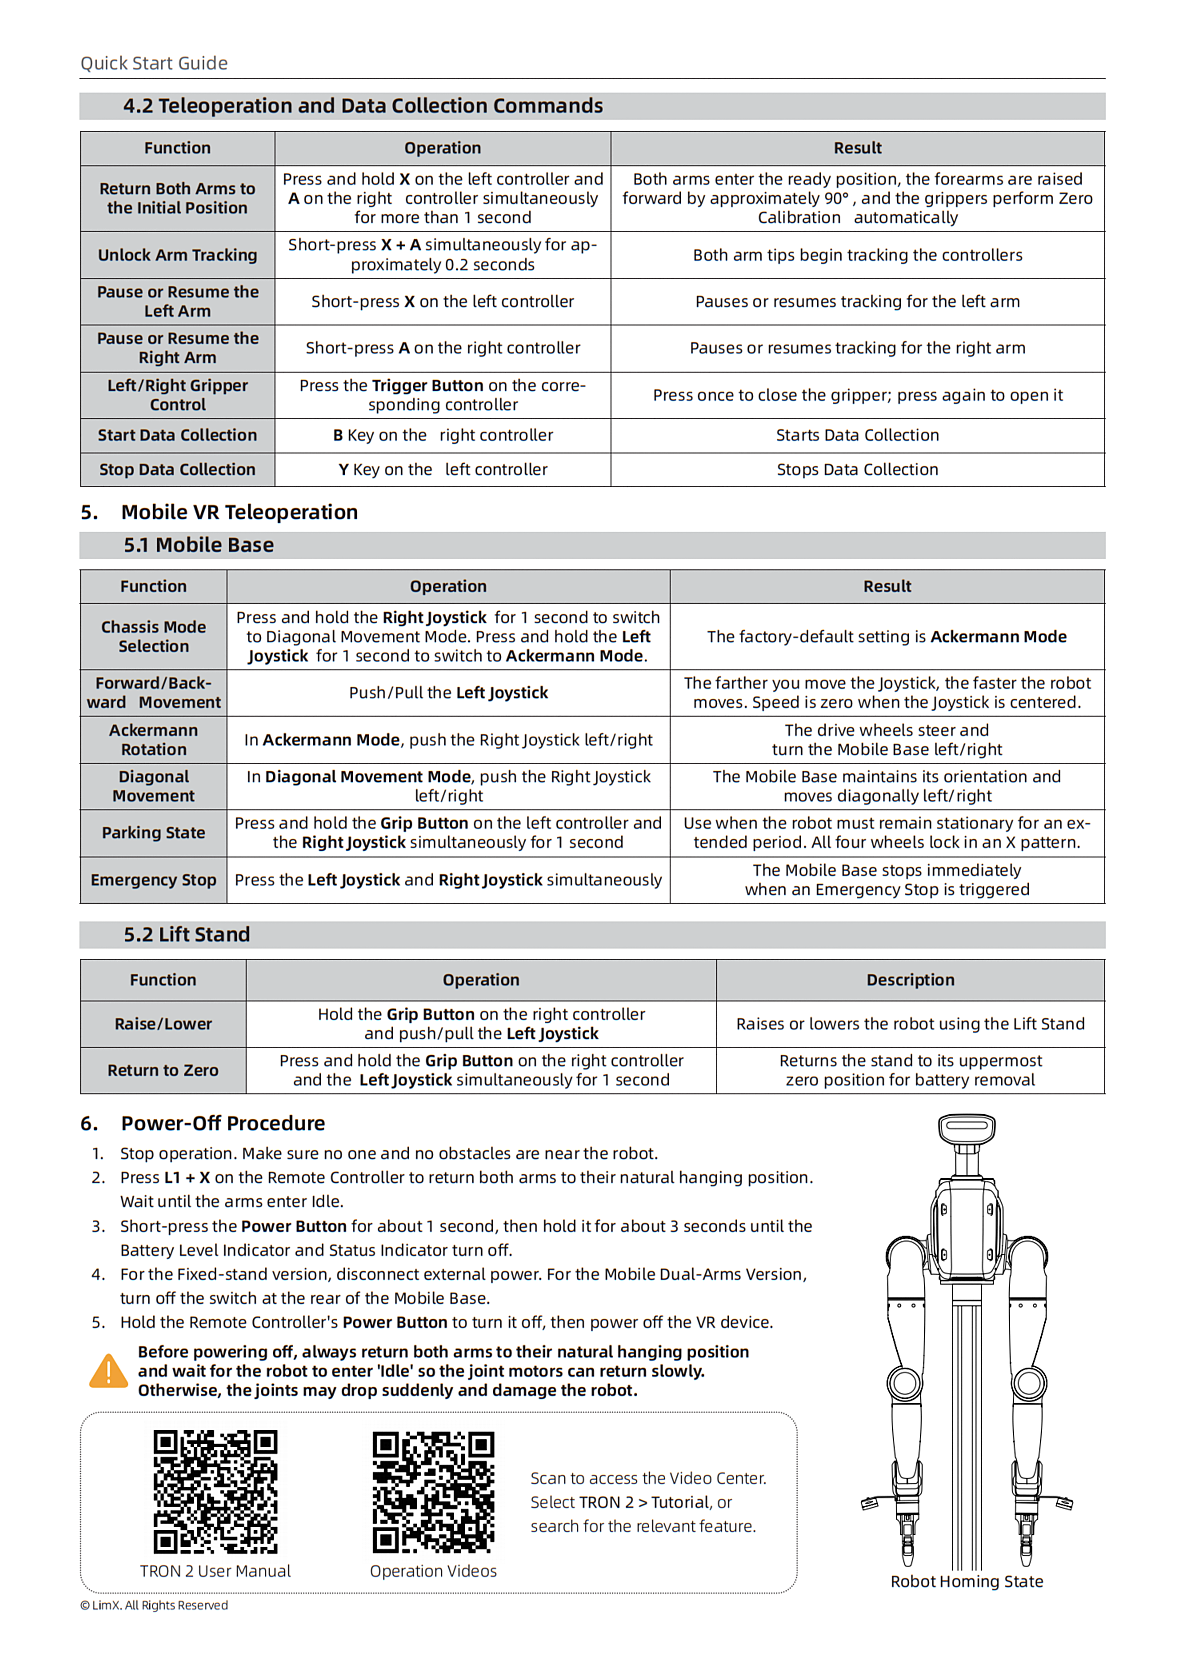
Function Operation Description
Pause/resume left arm Briefly press the X button on the left controller
Pause/resume right arm Briefly press the A button on the right controller
Control left/right gripper Briefly press the Trigger Button on the
corresponding controller. Press once
to close the gripper and again to open it.
Start Data Collection Press the B button on the right controller Starts collecting teleoperation data.
The VR device receives confirmation from the robot,
the controllers vibrate, and the data collection platform updates its status.
Stop Data Collection Press the Y button on the left controller Stops collecting teleoperation data.
The VR device receives confirmation from the robot,
the controllers vibrate, and the data collection platform updates its status.

4.5.2 Mobile Base

Function Operation Description
Select Base mode Press and hold the joystick on the
right controller
for 1 second to select
Diagonal Movement Mode.Press and
hold the joystick on the left controller
for 1 second to select Ackermann Mode.
Ackermann Mode is selected by default at the factory.
Move forward/backward Push the joystick on the left controller forward/backward
Ackermann steering In Ackermann Mode, push the joystick on the right controller left/right Turns the drive wheels to steer the Mobile Base left/right.
Diagonal movement In Diagonal Movement Mode,
push the joystick on the right controller left/right
Moves the Mobile Base diagonally left/right without changing its orientation.
Adjust speed Push the joystick on the left controller forward/backward Greater joystick travel produces greater speed.
The speed is zero when the joystick is centered.
Parking State Press and hold the Grip Button on the
left controller
and the joystick on the right controller simultaneously for 1 second
Use when the robot must remain stationary for an extended period. The four wheels lock in an X pattern.
Emergency Stop Press the joystick buttons on the left
and right controllers simultaneously
Immediately stops the Mobile Base.

4.5.3 Lift Stand

Function Operation Description
Raise/lower Hold the Grip Button on the right controller
and push the joystick on the left controller forward/backward
Return to Zero Press and hold the Grip Button on the right controller
and the joystick on the left controller simultaneously for 1 second
Returns the stand to its uppermost zero position for battery removal.

5 Powering Off

  1. Stop moving the controllers. Make sure there are no people or obstacles around the robot.
  2. Press L1+X on the Remote Controller. The arms return to their natural rest position and the robot enters Idle.

  1. Wait until the robot arms are stable in their natural rest position.
  2. Disconnect power. For the Fixed-Base Dual-Arm Version, disconnect the external power supply. For the Mobile-Base Dual-Arm Version, turn off the power switch at the rear of the Mobile Base.
  3. Power off the robot. Briefly press the Power Button for approximately 1 second, then press and hold it for approximately 3 seconds until the Battery Level Indicator and Status Indicator turn off.
  4. Press and hold the Power Button on the Remote Controller to turn it off, then turn off the VR device.

⚠️ Always home both arms and place the robot in Idle before disconnecting power. Disconnecting power directly may cause the robot arms to drop suddenly and damage the equipment.

6 Troubleshooting and Important Notes

When Is Zero Calibration Required?

Zero Calibration is not required during normal startup. Perform it only after a Main Controller upgrade, a severe impact, loss of joint zero positions, or noticeable arm position drift.

  1. Press L1+X to home both arms and place the robot in Idle.
  2. For the Mobile-Base Dual-Arm Version only, raise the Lift Stand to its uppermost position.
  3. Press L1+R1 on the Remote Controller to start automatic Zero Calibration.
  4. After calibration is complete, wait approximately 5 seconds before performing another operation. If the Status Indicator turns red during calibration, calibration failed. Stop operation and inspect the robot.
  • Watch the Zero Calibration video below.

How Do I Recover After an Emergency Stop?

  • Remote Emergency Stop: Briefly press the right joystick button to release Emergency Stop. Wait several seconds for the robot to enter the Damping state before continuing operation.
  • Onboard Emergency Stop: Rotate or pull up the onboard Emergency Stop button until it is fully raised, then restart the robot.

Why Does the Remote Controller Have No Signal?

  • Make sure the robot and Remote Controller are both powered on, then wait approximately 20 seconds for the self-test to finish.
  • Move the Remote Controller closer to the robot and check for wireless interference on the same frequency.

Why Won't the Robot Enter Teleoperator Mode?

  • Press L1+X first to make sure the robot is in Idle. Mode switching is available only in Idle.
  • Press R1 + Right on the D-pad to switch modes, and check the mode shown at the bottom of the Remote Controller screen.

Why Can't the VR App Connect to the Robot?

  • Make sure the VR device is connected to the robot's Wi-Fi network, TRON2A_XXX_2.4G or TRON2A_XXX_5G, using password 12345678.
  • Make sure the configuration is set to tron2-offline and the IP address is 10.192.1.2.
  • Check the tracking settings. Head, Controller, and Hand must be enabled, and Body tracking must be disabled.

Why Can't the Remote Controller Find the Robot?

The Remote Controller is paired with the robot at the factory, so manual pairing is not required during normal use. If the Remote Controller cannot find the robot, such as after replacing the Remote Controller or robot, pair them again.

Watch the pairing video below.

Safety Summary

  • The robot is not water-resistant or dust-resistant. Do not use it in wet, dusty, rainy, or snowy environments.
  • Keep the robot in sight throughout operation, and keep all personnel outside its operating range.
  • During your first teleoperation session, start with slow movements and a limited range of motion.
  • If an abnormal condition occurs, immediately press both joystick buttons to trigger Remote Emergency Stop, or press the onboard Emergency Stop button. Once the issue is resolved, follow the recovery procedure in Section 6.