Oli Teleoperation Quick Start Guide
This guide describes local teleoperation for Oli EDU. For first-time use, we recommend completing upper-body teleoperation before proceeding to whole-body teleoperation.
Safety Notice and Disclaimer
-
Reading and Acknowledgment: Before operating the robot, ensure that you understand all operating instructions and safety requirements in this guide and the LimX Humanoid Robot Whole-Body Teleoperation User Manual.
-
Operator Responsibility: This product is a mechatronic device whose robotic arms move quickly and with great force. It must be operated by trained personnel and used only for lawful and compliant purposes. Users assume responsibility for personal injury, property damage, and third-party damage caused by failure to follow the instructions, unauthorized modification, or use in hazardous environments.
-
Safe Environment: Keep everyone outside the robot's range of motion. Keep the robot within sight throughout operation, and keep it away from damp, flammable, and explosive environments and sources of strong electromagnetic interference. We recommend using an overhead crane (safety suspension frame) for protection throughout biped robot teleoperation.
-
Emergency Stop Awareness: Before operation, make sure you know the location and operation of the safety stop (emergency stop): Pressing the left and right joystick buttons simultaneously triggers a safety stop. All motors immediately enter damping mode, and the robot will lose support and fall. Before triggering the stop, confirm that no people or fragile objects are nearby.
-
Changes to Terms: This guide and its safety requirements are subject to revision with product firmware and feature updates. Refer to the latest version officially released by LimX Dynamics.
Document Guide
| What do you want to do? | Reading order |
|---|---|
| Upper-body teleoperation | Read Chapters 1–3 in order, and follow Chapter 5 when finishing. |
| Whole-body teleoperation | Complete the common preparations in Chapters 1 and 2, then read Chapter 4. Follow Chapter 5 when finishing. |
1 Before Use
1.1 Prepare the Equipment
| Equipment | Purpose |
|---|---|
| Oli EDU robot | Teleoperation target |
| Oli physical remote controller | Check robot status and switch basic states |
| PICO headset and left/right VR controllers | View the robot camera feed and control the head, arms, and robot movement |
| PICO motion trackers ×5 | For whole-body teleoperation: 1 at the waist, 2 at the ankles, and 2 on the thighs |
| Overhead crane (safety suspension frame) | Provide safety protection for the robot |
Before powering on, confirm that all devices are sufficiently charged.
1.2 Initial Activation and Updates
-
The teleoperation feature must be activated in advance. Provide your order number and the robot's MAC address (device identifier) to your sales manager to apply for activation. Use teleoperation only after activation is complete.
-
The LimX Teleop App is preinstalled on PICO and can receive updates while connected to the Internet. After updating, connect to the Oli hotspot to perform teleoperation.
1.3 Powering On the Robot and Basic States
We recommend working in pairs: one person operates PICO, while the other handles the Oli remote controller and overhead crane and continuously monitors the robot.
-
Power on the robot: Short-press and release the power button on the robot body, then press and hold it for approximately 2 seconds. Wait for the self-check to complete.
-
Switch basic states: Press and hold the Power button on the Oli physical remote controller for at least 3 seconds to turn it on. Use the table below to enter Damping first, then Walk.
| Target state | Remote controller buttons | Description |
|---|---|---|
| Damping / Offline Preparation | L2 + Down + X |
Switch from the zero-torque state after power-on to prepare for subsequent operations |
| Walk | L2 + △ |
Enter the basic walking state. Teleoperation is performed in this state |
| Recovery | R1 + X |
A transitional recovery state used when the robot's posture is abnormal |
Note: When switching states, ensure that the robot is suspended by the overhead crane or protected by personnel to prevent it from falling.
Start teleoperation only after confirming that both of the robot's feet are on the ground, the robot is standing steadily, and the remote controller displays Walk.
2 Prepare and Connect the VR Equipment
2.1 VR Controller Buttons
-
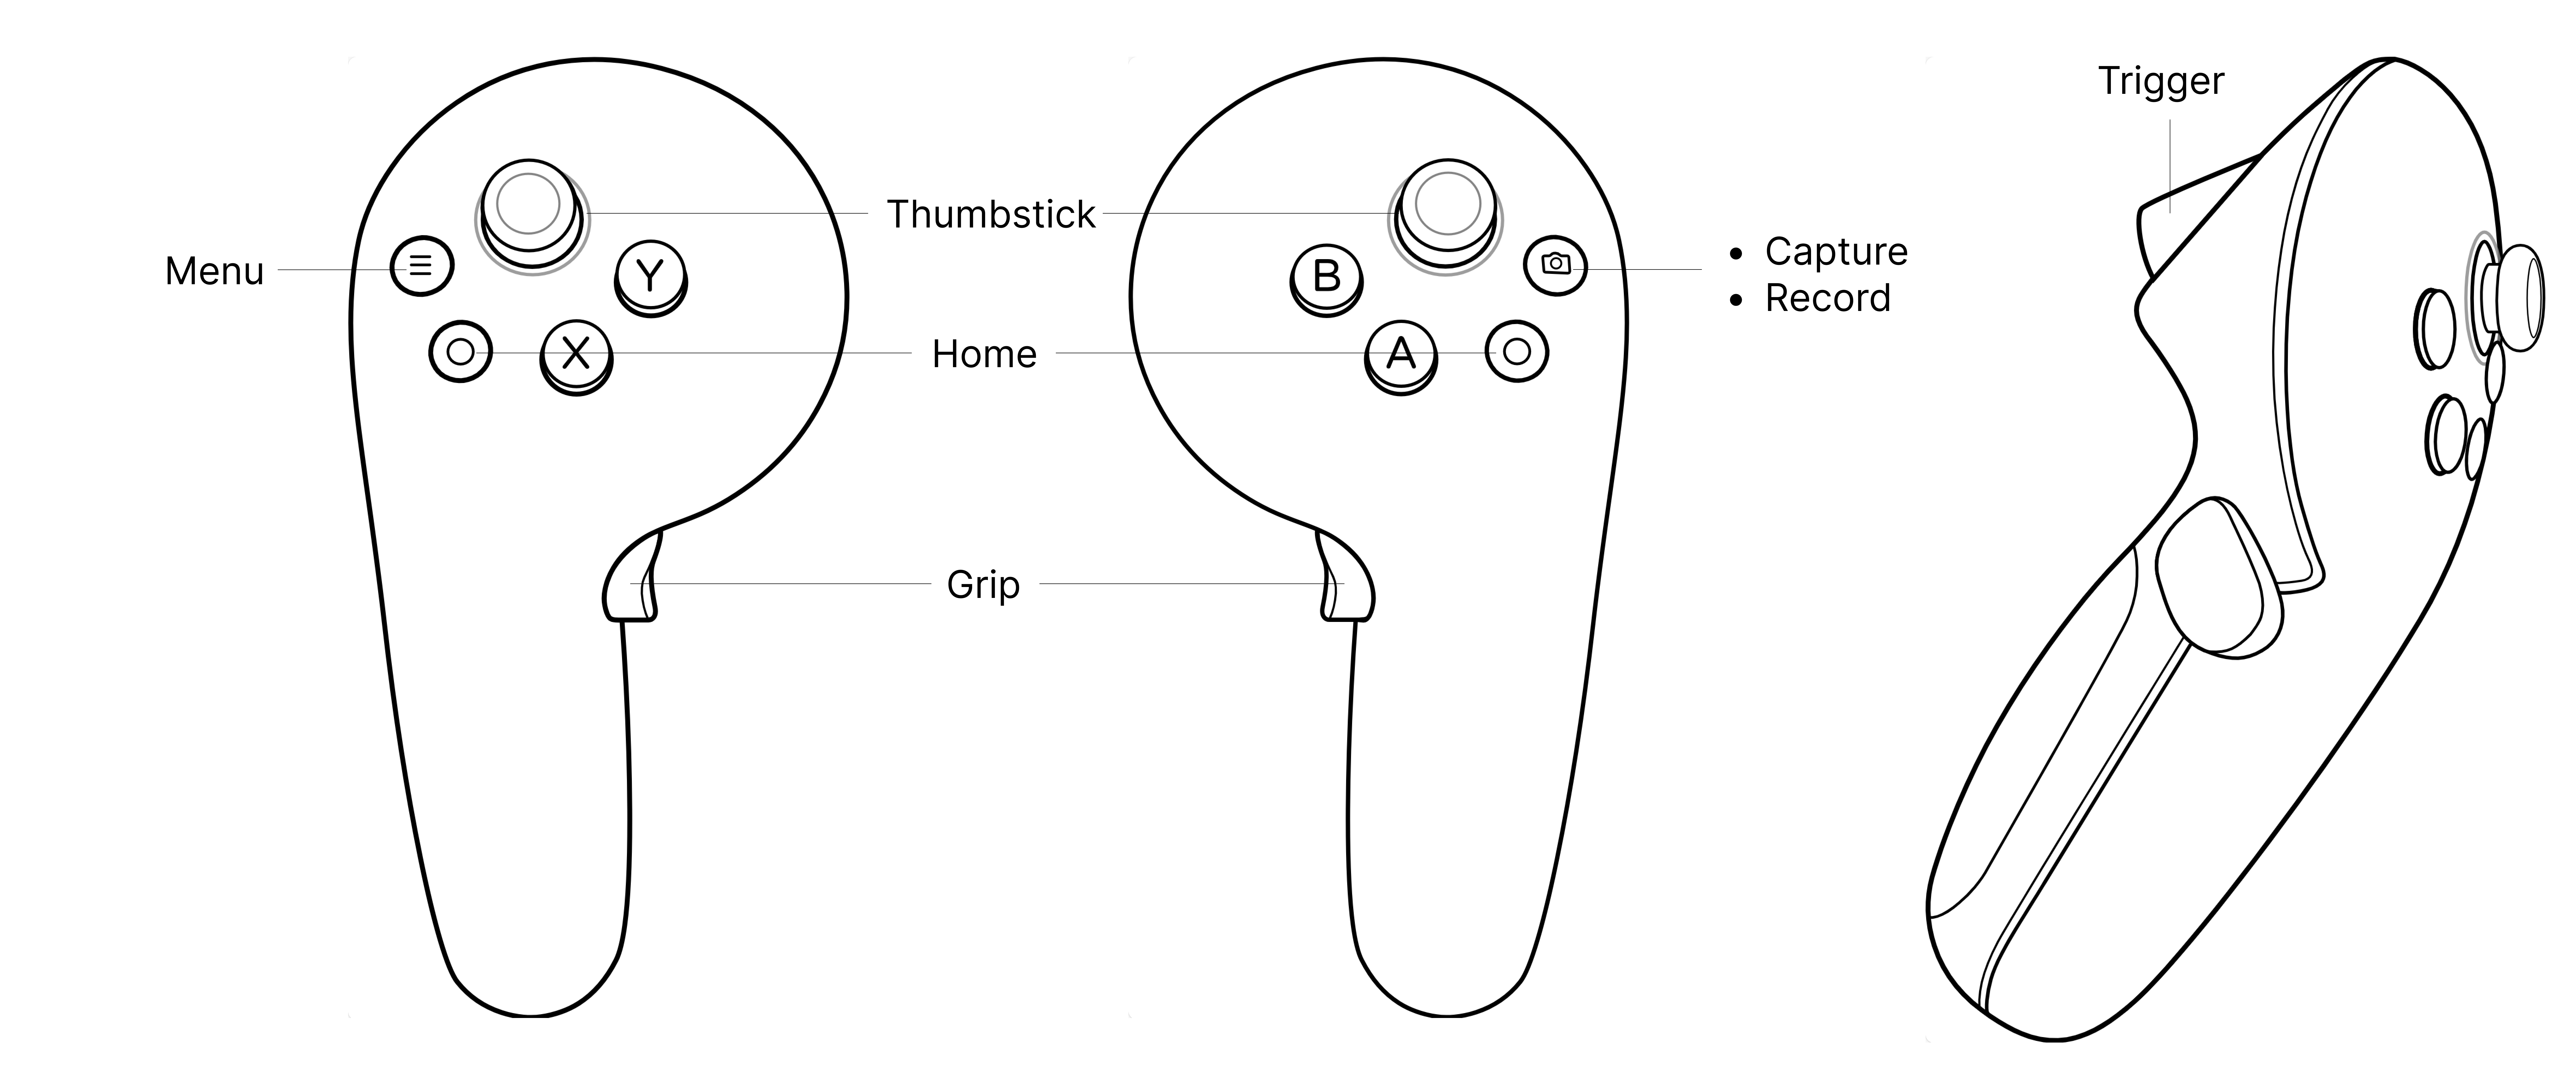
Left controller: X and Y buttons, Menu button, and left joystick.
-
Right controller: A and B buttons, Screenshot/Recording button, and right joystick.
-
Common to both controllers: Home button, grip button (G) on the inside of the handle, and trigger (T) at the index finger. The joysticks can also be pressed downward.
2.2 Prepare the Headset and Controllers
-
Click to confirm: Aim the controller ray at an option and short-press the trigger (T) to select or confirm.
-
Drag a window: Point at the horizontal bar at the bottom of the window, hold the grip button (G), drag it into position, and release.
-
Switch between immersive view and passthrough: After enabling Quick Passthrough, double-tap the right side of the headset.
| Step | Operation | Illustration |
|---|---|---|
| 1. Power on the headset and controllers | Press and hold the headset power button for approximately 3 seconds. Put on the headset and wait for the system Home screen to appear. If insulating paper is present in the controller battery compartment, remove it first. If the controllers are off, short-press the Home button on each controller. |
Headset Home screen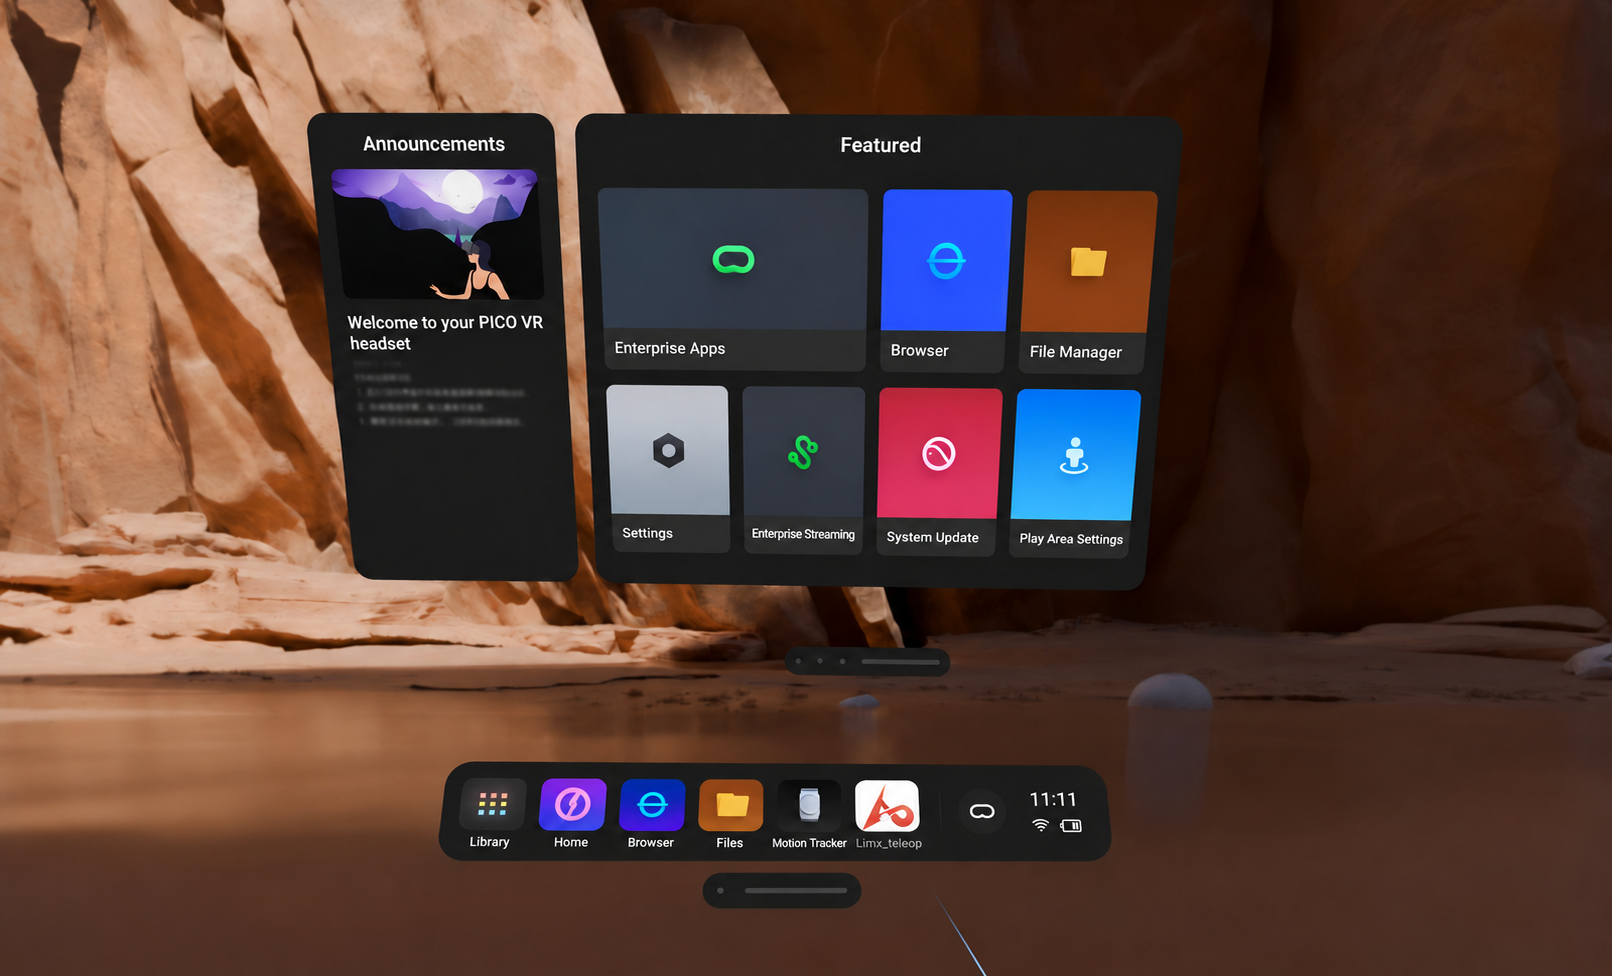 |
| 2. Confirm positional tracking | Open Settings → General and confirm that Positional Tracking is enabled. | Positional Tracking toggle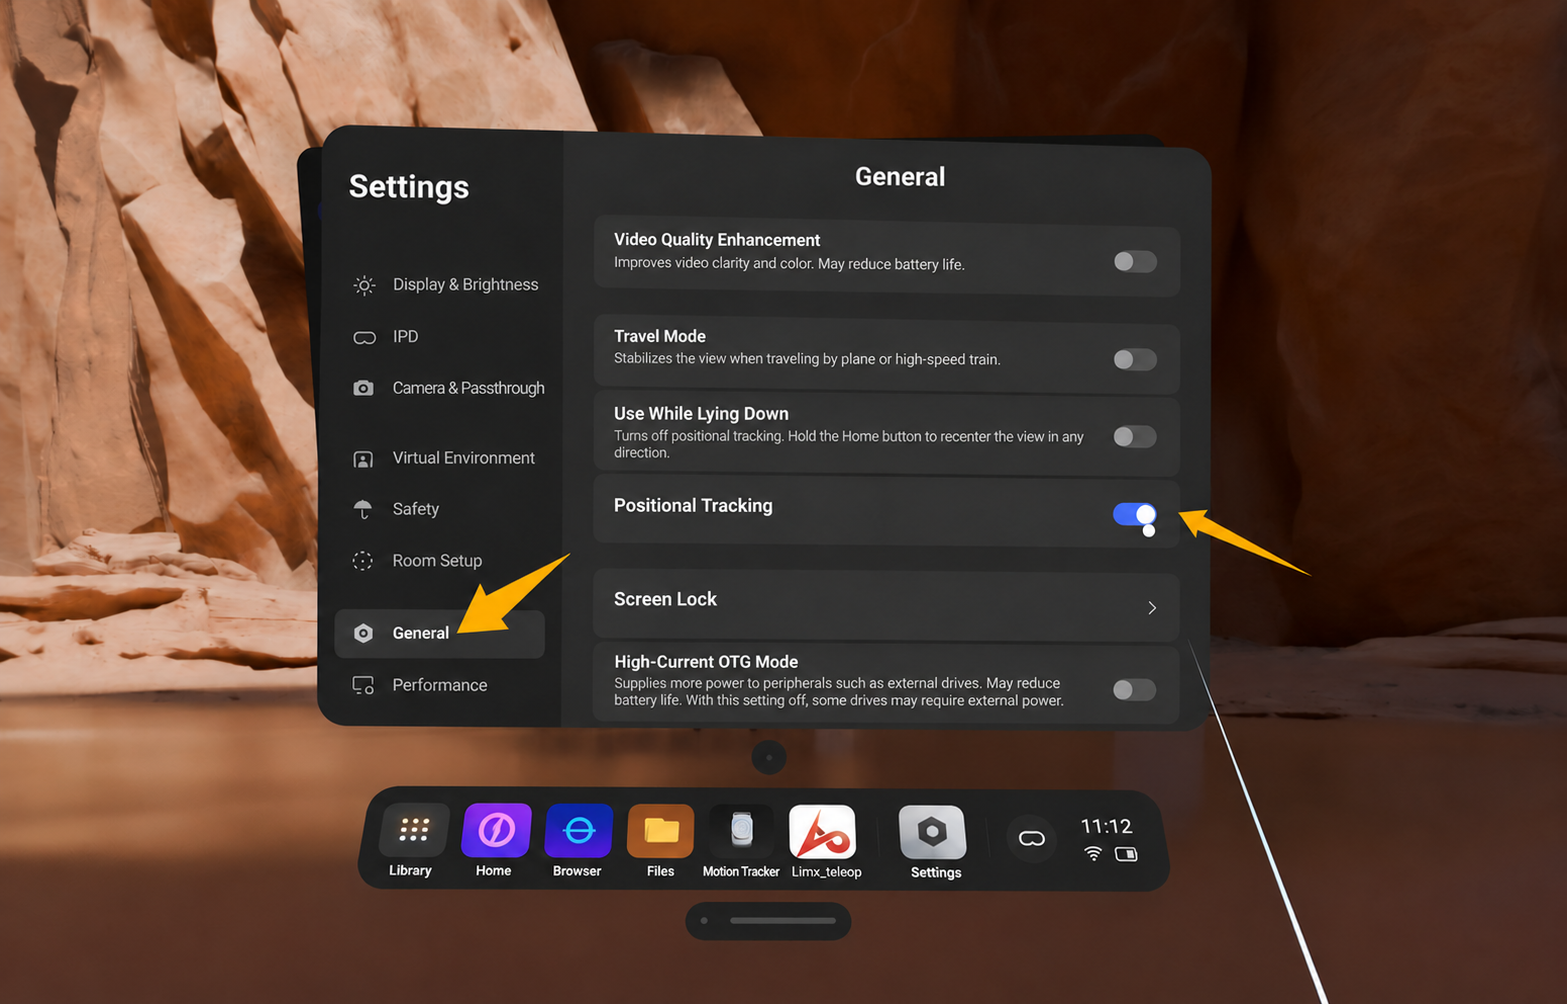 |
2.3 Connect to the Robot
| Step | Operation | Illustration |
|---|---|---|
| 1. Connect to Oli's Wi-Fi | Open Control Center at the lower-right corner of the headset Home screen, enter the Wi-Fi list, and connect to the hotspot of the Oli robot you want to operate. | Control Center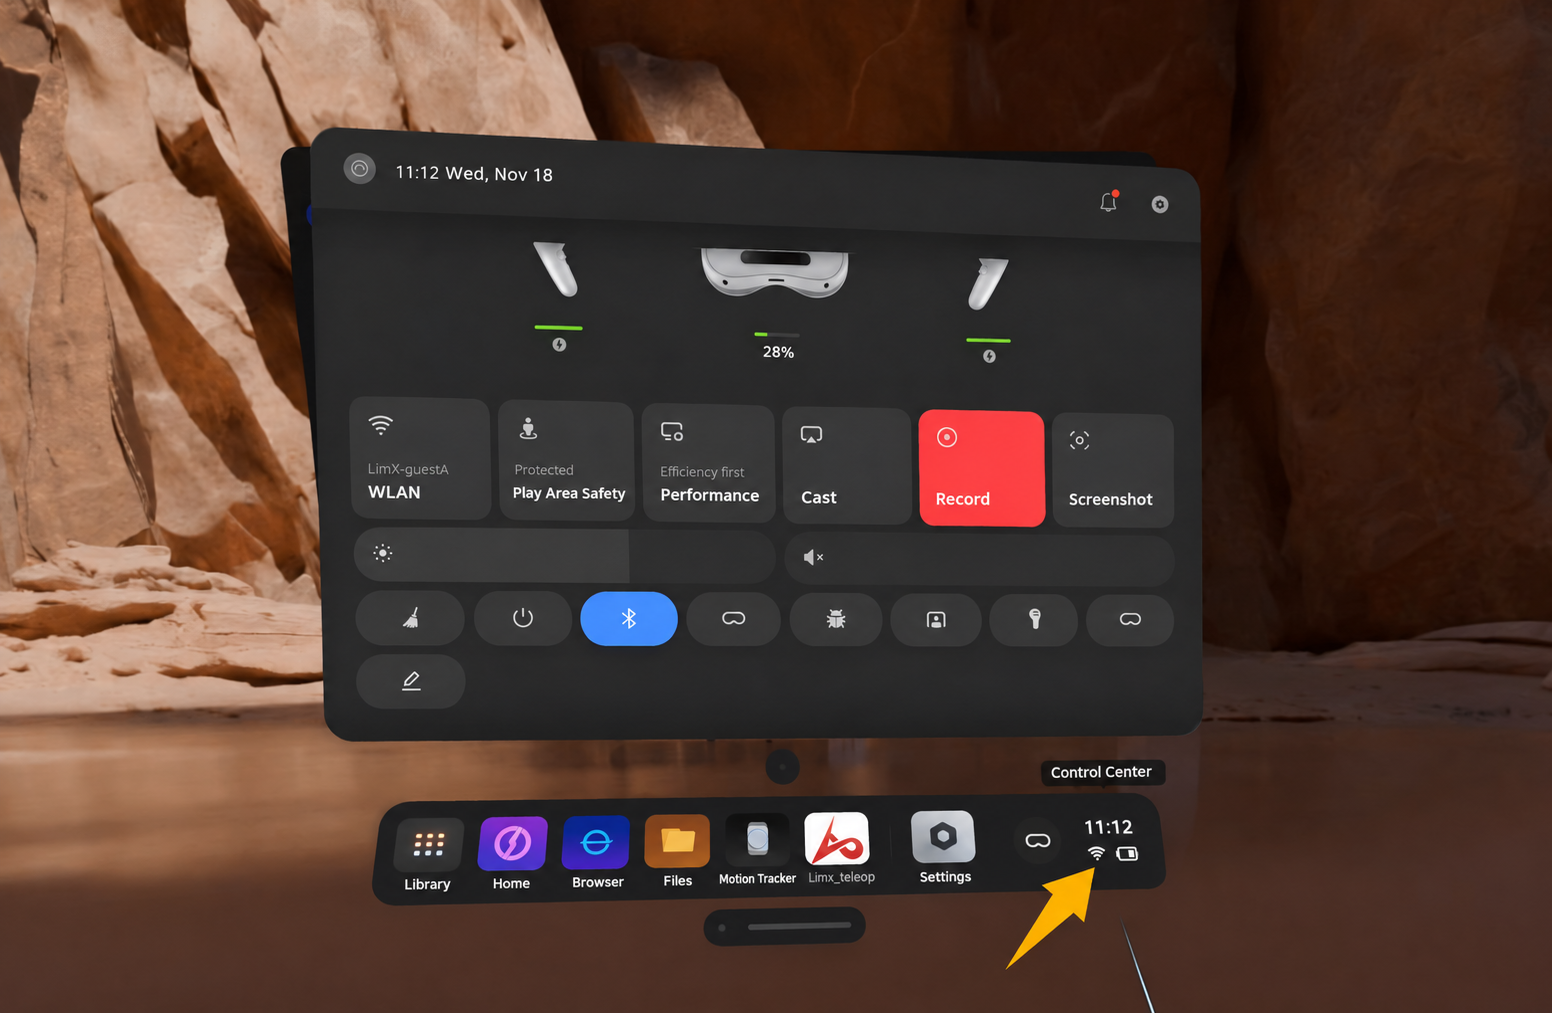 |
| 2. Open the teleoperation app | On the PICO system Home screen, open Library → Unknown Sources → LimX Teleop App. | Select the teleoperation app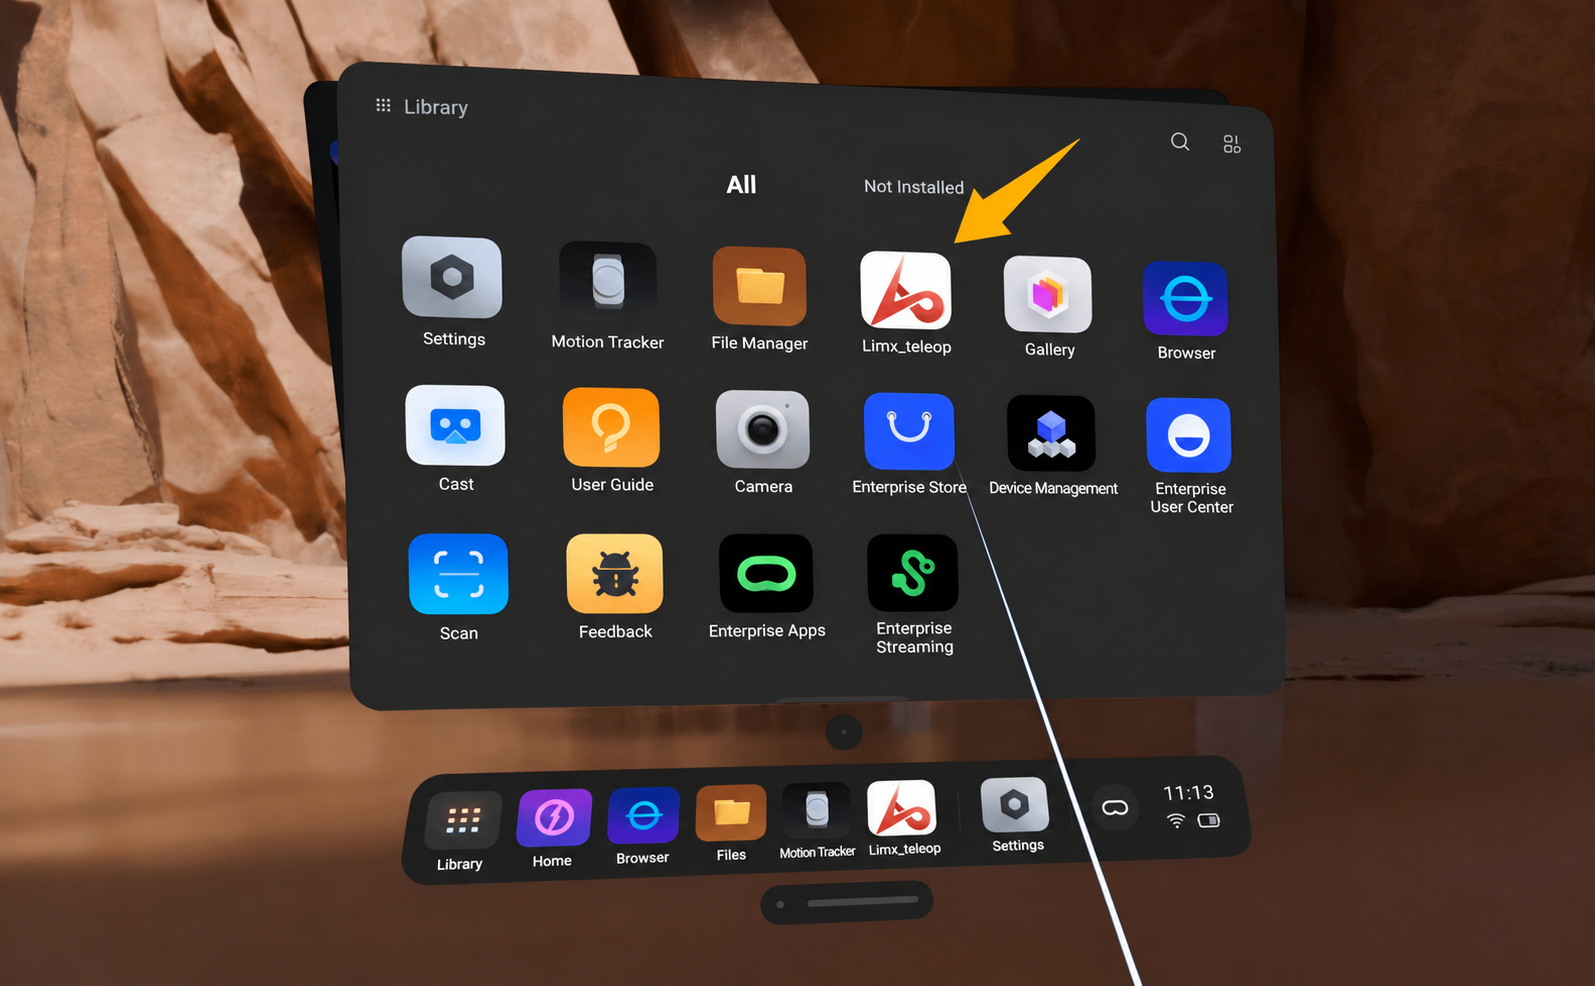 |
| 3. Set up the local connection | Under Profile, select Oli, disable Remote teleop, and verify the prefilled Robot IP. If you use a custom IP, enter the actual address. Under Settings, set User height to your actual height and tap Connect. |
Teleoperation app Home screen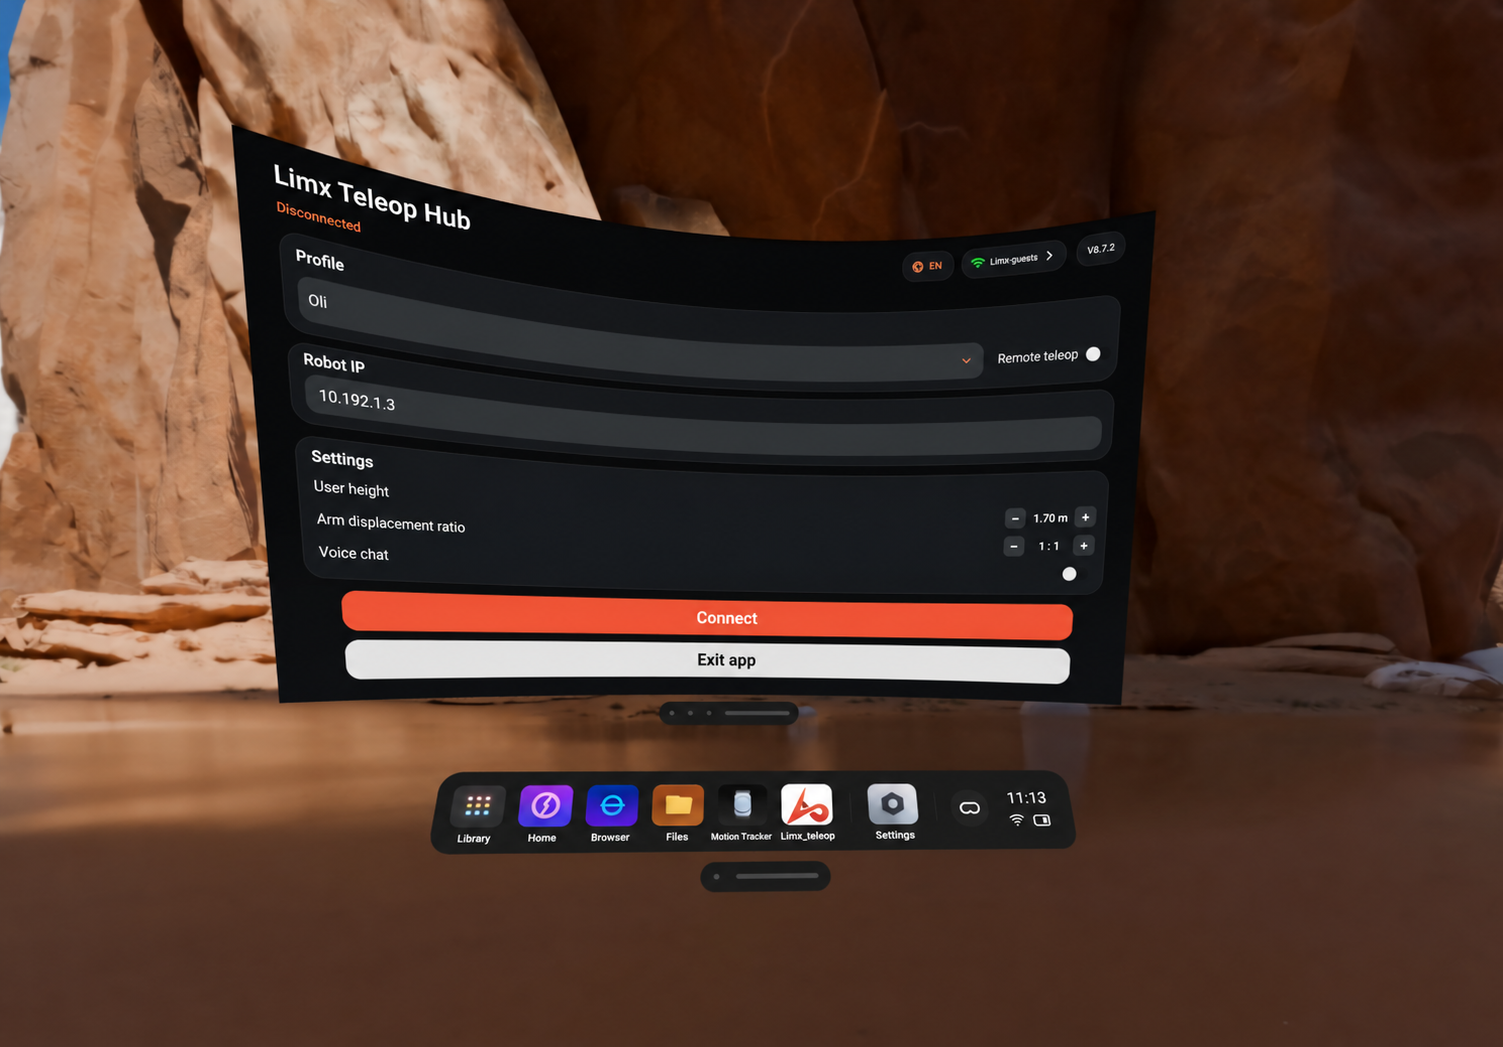 |
3 Upper-Body Teleoperation
Upper-body teleoperation does not require trackers. Starting from their current positions, the arms follow the direction and distance of controller movement.
3.1 Enter the Mode and Test Movement
Outside the robot's range of motion, stand or sit facing the robot. Put on the headset and hold the left and right controllers.
| Step | Operation | Illustration |
|---|---|---|
| 1. Select the mode | Under Current Mode, select VR Partial-Body Mocap (upper-body teleoperation). Under End Effector Control, select Pico Controller and tap Enter Teleop. |
Mode selection screen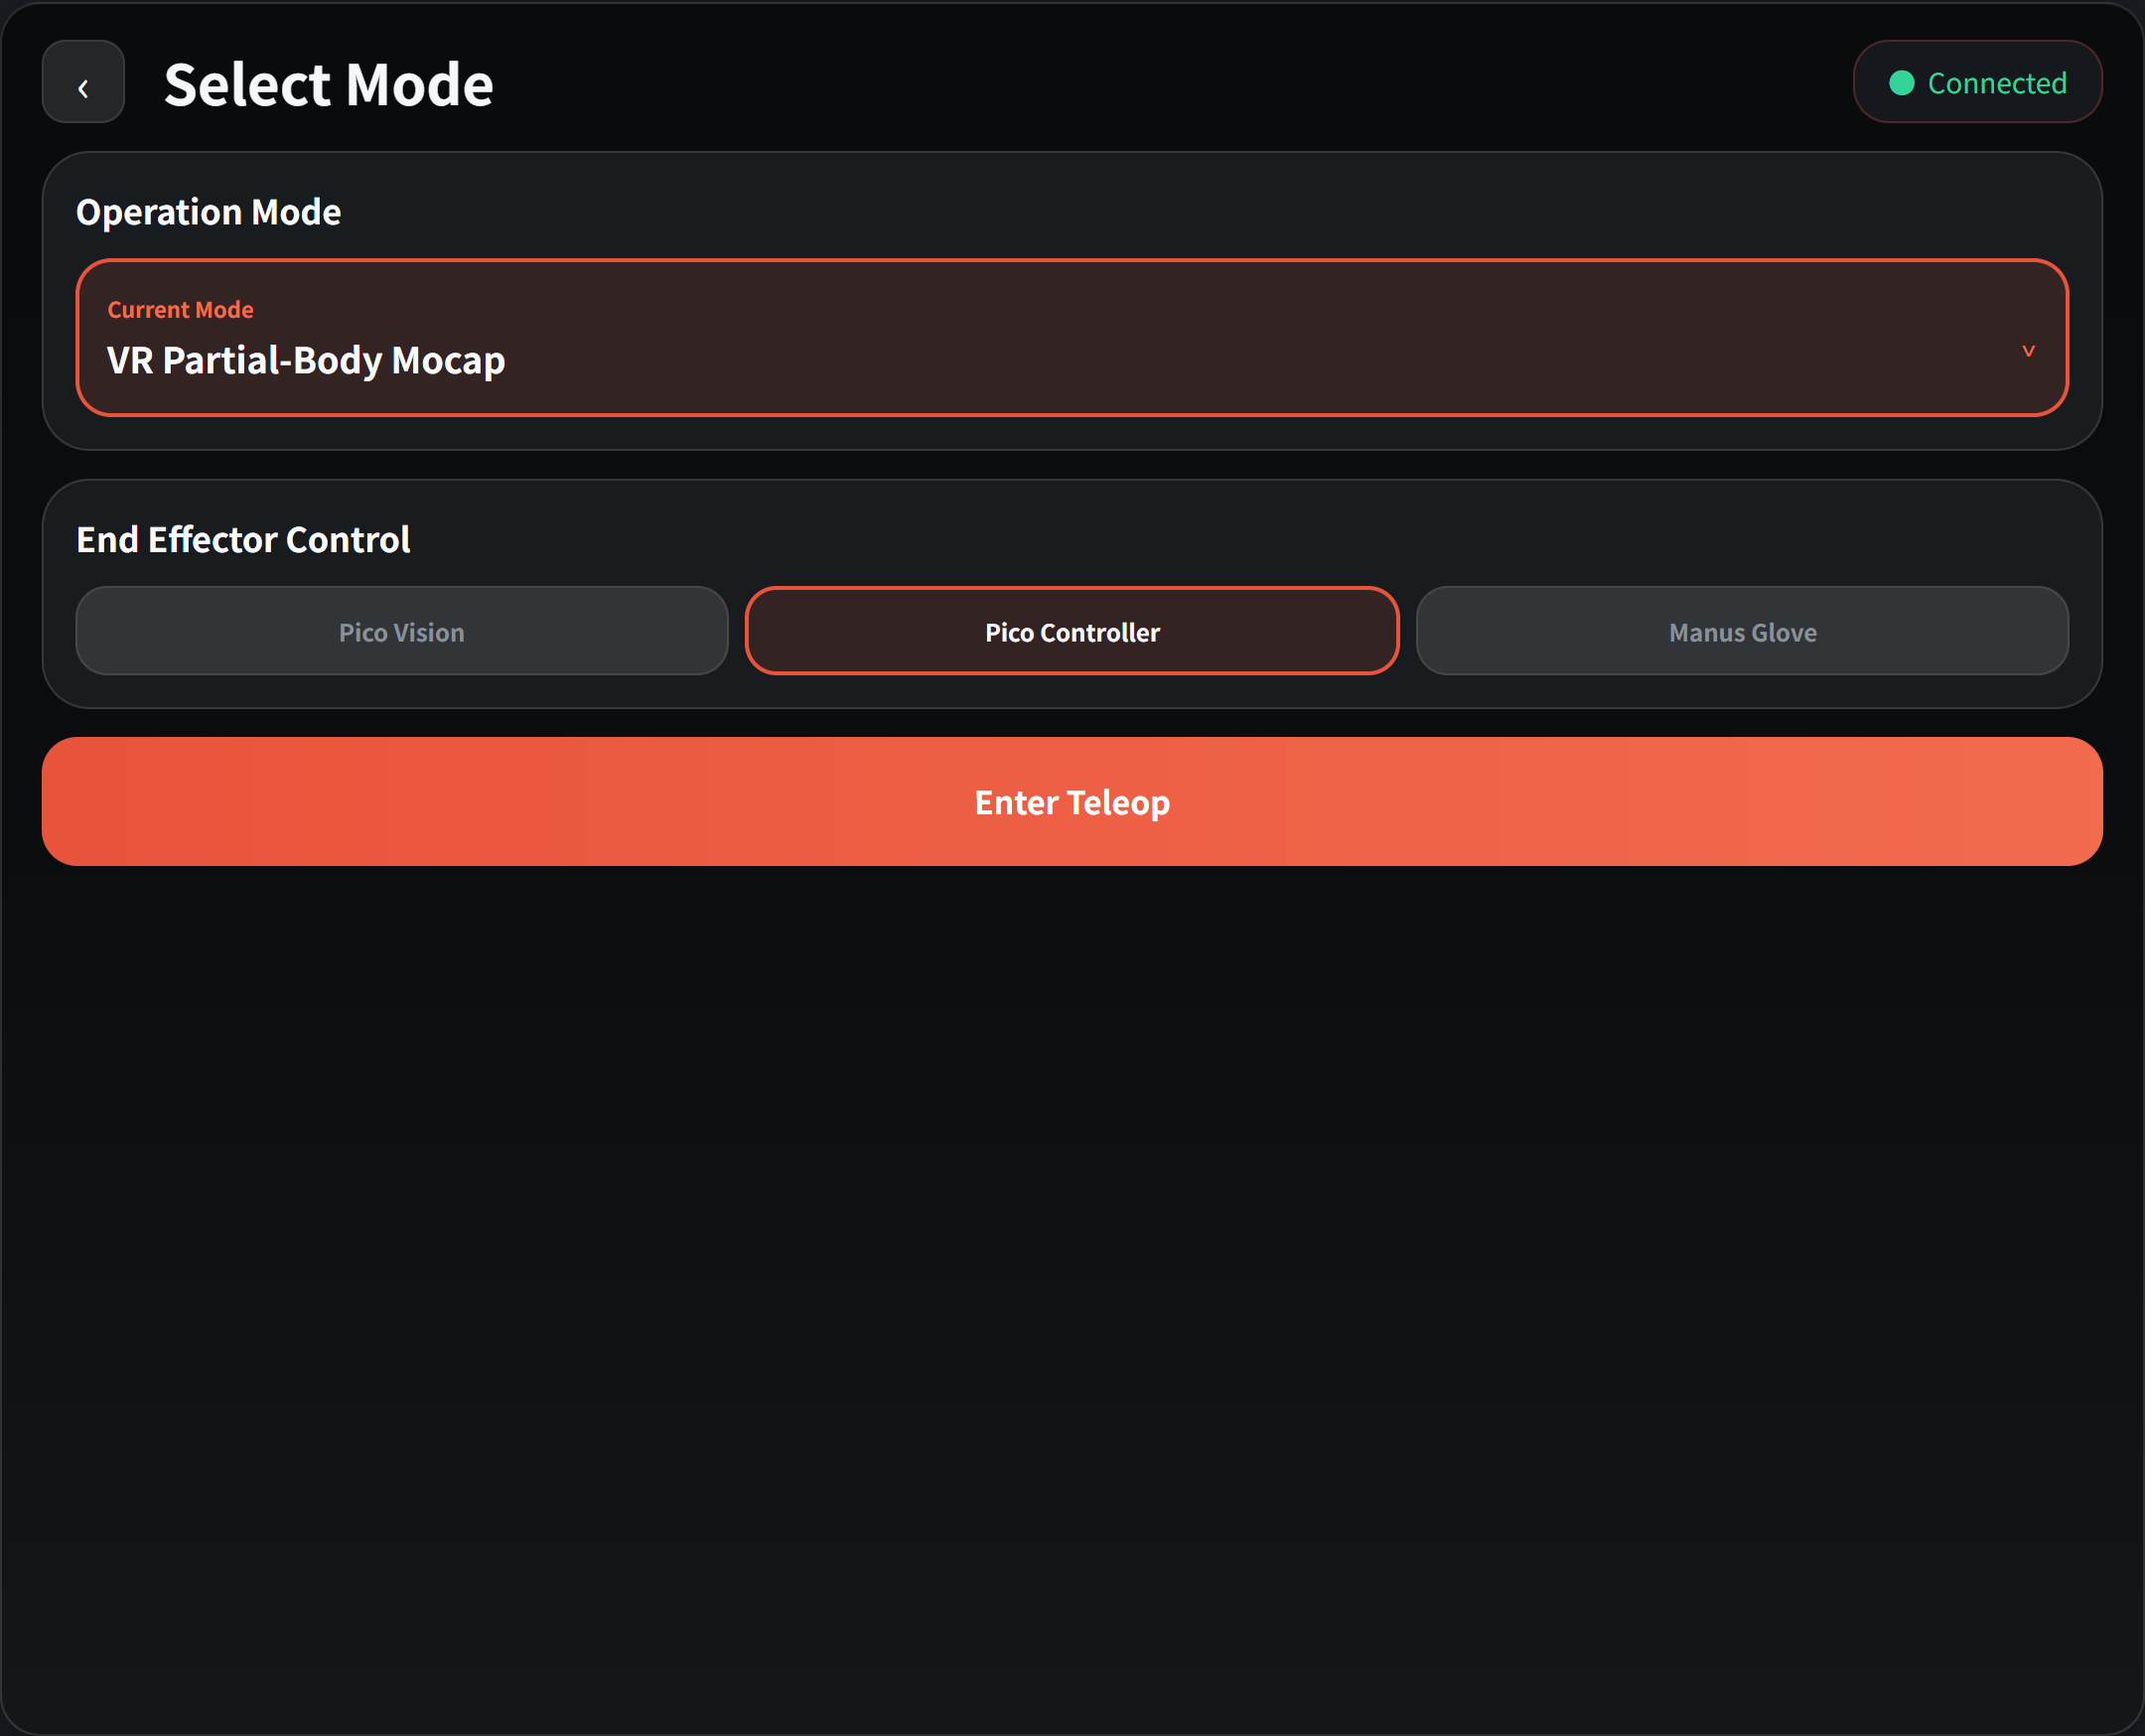 |
| 2. Verify the robot ID and return the robot to its initial teleoperation pose | Verify the robot ID. Press and hold left grip (G) + X and right grip (G) + A simultaneously until the robot returns to its initial teleoperation pose. By default, both elbows are at approximately 90° and the forearms are horizontal. Release all buttons once the pose is reached. |
Teleoperation interface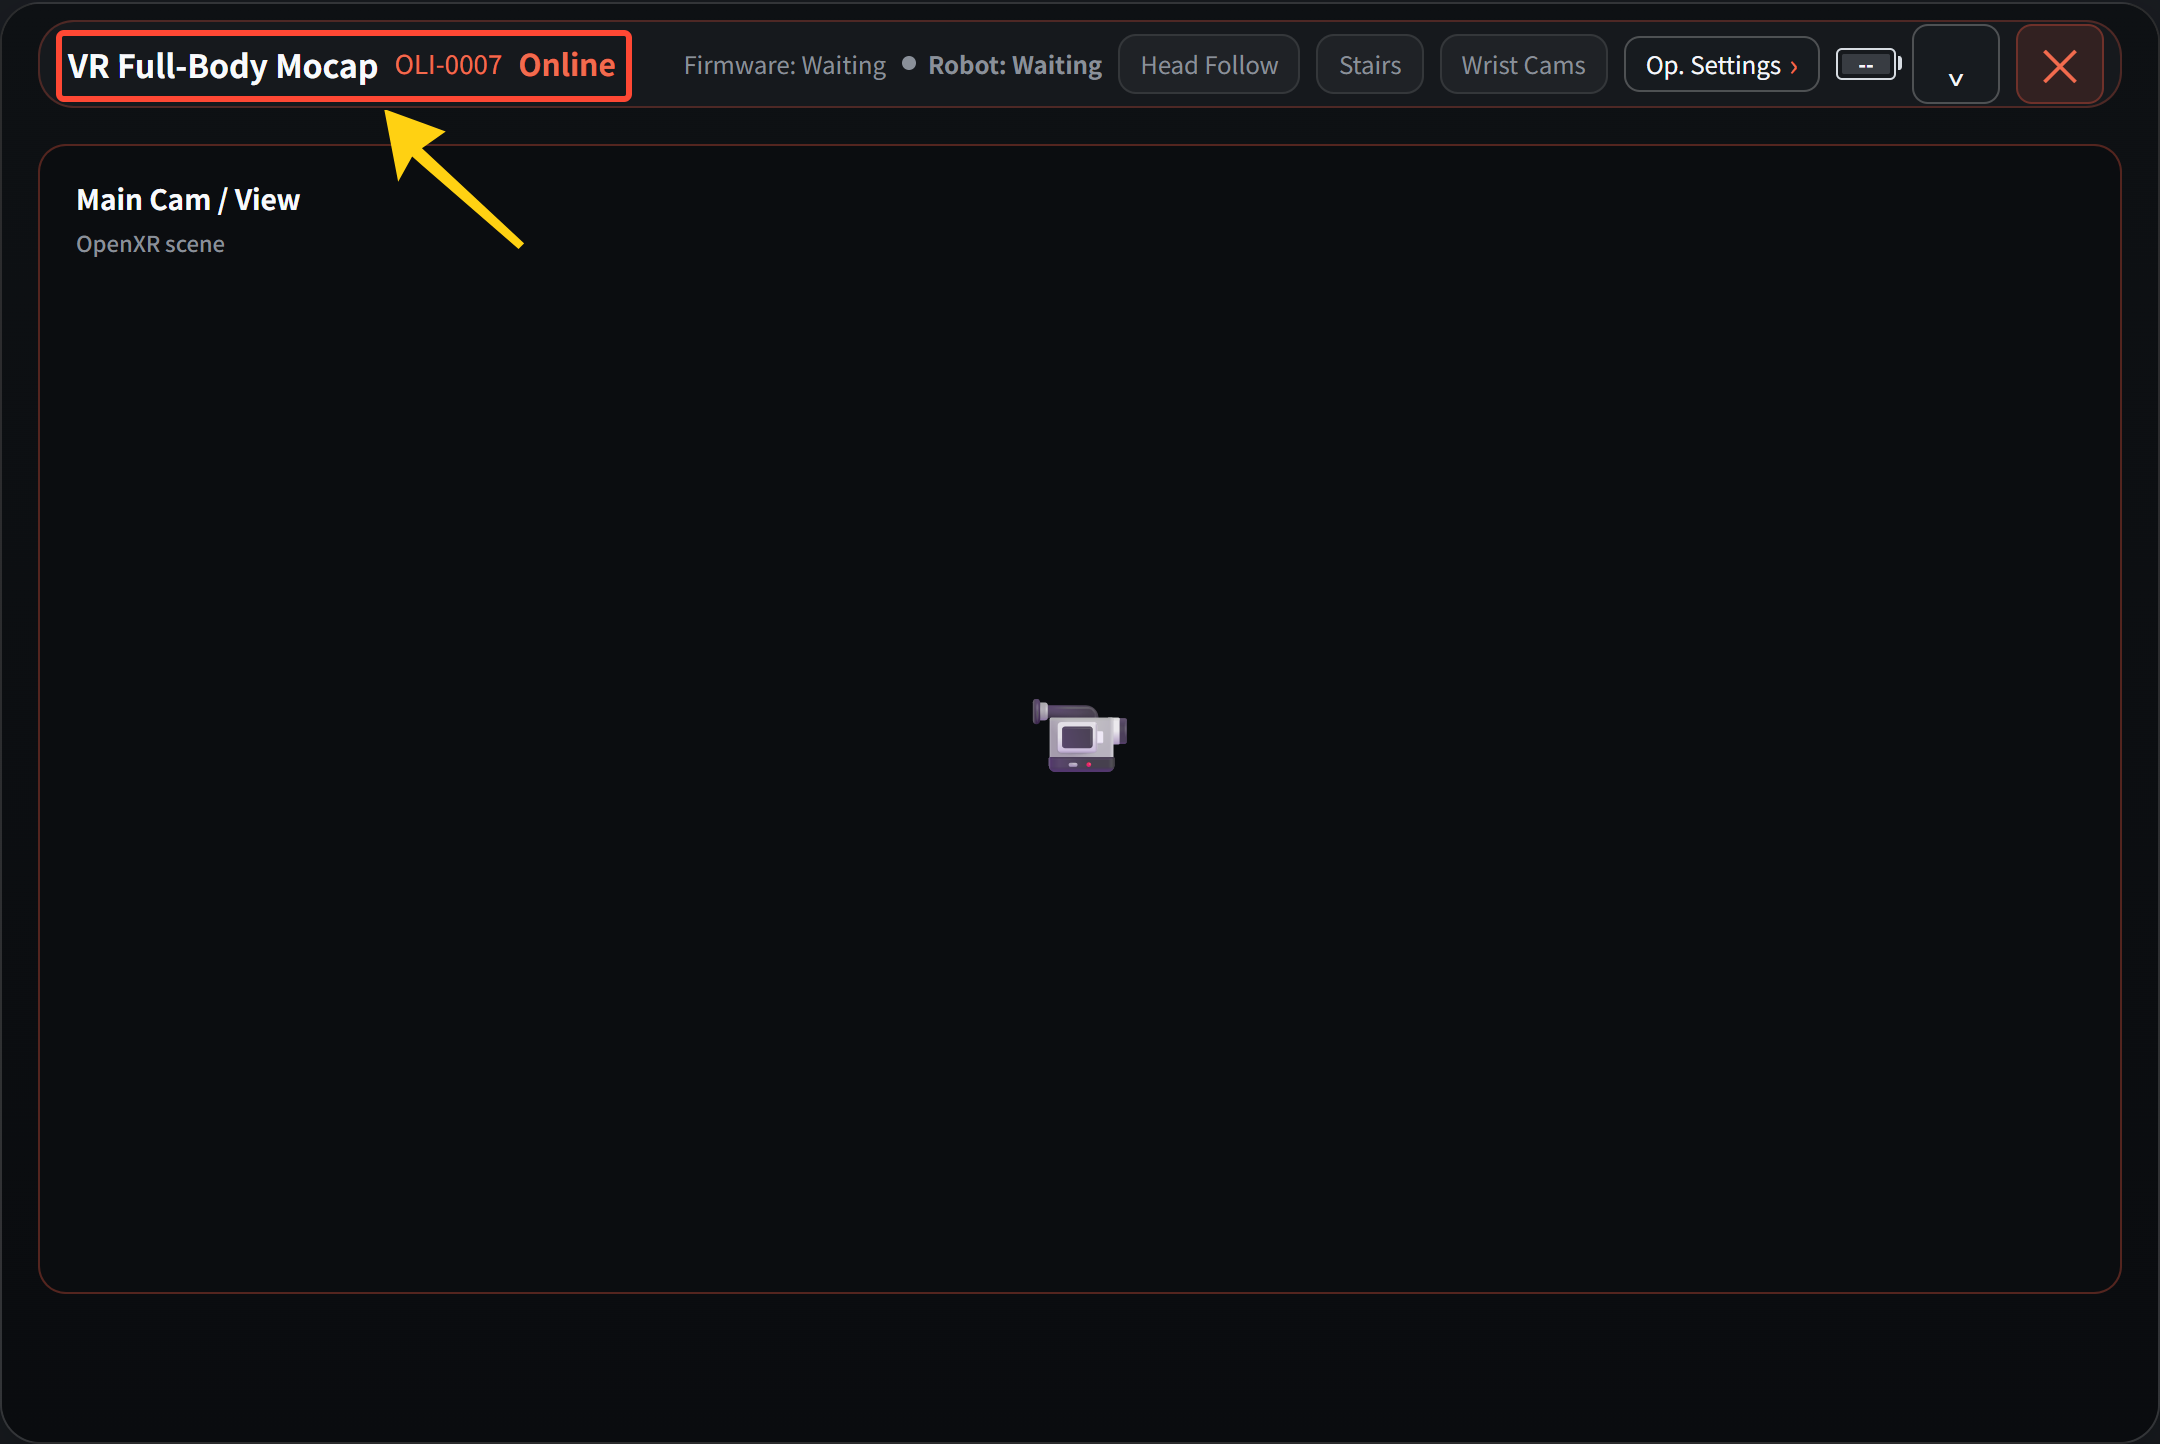 |
| 3. Test one arm first | Hold the grip button (G) on one side and move the controller on the same side slowly through a small range. Confirm that the arm follows. Release the grip button (G) on that side and confirm that the arm stops. Before adjusting your stance or repositioning the controllers, release both grip buttons (G). |
|
| Optional: Operation Settings | Open Op. Settings, adjust the compliance level, gripping force, or dexterous-hand gestures, then tap Apply. Lower stiffness makes the arm yield more easily to external force. After making adjustments, test with small movements first. |
Operation Settings screen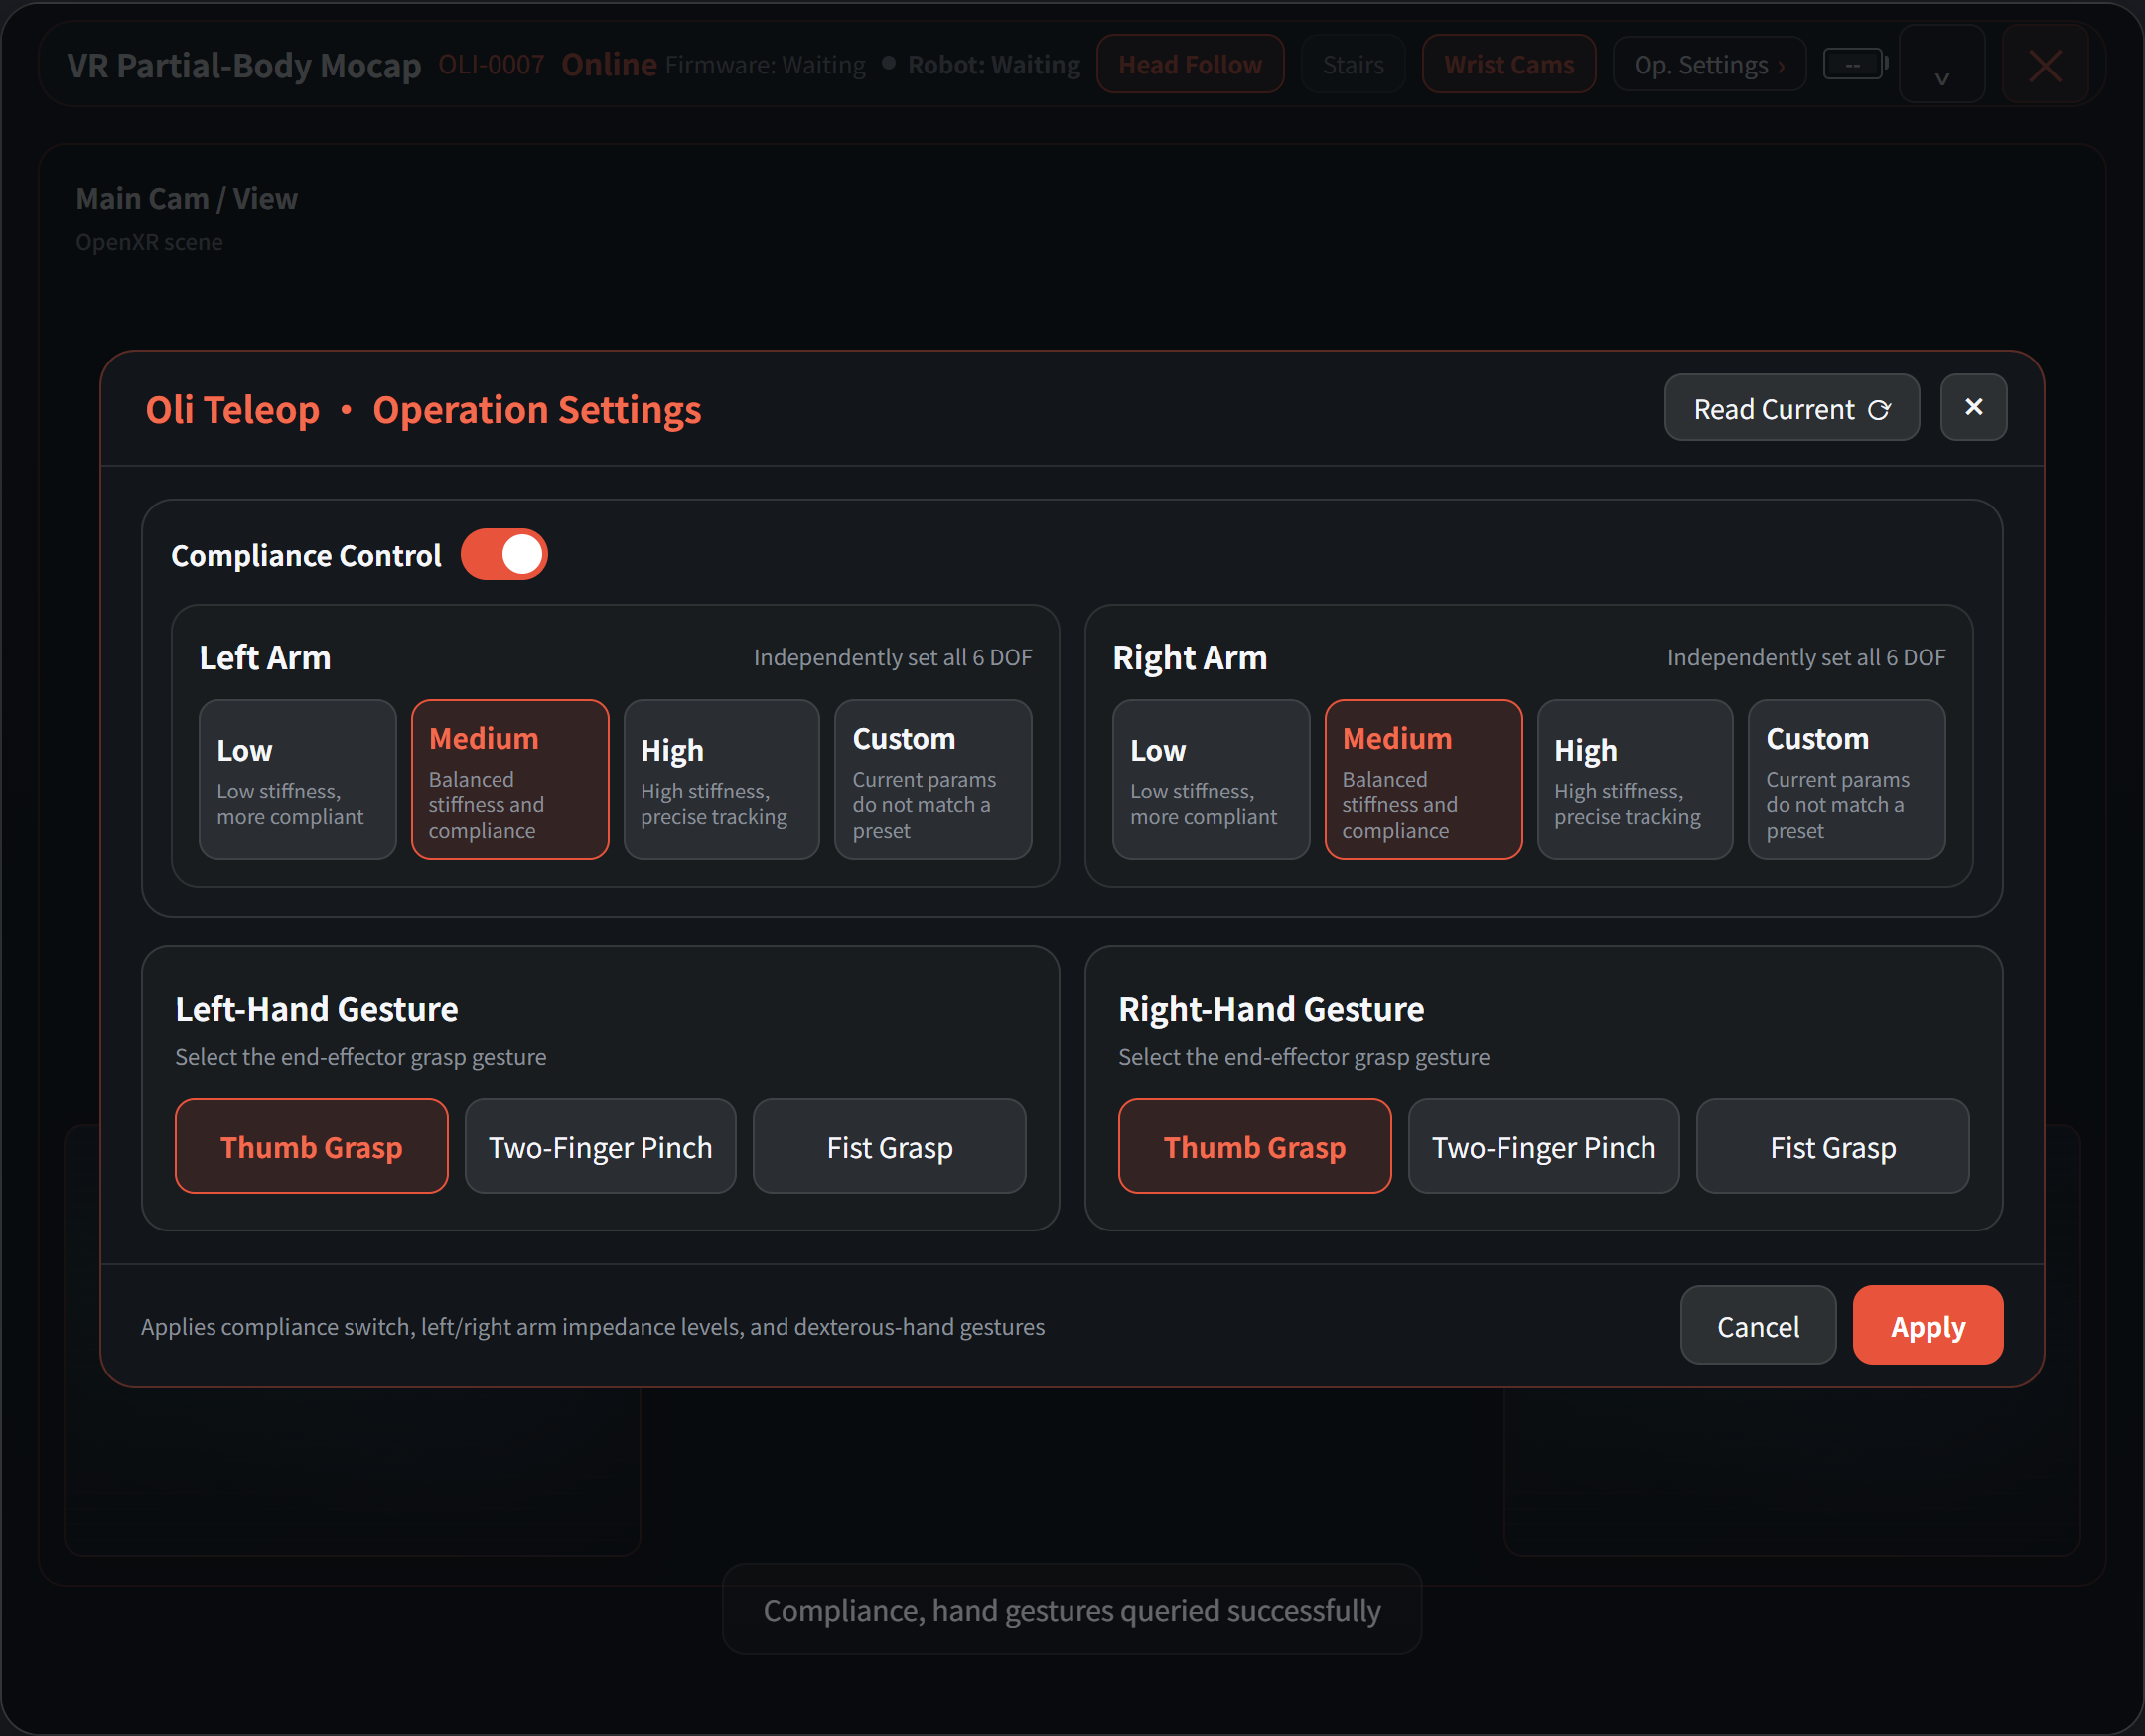 |
3.2 Common Actions
| Action | Buttons / Operation | Result |
|---|---|---|
| Head following | Enable Head Follow at the top of the operation page. Hold either grip button (G) and turn your head, look up, or look down. |
The head follows the headset's movements. |
| Open or close the gripper or dexterous hand | Hold the grip button (G) on the same side and pull the trigger (T) on that side. | Opens or closes the gripper or dexterous hand on the same side. |
| Move forward / backward | Hold the left grip button (G) and push or pull the left joystick forward or backward. | The greater the joystick deflection, the faster the movement. |
| Turn in place | Hold the right grip button (G) and push the right joystick left or right. | The greater the joystick deflection, the faster the turn. |
| Raise or lower the body | Hold the right grip button (G) and push the right joystick forward or backward. | Adjusts body height within the robot's configured range. |
| Return the arms to the initial teleoperation pose | Left arm: Press and hold left grip (G) + X. Right arm: Press and hold right grip (G) + A. Both arms: Press and hold both button combinations simultaneously. |
The arms slowly return to the initial teleoperation pose. Releasing the buttons midway stops the return. |
Operating Precautions
· While the robot is moving, no one may enter the robotic arms' range of motion.
· For first-time operation, move the controllers slowly and through small ranges to avoid collisions.
· The teleoperation link has latency (≤200 ms), so allow sufficient lead time when operating.
· Release the grip buttons (G) to exit following before walking around.
4 Whole-Body Teleoperation
Whole-body teleoperation requires motion trackers. The robot follows your body posture.
If you are already in upper-body teleoperation, first follow Steps 1 and 2 in Chapter 5 to exit teleoperation and close the app, then prepare the trackers.
4.1 Put On the Trackers
Use five trackers: one at the waist, one at each ankle, and one on each thigh.
You may put them on in any order. If the headset gets in the way, you can take it off first.
| Body part | Operation | Illustration |
|---|---|---|
| Ankles | Fasten the trackers to the front of the ankles, near the base of the instep, avoiding protruding bones. Keep both at the same height, facing forward, with the indicator lights pointing upward. Keep the padding snug and prevent the straps from slipping. Shoes, socks, and pant cuffs must not cover the sensors. |
Ankle and thigh placement (wear the waist tracker at the center of your lower back)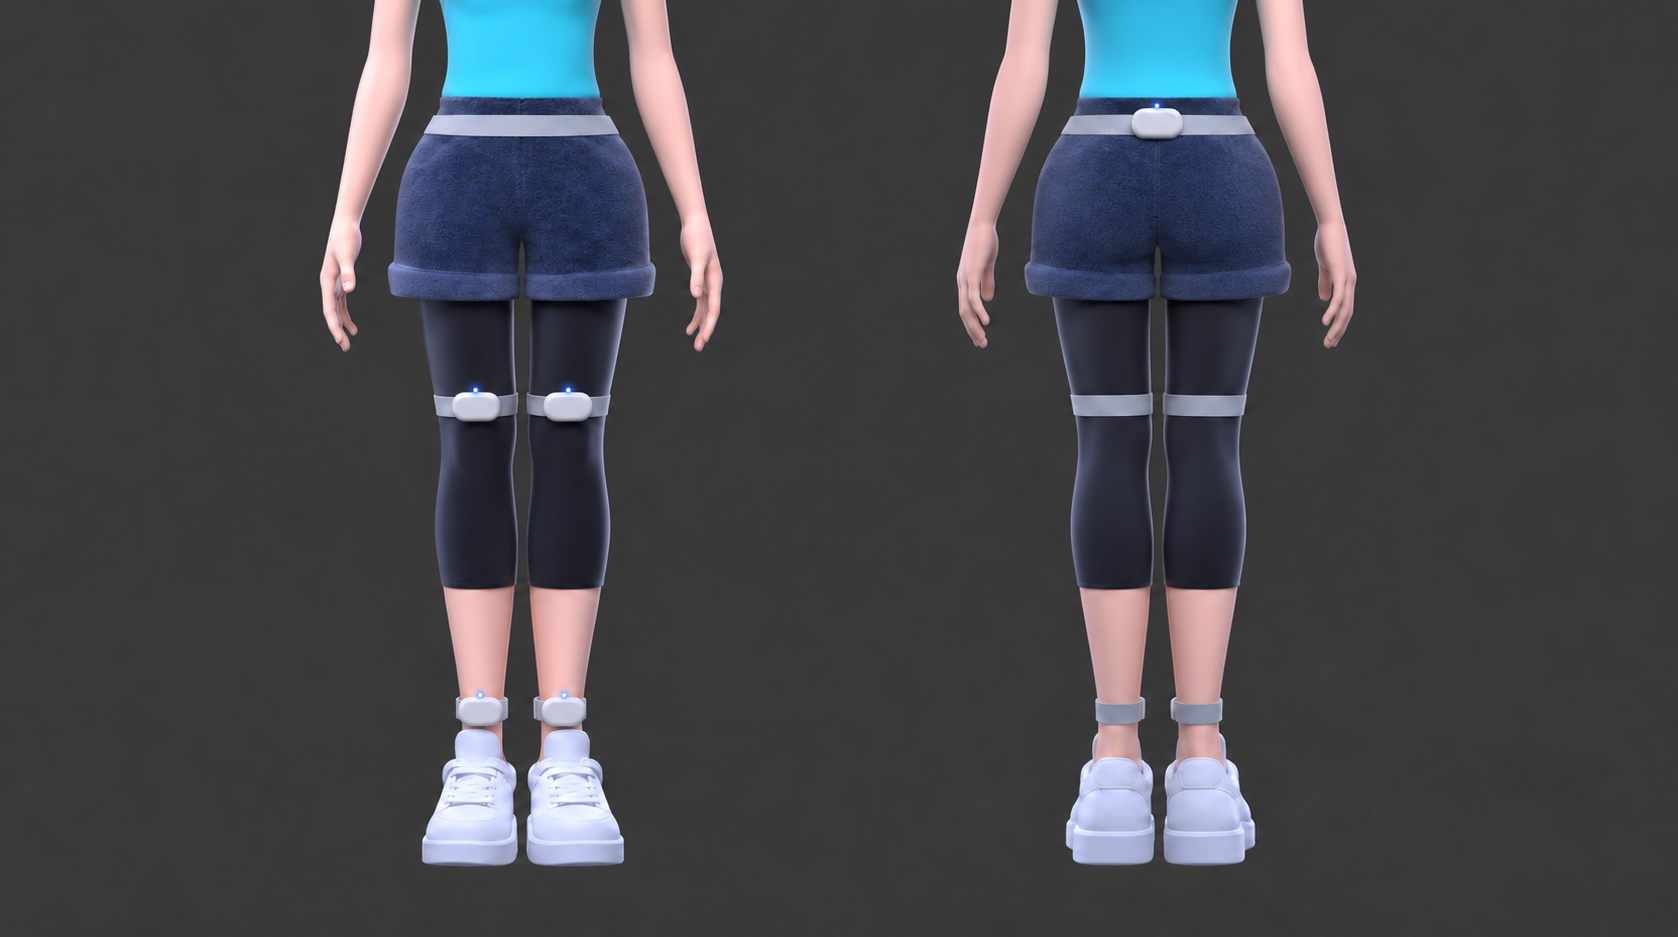 |
| Waist | Fasten the tracker at the center of the lower back, along the upper edge of the hips and aligned with the spine. The tracker must face straight back. | |
| Thighs | Fasten the pair of trackers above the knees, facing forward and avoiding the knee joints. |
4.2 Pair and Calibrate the Trackers
| Step | Operation | Illustration |
|---|---|---|
| 1. Power on and pair | Press the power button on each tracker. Put on the headset and hold the left and right controllers. On the PICO Home screen, open Library → Apps → Motion Tracker. If the trackers have not been paired, tap Start Pairing and follow the prompts. Before calibration, confirm that all five trackers worn for this session are connected. |
Select the Motion Tracker app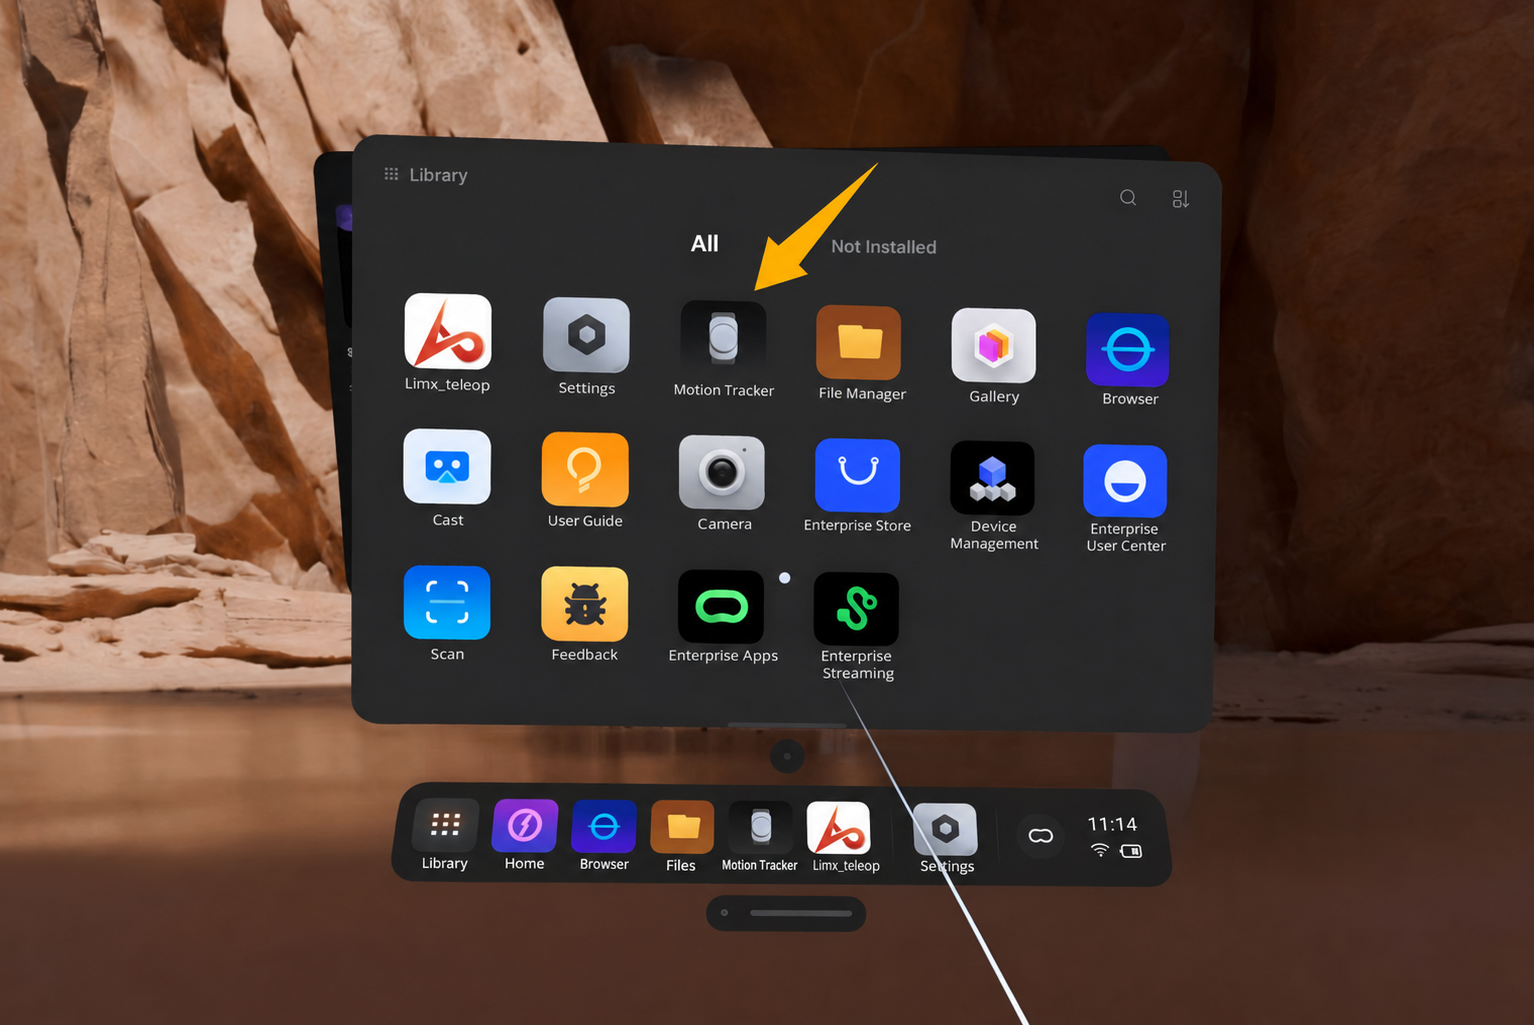 |
| 2. Select the wearing mode | Set Wearing Mode to Thigh Enhanced, and set Waist Placement to Directly Behind Waist. | Wearing mode selection screen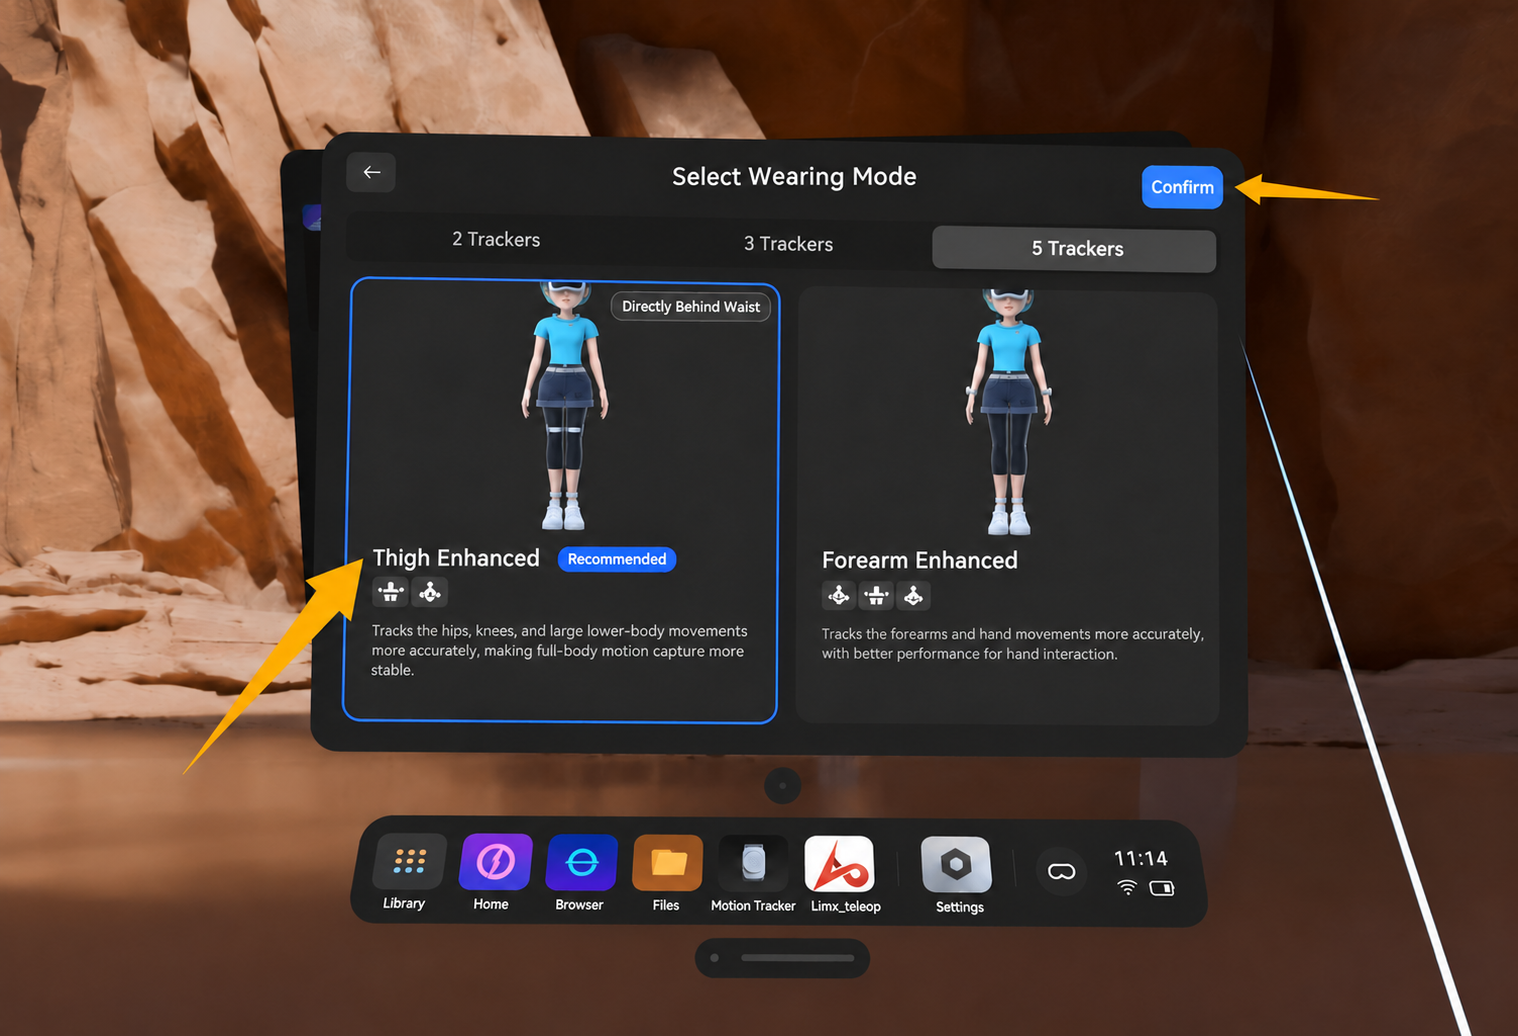 |
| 3. Start calibration | Tap Start Calibration. Hold the controllers with both hands, stand straight with your legs together and arms hanging naturally at your sides, then look down at the ankle trackers as prompted. | Tap Start Calibration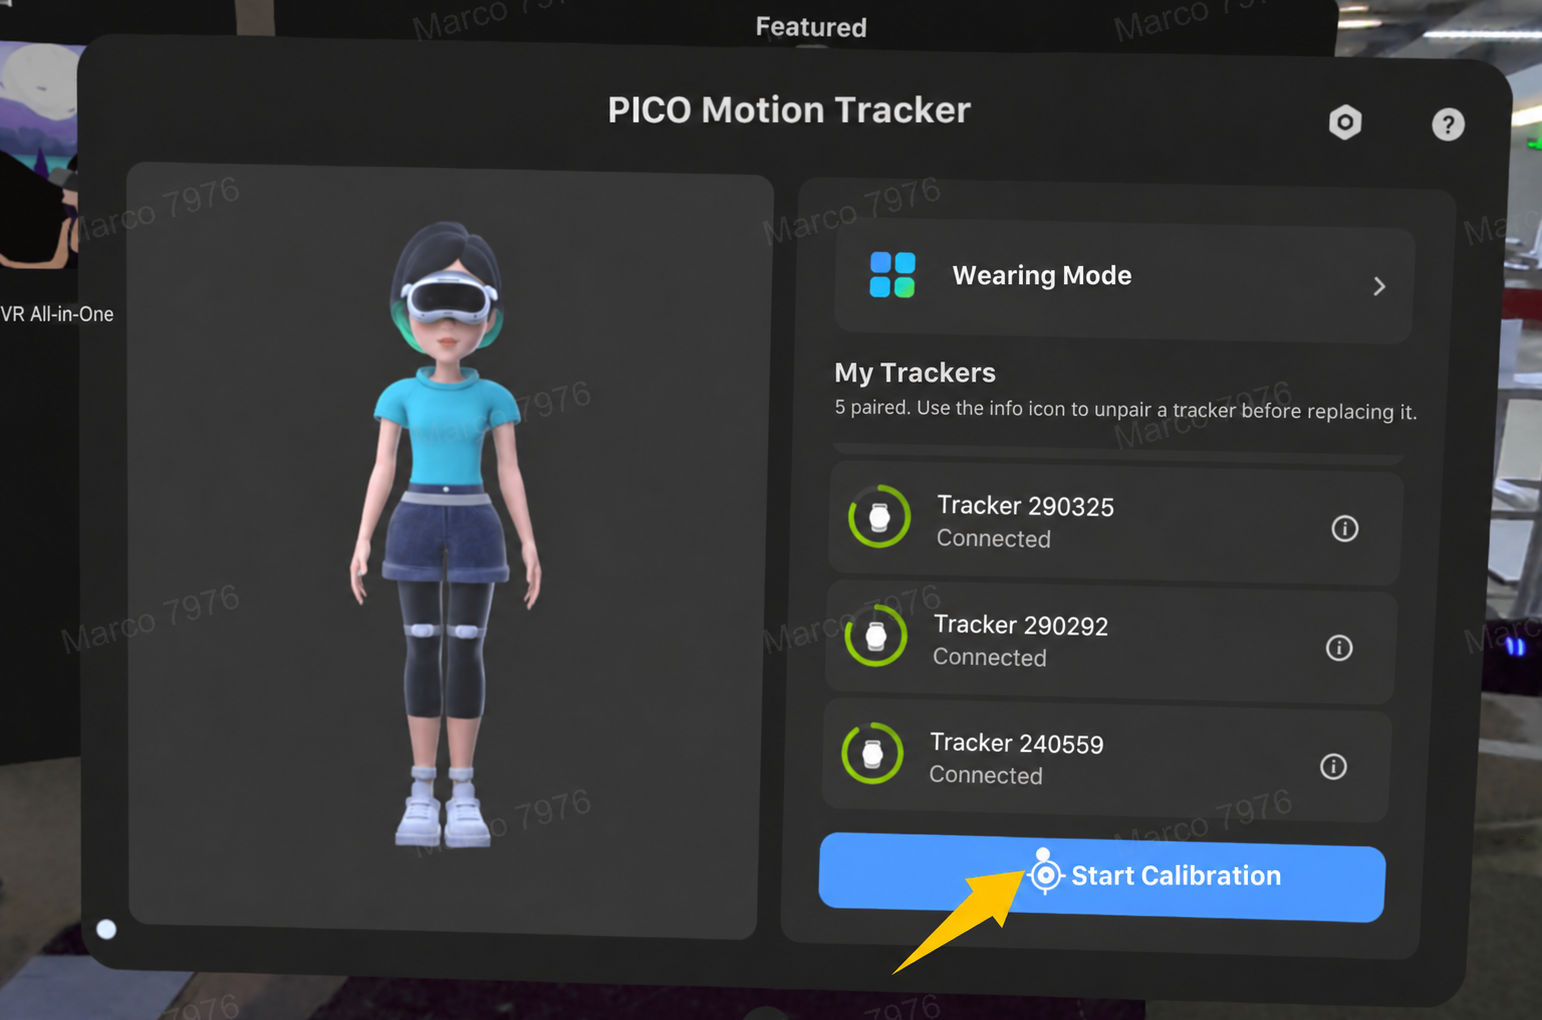 |
| 4. Check the preview | Gently move your feet and confirm that the preview figure moves in sync. Stand steadily and confirm that the figure's feet are touching the ground. If the feet remain above the ground, tap Adjust Ground, then use a VR controller to touch the floor and confirm as prompted. |
4.3 Enter Whole-Body Following
Open LimX Teleop App, connect to Oli, and confirm that the robot is in Humanoid Walking (Walk) state.
Note: Before starting or resuming following, align your orientation, arms, and legs with those of the robot to prevent sudden, large movements.
| Step | Operation | Illustration |
|---|---|---|
| 1. Select the mode | Under Current Mode, select VR Full-Body Mocap (whole-body teleoperation). Under End Effector Control, select Pico Controller and tap Enter Teleop. |
Mode selection screen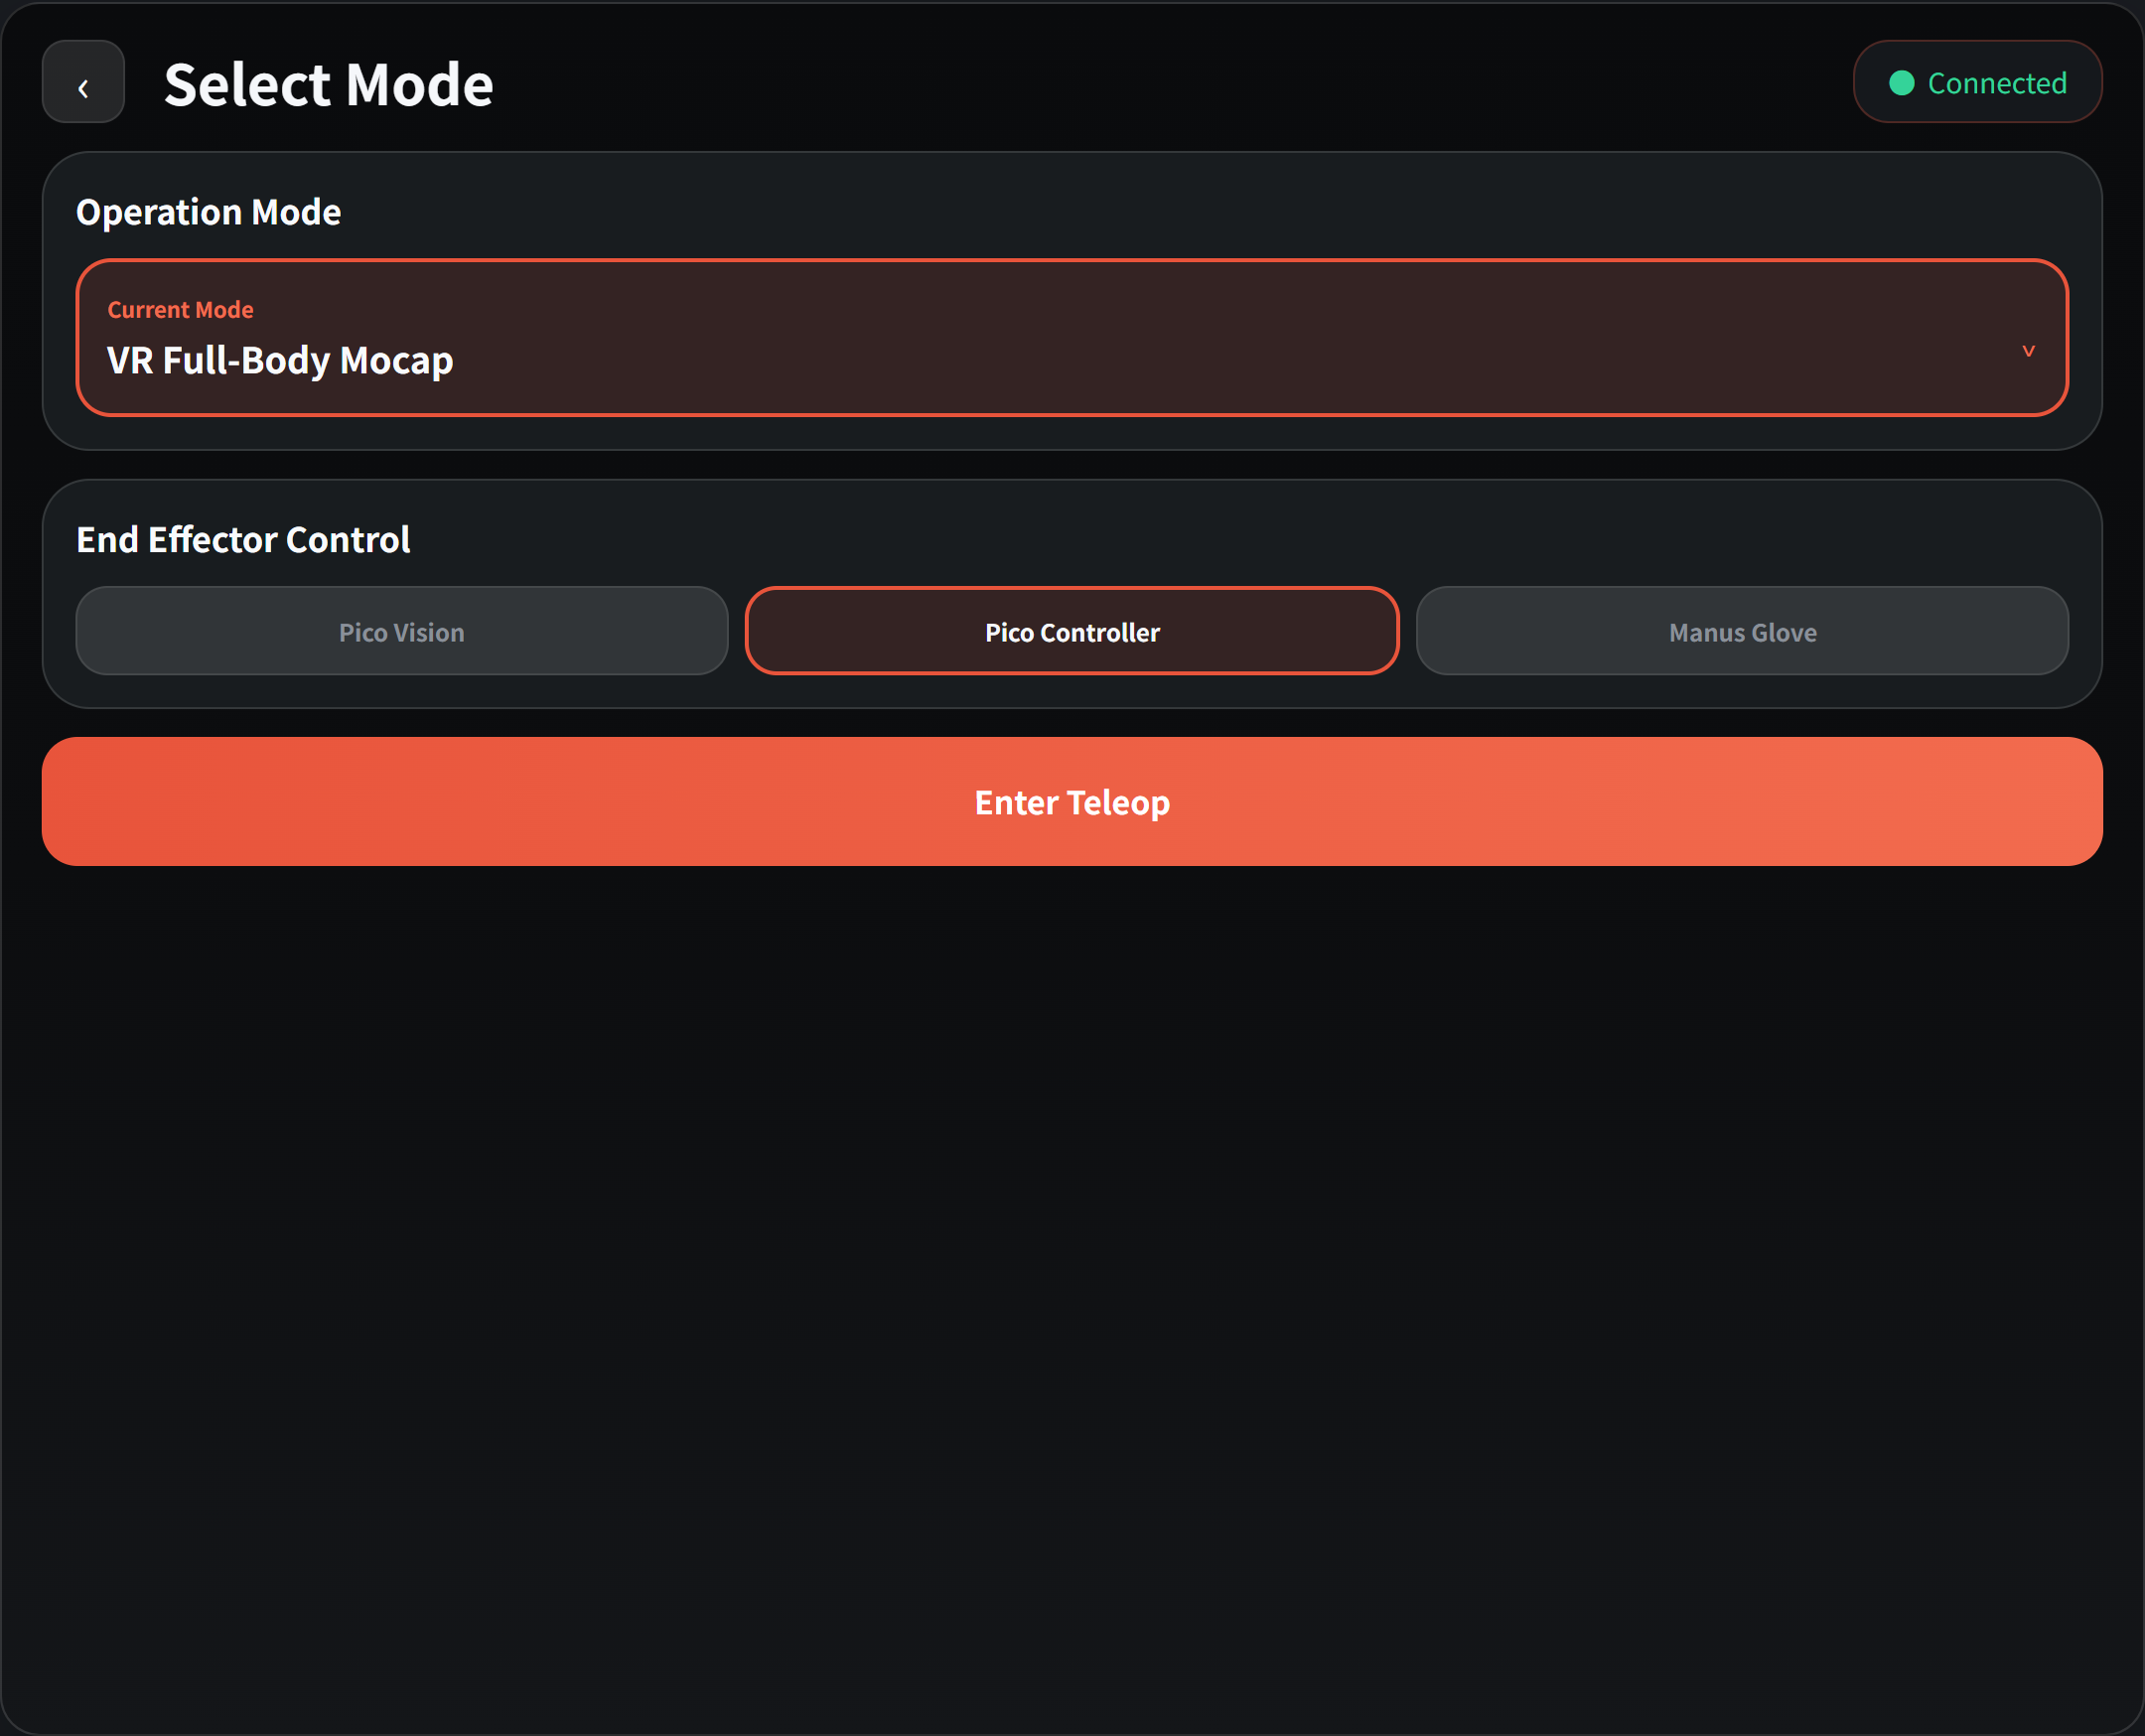 |
| 2. Return the robot to its initial teleoperation pose and align your posture | Verify the mode and robot ID on the operation page. Press and hold left grip (G) + X and right grip (G) + A simultaneously until the robot returns to its initial teleoperation pose. By default, both elbows are at approximately 90° and the forearms are horizontal. Keep holding these buttons and observe the robot through the headset. Align your orientation, arms, and legs with those of the robot as closely as possible. |
Teleoperation interface |
| 3. Start following and test movement | Release X and A while keeping at least one grip button (G) held down. Make small test movements and confirm that the robot follows steadily. |
During whole-body teleoperation, we recommend continuously holding the grip button (G) on at least one controller whenever possible.
Releasing both buttons pauses following, and the robot maintains the posture it held before release.
Align your posture with the robot before resuming teleoperation. If necessary, return the robot to its initial teleoperation pose first, then align.
4.4 Basic Movements
| What you do | Robot response |
|---|---|
| Move both arms through small ranges. | Both arms follow your arm posture. |
| Enable Head Follow at the top of the operation page, then turn your head, look down, or look up. | The robot's head follows the headset's movements. |
| Bend or rotate your waist slightly. | The robot's waist follows your waist movements. |
| Bend your knees or squat slightly. | The robot's legs follow the posture changes. |
| Hold the grip button (G) and pull the trigger (T) on the same side. | Opens or closes the gripper or dexterous hand. |
Pause following before removing the headset.
Tip: If you remove the headset and put it back on during operation, first check whether the human-body preview in the Motion Tracker app is normal. If it is abnormal, recalibrate.
5 Finishing Up
| Step | Operation |
|---|---|
| 1. Stop following | Release both grip buttons (G) and confirm that the robot stops following. |
| 2. Return the robot to its initial teleoperation pose and exit | Press and hold left grip (G) + X and right grip (G) + A simultaneously until the return is complete. Then hold right grip (G) + B to exit teleoperation. Confirm that the robot is back in Walk before closing the app. |
| 3. Power off the robot | Have the on-site safety personnel confirm that the overhead crane is reliably supporting the load. Use the Oli remote controller to adjust the robot to a standing posture, then switch to Damping. Short-press and release the power button on the robot body, then press and hold it for approximately 2 seconds to power off. |
| 4. Power off the other devices | Press and hold the Power button on the Oli remote controller for at least 2 seconds. Press and hold the headset power button for approximately 3 seconds and follow the prompts to power off. The controllers will turn off with it. Remove and store the trackers. |
Note: Always exit teleoperation and put the robot in a safe state before shutting it down or disconnecting power. Cutting power directly may cause the robot to fall suddenly.