Revision History
| Version | Date | Author | Change Description |
|---|---|---|---|
| v1.0 | 2026-09-03 | Yuna | First draft |
Safety and Responsibility Guidelines
The copyright and ownership of this manual belong to Shenzhen LimX Dynamics Technology Co., Ltd. and its affiliates (collectively referred to as "LimX Dynamics"). Without written authorization from LimX Dynamics, no individual or organization may copy, scan, store, distribute, reprint, sell, transfer, modify, or otherwise use all or part of this manual for themselves or others. This manual and its contents are intended only for operating and using this product and may not be used for any other purpose.
To avoid illegal acts, possible injury, and losses, please strictly observe the following requirements:
-
Read this manual carefully before using the product. Make sure you understand the safety information and your responsibilities as an operator.
-
By using this product, you acknowledge that you have read and understood these requirements. Always operate the product in accordance with this manual and applicable laws.
-
This product is not a toy and is not intended for use by anyone under 18 years of age. Keep it out of the reach of children.
-
During docking, keep hands, feet, and foreign objects out of the docking area. To the fullest extent permitted by applicable law, LimX Dynamics is not liable for injury or loss caused by misuse or failure to follow these instructions.
-
Installation, wiring, and maintenance of the charging dock must be performed by qualified personnel. Do not disassemble the enclosure, circuitry, or internal components unless you are authorized and qualified to do so. Unauthorized disassembly, modification, or repair may result in injury or damage, may void the warranty, and, to the fullest extent permitted by applicable law, is performed at the user's own risk.
-
Use only the original power cord and adapter. Verify that the supply voltage is within the rated input range of 100–240 V AC. Do not short-circuit, disable, or bypass this safety mechanism. Reverse polarity, short-circuit, overvoltage, and overcurrent protection automatically disable the output when a fault is detected. If you notice smoke, an unusual odor, overheating, or enclosure damage, disconnect the power immediately, stop using the product, and contact LimX Dynamics Customer Support.
-
Do not use or store the product in extreme temperatures or in areas exposed to corrosive chemicals, standing water, excessive humidity, flammable or explosive materials, or strong electromagnetic interference. Install the charging dock indoors on a dry, level, stable, and non-slip surface, and secure it in place. Do not move the dock while it is operating. Disconnect the power before moving it. Avoid prolonged storage or operation in direct sunlight. Damage caused by use or storage outside these conditions may not be covered by the warranty, except where coverage is required by applicable law.
-
Keep the charging contacts clean and dry. Do not allow metal objects or standing water to contact them, as this may cause a short circuit. Do not cover the Status Indicator Light or QR Codes.
-
Do not use the charging dock with any device other than a TRON 2 robot in the Wheeled-legs Configuration.
-
Normal wear of components and charging contacts, and normal battery aging, are not considered product defects and are not covered by the warranty unless otherwise required by applicable law.
-
Do not use this product for any unlawful or prohibited end use, including support for terrorism; use in nuclear facilities; or the research, development, production, design, or use of chemical, biological, or other weapons of mass destruction.
-
Do not purchase, receive, or use this product where doing so is prohibited by applicable trade restrictions or sanctions.
-
Comply with all laws, regulations, and other requirements that apply where the product is installed or used.
-
Do not export, re-export, or transfer this product, its software, or related technology in violation of applicable export control laws and regulations.
-
Use this product only for lawful and legitimate purposes.
-
LimX Dynamics may revise this manual and these terms from time to time. Any revision applies only to the extent permitted by applicable law. Nothing in this manual excludes or limits rights or remedies that cannot lawfully be excluded or limited.
1 Product Overview
1.1 Introduction
The TRON 2 Auto-Recharge Base is a contact-based charging solution for the TRON 2 robot in the Wheeled-legs Configuration. It combines dock hardware, near-field autonomous docking, charge management, and SDK interfaces, allowing the robot to complete the entire return, docking, charging, and undocking cycle without manual connection of a charging cable.
1.2 Features
-
Contact-based charging: the charging contacts on top of the dock align with the contacts on the underside of the robot.
-
Uses guide slots, rails, and other physical guidance structures to help the robot align precisely.
-
Near-field Autonomous Charging Algorithm: within 200–650 mm in front of the dock, the robot autonomously detects, locates, approaches, and docks with the charging dock.
-
Supports Low-Light Charging; the dock's illumination lights assist when needed and turn off automatically once docking is complete.
-
Monitors charging status and detects faults throughout the charging process. Charging stops automatically when the battery is full, and the dock maintains a full charge while the robot remains docked.
-
Provides comprehensive electrical safety features, including Anti-Arc Protection, Output Short-Circuit Protection, Reverse Polarity Protection, Output Overvoltage Protection, Output Overcurrent Protection, and protection against charging devices other than TRON 2.
-
Provides SDK interfaces for starting a charging cycle, canceling a charging cycle, leaving the dock, querying battery information, querying charging status, and reporting faults.
-
Uses a Bluetooth ID pairing mechanism to precisely target a specific dock in multi-dock environments.
1.3 Packing List
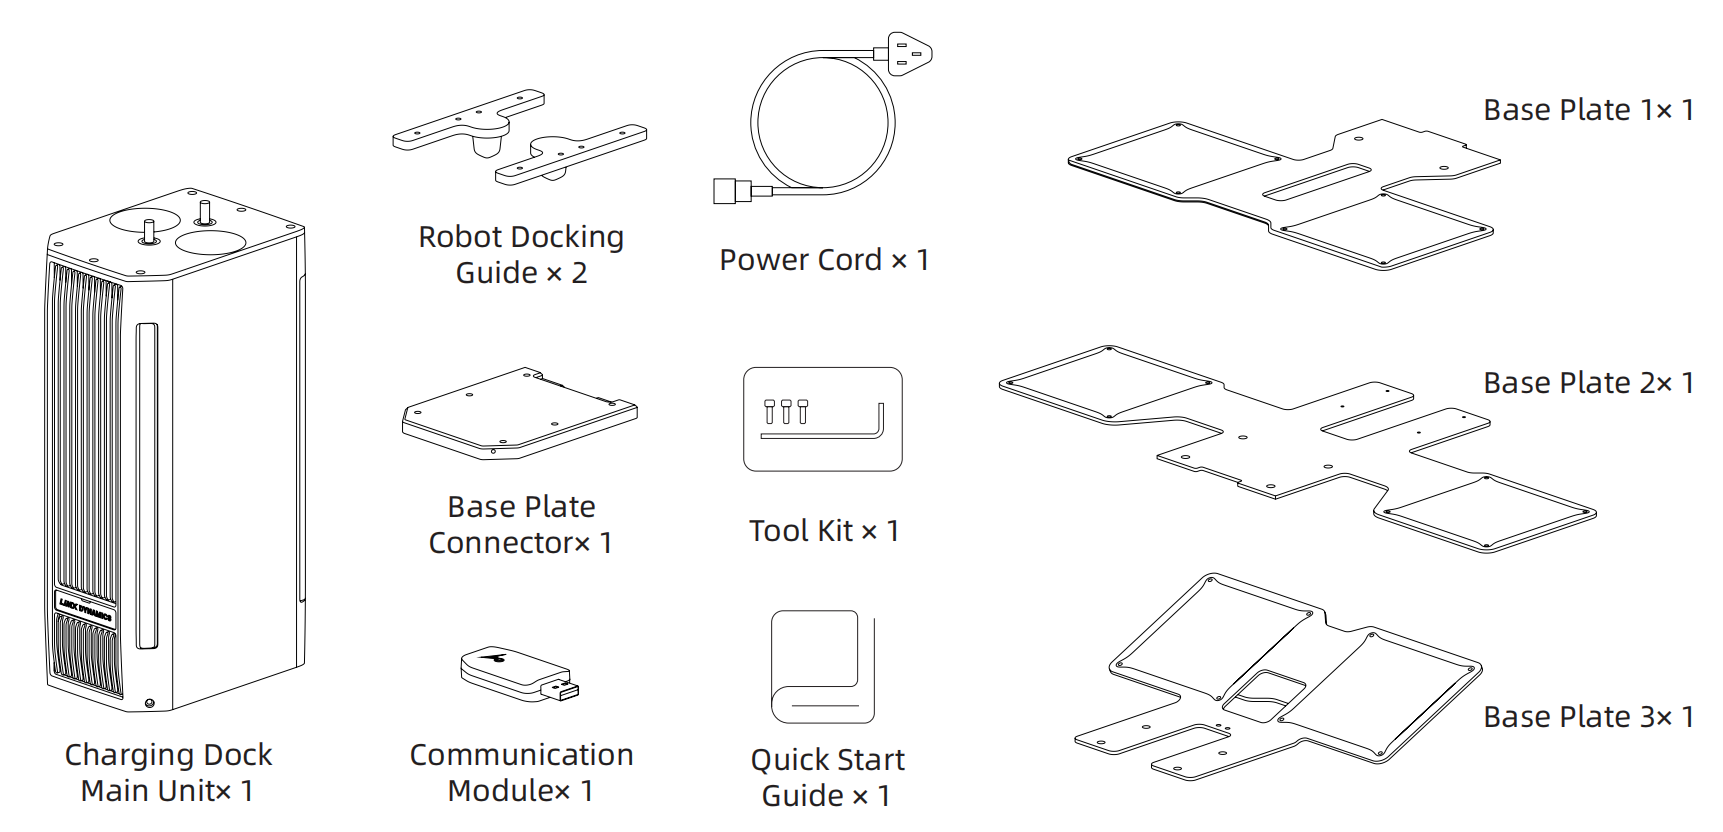
Refer to the packing list included in the box for the actual contents. After unpacking, check the contents; if anything is missing or damaged, contact customer support.
1.4 Specifications
| Category | Item | Specification |
|---|---|---|
| General Information | Compatible Model | TRON 2 robot in the Wheeled-legs Configuration only |
| Applicable Ground | Flat, level ground | |
| Overall Dimensions | 600 × 721 × 423 mm | |
| Dimensions with Robot Docked | 600 × 721 × 692 mm | |
| Material | Steel, aluminum alloy, copper, engineering plastic | |
| Features & Performance | Autonomous Charging Algorithm | Supported |
| Low-Light Charging | Supported | |
| Effective Docking Range | Distance: 200–650 mm Angle: within the 180° area in front of the charging dock |
|
| Average Docking Time | ≤ 30 s | |
| SDK Interfaces | Provides interfaces for starting a charging cycle, leaving the dock, battery information, charging status, and fault reporting | |
| Electrical Parameters | Rated Input Voltage | 100–240 V AC |
| Maximum Input Current | 8 A | |
| Maximum Output Voltage | 54.2 V | |
| Maximum Output Current | 10 A | |
| Charging Time (tested at an ambient temperature of 15–25 °C) |
20% → 80%: approx. 31 min 20% → 100%: approx. 66 min |
|
| Safety Protections | Reverse Polarity Protection | The charger automatically shuts off if the battery's positive and negative terminals are connected in reverse to the charger output |
| Output Short-Circuit Protection | The charger automatically shuts off if the output is short-circuited | |
| Output Overvoltage Protection | The charger shuts off the output when the DC output voltage exceeds 1.05 × Vout | |
| Output Overcurrent Protection | The charger shuts off the output when the output current exceeds 1.1 × Iout | |
| Anti-Arc Protection | The charging contacts are energized only after the MicroSwitch confirms that they are properly engaged | |
| Other | Warranty Period | 12 months |
1.5 Dock Components and Interfaces
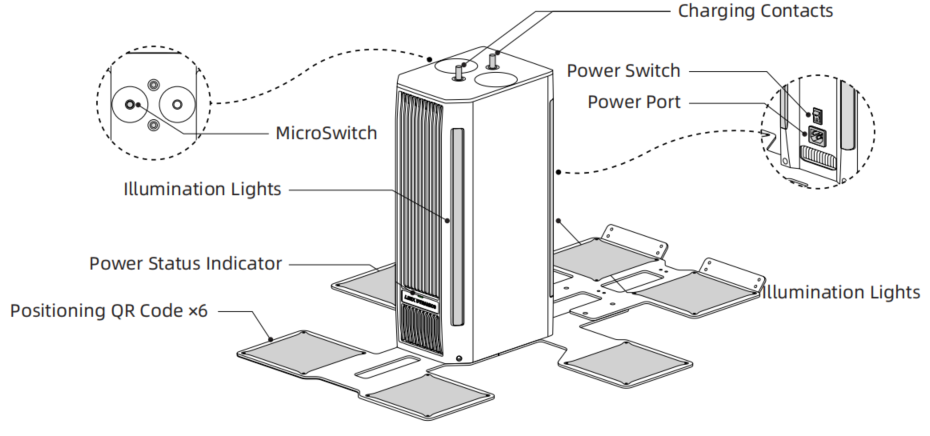
2 Installation Guide
Follow the installation video below to install the charging dock and the robot-side accessories.
3 Operating Status
3.1 Power Indicator Light
The front of the charging dock has a power indicator that shows the dock's current operating status.
| Indicator Status | Meaning |
|---|---|
| Steady green | Powered on and idle; or the robot is docked and the battery is fully charged |
| Steady orange | Charging in progress |
| Flashing red | Dock fault detected |
3.2 Illumination Lights
Four illumination lights on the front of the charging dock assist the robot's visual positioning. They light up only during the Docking and Undocking processes and stay off at all other times.
-
Once docking is complete and the robot enters the Docked Charging state, the lights turn off automatically.
-
They light up again when undocking begins, then turn off once the robot has left the dock.
4 Usage Instructions
4.1 Preparation Before Use
4.1.1 Environment Requirements
To ensure a high docking success rate and safe operation, the location where the dock is installed must meet the following spatial and environmental requirements.
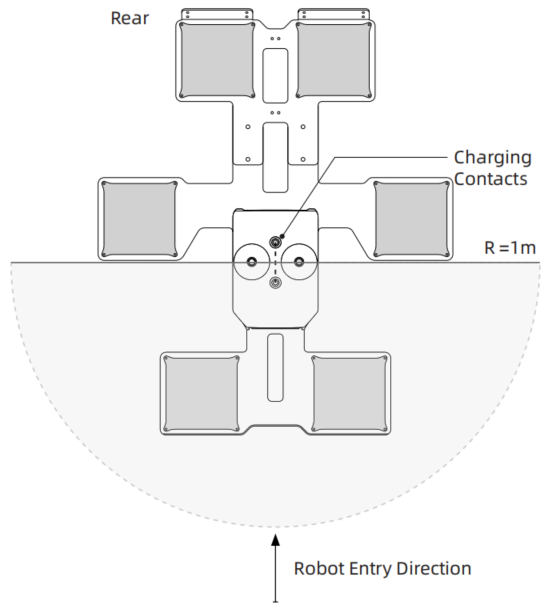
- Space requirements: Keep the 1 m-radius semicircular area in front of the dock clear, using the center of the charging contacts as the center of the semicircle. Do not place boxes, equipment, cables, or other obstacles in this area, as they may obstruct the robot's navigation and docking path.
-
Floor requirements: The installation floor must be flat and solid, dry, free of standing water or oil stains, with nothing wedged between the base plates and the floor.
-
Lighting requirements: The docking system operates reliably in dim or low-light conditions. Strong direct light, including direct sunlight or high-intensity lighting, may interfere with visual localization and cause docking to fail. Install the charging dock away from strong direct light.
4.1.2 First-Time Setup
-
Power on the dock: Confirm that the charging dock has been installed, secured, and wired, and that it is powered on (the indicator shows steady green).
-
Prepare the robot: Confirm that the robot has sufficient battery charge and is powered on, and that the Bluetooth communication module on its back is installed and the robot is ready to receive remote-control or API commands.
-
Position the robot: Move the robot to a location 200–650 mm in front of the charging dock, within 180° of the dock's front face.
-
Charging Dock Spacing: Adjacent docks must be at least 1.1 m apart laterally and 1.4 m apart longitudinally, measured center to center between the Charging Contacts.
4.2 Getting the Charging Dock's Bluetooth ID
Each charging dock has a unique Bluetooth ID in the format TRON2A_DOCK_XXXX. You can obtain it by scanning the QR Code on the back of the dock or the QR Code on the device nameplate.
4.3 Docking and Undocking
The charging cycle consists of docking and undocking. During docking, the robot autonomously approaches the charging dock, aligns itself, and lowers itself onto the dock to enter the Docked Charging state. During undocking, the robot rises, leaves the dock, and returns to a standing position on level ground. Both actions can be triggered using the remote controller or API.
Two trigger methods
- Remote controller trigger: Used for on-site demonstrations, manual intervention, and manual testing. The operator triggers it directly by pressing buttons on the handheld remote controller.
- API trigger: Used for 24/7 autonomous inspection. Triggered by the customer's inspection/dispatch platform or by the robot's own logic, in scenarios such as low battery, task completion, or remote recall.
4.3.1 Triggering via Remote Controller
Operating Procedure
-
Position the robot using the Remote Controller. With the robot standing in the Wheeled-legs Configuration, confirm that
Drive | Walkappears at the bottom of the Remote Controller screen. Move the robot to a position 20–65 cm in front of the charging dock. Keep the docking path clear. -
Start docking. Press L2 + X simultaneously on the Remote Controller. The display at the bottom of the screen changes to
Drive | Docking. The robot autonomously moves into position over the charging dock and slowly lowers itself to complete docking. -
Confirm that charging has started. Once docking is complete, the display changes to
Drive | Charging, the charging dock's power indicator shows steady orange, and the illumination lights turn off automatically. Charging starts automatically after docking; no additional button press is required. See Section 4.4 for details on Docked Charging. -
Start undocking. To stop charging and leave the charging dock, press L2 + □ (square key) simultaneously on the Remote Controller. The display changes to
Drive | Undocking. The robot automatically stands up and leaves the charging dock. -
Confirm that undocking is complete. Wait until the robot is standing and
Drive | Walkreappears at the bottom of the screen before resuming remote-control operation.
CAUTION
After pressing a button combination, allow a few seconds for the state to change and motion to begin. Wait and check the screen. Keep hands, feet, and foreign objects out of the docking area during docking and undocking.
Button and State Quick Reference
| Action | Buttons | Screen Display | Description |
|---|---|---|---|
| Docking | L2 + X | Docking | The robot autonomously approaches the dock, moves into position, and slowly lowers itself onto the physical guide structure for final alignment. Before docking, position the robot 200–650 mm in front of the charging dock. |
| Docked Charging | — | Charging | The charging dock indicator shows steady orange |
| Undocking | L2 + □ | Undocking | The robot stands up and leaves the charging dock. Once finished, it stands in place awaiting further commands. |
Tip: After pressing a remote controller button, if nothing seems to happen right away, wait a few seconds.
When multiple charging docks are present, triggering a charge via the remote controller automatically connects to the paired default dock. If no default dock has been set, the robot may connect to the wrong dock; pair the dock in Studio first.
The visual Bluetooth pairing panel in Studio is currently under development and will be available in an upcoming release.
4.3.2 Triggering via API
Recharging commands can be sent through the SDK or API. Each command must include the target dock's Bluetooth ID in the format TRON2A_DOCK_XXXX, allowing the robot to identify and activate the correct dock.
For the full list of interfaces and typical use cases, see the TRON 2 SDK Development Guide and look for the section on the charging dock.
4.4 Docked Charging
-
Once the robot has successfully docked with the charging dock, the charger begins delivering power and charging starts.
-
After charging begins, the leg motors enter the Damping State, allowing the robot to settle naturally onto the dock.
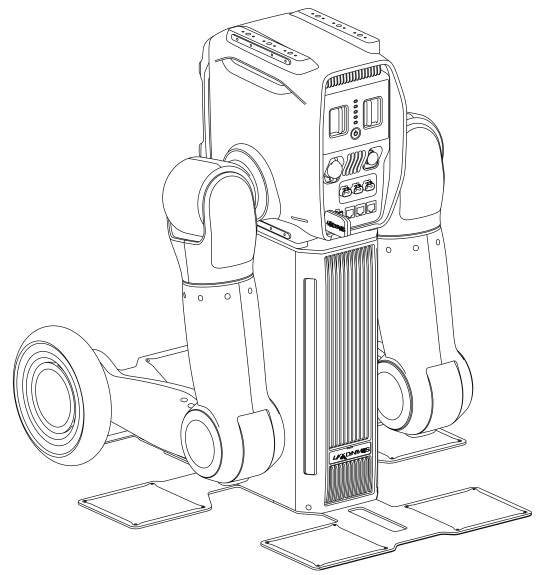
- Charging stops when the battery reaches 100%. While the robot remains docked, the charging system maintains a full charge automatically.
5 FAQ and Troubleshooting
| Symptom | Possible Cause | Recommended Action |
|---|---|---|
| Robot does not detect the charging dock | The robot has not navigated into the 200–650 mm zone in front of the dock; something is blocking the line of sight between the dock and the robot; the dock is not powered on |
Check the robot's starting position and remove any obstruction between the robot and the dock; confirm the dock is powered on (green indicator) |
| Robot loses track of the dock | Direct sunlight; sensor malfunction | Improve the lighting conditions and avoid direct sunlight; contact customer support if the issue persists |
| Docking fails or the robot keeps readjusting | Uneven floor, dock misalignment, or obstructed positioning QR Codes | Check that the floor is level and the dock is securely fixed; clean the charging contacts; recalibrate the dock position |
| Indicator does not light up | Power is not connected; circuit breaker has tripped | Check the power wiring and circuit breaker; verify that the input voltage is within the rated range |
| Indicator flashes red | The charging dock has detected a fault | Disconnect the power and identify the cause before restoring power; contact Customer Support if the issue persists |
6 Service, Warranty, and Maintenance
6.1 Routine Care
-
When the enclosure is dirty, wipe it with a clean soft cloth. Do not use chemical cleaners or sprays, and always disconnect the power before cleaning.
-
Inspect the charging contacts regularly. Keep them clean and free of corrosion and debris. Before cleaning, disconnect the power, then use a dry, soft cloth or a suitable electrical contact-cleaning tool.
-
Before long-term storage, disconnect the power, clean the unit, and store it indoors in a dry environment free of corrosive gases and away from direct sunlight.
6.2 Warranty
Warranty period: 12 months from the date of purchase.
Warranty coverage: Defects in materials or workmanship that occur under normal use during the warranty period, subject to the applicable warranty terms.
Not covered by the warranty: Damage caused by unauthorized disassembly, modification, or installation of devices not approved by LimX Dynamics; failure to provide valid proof of purchase; or alteration or removal of product labels.
If a fault occurs, contact LimX Dynamics Customer Support and follow the instructions provided by the technical support team.